HKU Assignment
Hello all!
Welcome to my HKU ITTT – “If This Than That” Project.
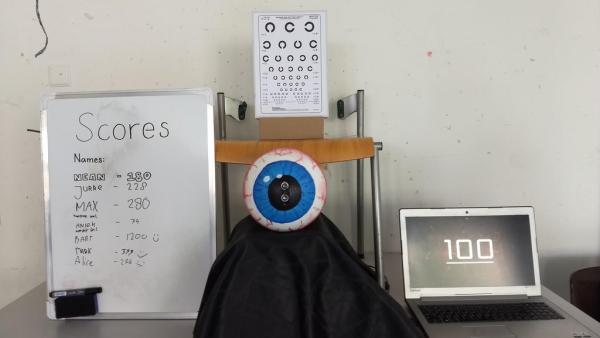
For this assignment I created a simple eye test. The Distance Measuring Eye will give you a score based on the distance away from the eye.
In this Instructable I will show you my thought process and the steps I took in creating this project. Enjoy!
Supplies
Materials:
– Arduino Uno R3
– Ultrasonic Sensor
– 4 Cables
– Partible Styrofoam Ball
– Cardboard
– Paint (For the colors of the eye)
Tools:
– Scalpel
– Hot Glue Gun
– Blow-drier
Also Important, but optional if you just want the Distance Measuring Eye:
– PC/Laptop
– Unity (Game Making Program)
– Blender (For all your visual needs :D)
Step 1: Getting Familiar
In all honesty, it took me some time getting into the ITTT assignment. During the lessons I created the basic Arduino stuff, like a button that lights a little LED light. This was already somewhat of a challenge, but quite doable.
Initially I started thinking about letting the Arduino communicate with Unity. Ideas like; LED’s as Hit Points, buttons moving your Unity Character, or using a servo to create some kind of game where the Unity Character could interact with the “outside” world. I soon realized this would be way too much coding work for me, so I put the assignment away for a bit.
Step 2: Brainstorming & Initial Ideas

Eventually I started talking to friends about recent (Non-ITTT) projects they worked on. One of them used the Ultrasonic Sensor to measure the height of a person, which gave me the idea to try something similar. I decided to ask him for help.
Using his help, I created the first basic functionality of what my project would become. He helped me through the process, just to get me started. But this would definitely not be the last time I needed to ask for help.
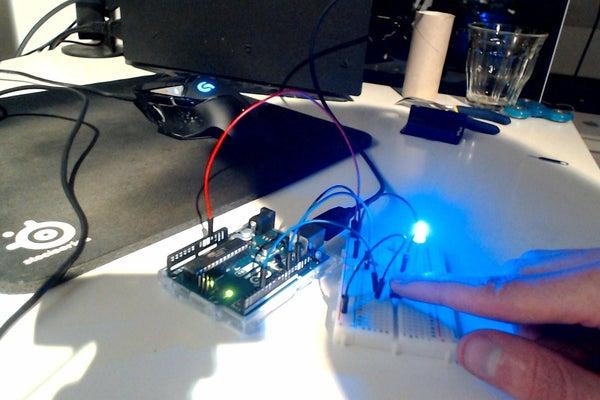
Connecting the Ultrasonic Sensor to the Arduino was easy enough. You just need 4 cables.
– Connect the Ground(GND) on the Arduino to the GND on the Sensor.
– Connect the Voltage(5V) on the Arduino to the Vcc on the Sensor.
– Connect the Digital 8 to the TrigPin on the Sensor.
– Connect the Digital 7 to the EchoPin on the Sensor.
With the Arduino and Ultrasonic Sensor properly connected, all I needed was the code.
Arduino code with the help of a friend:
#define echoPin 7
#define trigPin 8

float duration, distance;

//Hoogte van de sensor in CM
int hangHeight = 214;


void setup() {
  Serial.begin(9600);
  pinMode(echoPin,INPUT);
  pinMode(trigPin,OUTPUT);

}

void loop() {
  // put your main code here, to run repeatedly:
  digitalWrite(trigPin, LOW);
  delayMicroseconds(2);
  digitalWrite(trigPin, HIGH);
  delayMicroseconds(10);
  digitalWrite(trigPin, LOW);

  duration = pulseIn(echoPin, HIGH);
  distance = (duration * .0343) / 2;
  Serial.print("Distance: ");
  Serial.println(distance);


  //hoogte persoon calc
  int persHeight = hangHeight - distance;

  Serial.print("Your Height: ");
  Serial.println(persHeight);

  if (persHeight < 150 && persHeight > 100){
    Serial.print("Tuindecoratie");
    delay(1000);
  }

  if (persHeight >= 150 && persHeight < 160){
    Serial.print("Afgewezen tuinkabouter");
    delay(1000);
  }

  if (persHeight >= 160 && persHeight < 170){
  Serial.print("Lichtelijk teleurstellend");
  delay(1000);
  }

  if (persHeight >= 170 && persHeight < 180){
  Serial.print("Normie");
  delay(1000);
  }

  if (persHeight >= 180 && persHeight < 190){
  Serial.print("Appelplukker zonder boomgaard");
  delay(1000);
  }

  if (persHeight >= 190 && persHeight < 200){
  Serial.print("Koelkastkijker");
  delay(1000);
  }

  if (persHeight >= 200 && persHeight < 210){
  Serial.print("Plafondruiger");
  delay(1000);
  }
}<br>
The code measures the distance between the top of your head and the Sensor and subtracts the given height of the Sensor. This then outputs texts in the serial monitor.
I knew I wanted to make something that was somewhat unique, so all I had to try to do was alter the code so it would suit my needs, but an idea had yet to really develop.
At this stage new ideas came to mind. Maybe I could create a device that automatically measures your height if you want to go in a roller coaster? No that would be too easy and too similar to his code. Plus, I wanted it to connect with Unity.
The idea of a goblin cave maybe? Maybe you would need to pass the goblin test to be allowed inside their cave? I still wasn’t feeling this concept entirely.
But then, after just a couple days, it hit me…
Step 3: The Idea
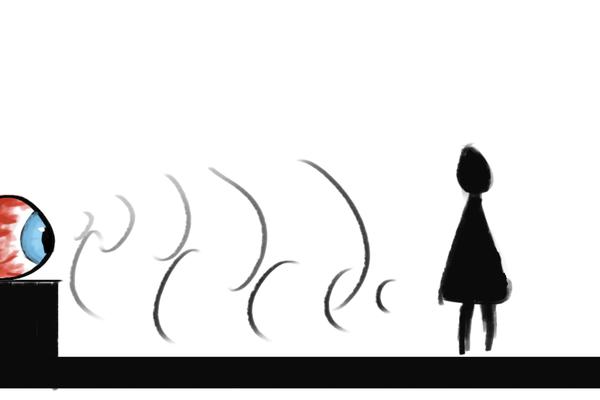
One day I was talking with my dad, who wears glasses, about eyesight and how I “technically” need glasses, but only by a little bit. Up until a couple years ago I had no idea. If you only have a tiny bit of a bad eyesight some people would never even notice. This gave me the great idea of making something that is somewhat interactive, and shows how well your eyesight is in a way.
I decided to measure the travel distance, not the height.
This gave me the idea of an “All-Seeing-Eye” that would measure the distance between you and it.
I chose to stick with this idea, since I still had a lot to figure out. I rewrote parts of the code so it would suit what I needed.
My version of the Arduino code:
#define echoPin 7
#define trigPin 8

float duration, distance;

void setup() {
  Serial.begin(9600);
  pinMode(echoPin,INPUT);
  pinMode(trigPin,OUTPUT);
}

void loop() {
  // put your main code here, to run repeatedly:
  digitalWrite(trigPin, LOW);
  delayMicroseconds(2);
  digitalWrite(trigPin, HIGH);
  delayMicroseconds(10);
  digitalWrite(trigPin, LOW);

  duration = pulseIn(echoPin, HIGH);
  distance = (duration * .0343) / 2;
  Serial.print("Distance: ");
  Serial.println(distance);

if (distance < 150 && distance > 100){
    Serial.print("Zwakzichtige");
    delay(2000);
  }

  if (distance >= 150 && distance < 160){
    Serial.print("Jij ziet HELEMAAL 0");
    delay(2000);
  }

  if (distance >= 160 && distance < 170){
    Serial.print("Jij hebt een bril nodig");
    delay(2000);
  }
}<strong><br></strong>
This code prints the distances in the Serial Monitor, and when it measures between a certain value it displays the corresponding text for 2 seconds. For me this was a big milestone. With the Arduino and Ultrasonic sensor set up, the code working, I know I was on the right way.
Step 4: Uni-(ty)-fying
The next big step was letting the Arduino communicate with Unity. I asked for help from a developer friend, I could never have figured this out on my own.
He helped me through the process, and actually connecting my Arduino to Unity proved easier than anticipated
Unity code that searches for the Arduino on COM4:
using UnityEngine.UI;
using System.IO.Ports;
using TMPro;

public class ArduinoTest : MonoBehaviour
{
    SerialPort sp;
    public Text txt;

    void Start()
    {
        txt.text = "Looking for Board";
        StartCoroutine(Search());
        InvokeRepeating("ScoreUpdate", 1f, 5f);
    }

    IEnumerator Search()
    {
        while (sp == null)
        {
            foreach (string str in SerialPort.GetPortNames())
            {
                if (str == "COM4")
                {
                    sp = new SerialPort("COM4", 9600);
                    sp.Open();
                    sp.ReadTimeout = 1;
                    txt.text = str;
                }
            }
            yield return new WaitForSeconds(1);
        }
    }
}<br>
While the SerialPort = null, the code searches for the Arduino on COM4, if Unity finds it, it shows “COM4”. When “COM4” shows, Unity has established a connection with the Arduino on COM4.
Checklist:
The Ultrasonic Sensor is connected to the Arduino.
The Ultrasonic Sensor measures distance and displays those in a Serial Monitor.
Unity has established a connection with the Arduino.
Next I will make Unity read the data that’s being printed to the Serial Monitor.
Step 5: Reading Data
I, luckily, have a friend working in IT already. So for this particular issue I asked him for help. Getting the Arduino to give data to Unity is harder than I had originally thought it would be.
The Arduino sends certain strings, only consisting of numbers, to Unity. These numbers would need to be converted to do anything with them. Luckily my friend found some other ways of getting the data I want. I had the Serial Monitor data, so how could I just print those so Unity would understand?
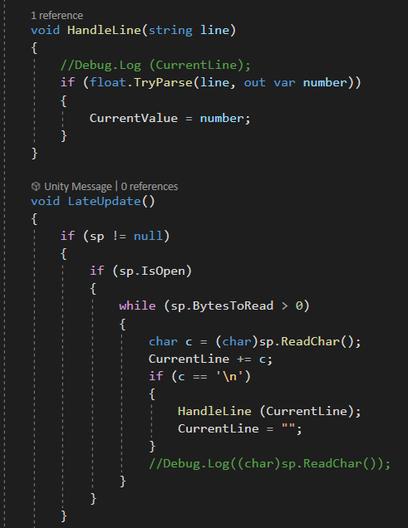
Unity checking the lines of Serial Monitor Data:
void LateUpdate()
    {
        if (sp != null)
        {
            if (sp.IsOpen)
            {
                while (sp.BytesToRead > 0)
                {
                    char c = (char)sp.ReadChar();
                    CurrentLine += c;
                    if (c == '\n')
                    {
                        HandleLine (CurrentLine);
                        CurrentLine = "";
                    }
                }
            }
        }
    }<br>
Unity writing a number from that given line:
  void HandleLine(string line)
    {
        if (float.TryParse(line, out var number))
        {
            CurrentValue = number;
        }
    }<br>
After all of this Unity finally prints the data to “Current Value”. As seen in the picture above.
To create a simple points system, this “Current Value” value will have to be printed to a text in Unity.
Next step here we go!
Source: ITTT – Project Distance – Jurre De Groot 1D