This will not be a tutorial, just me reflecting on the process and sharing it!
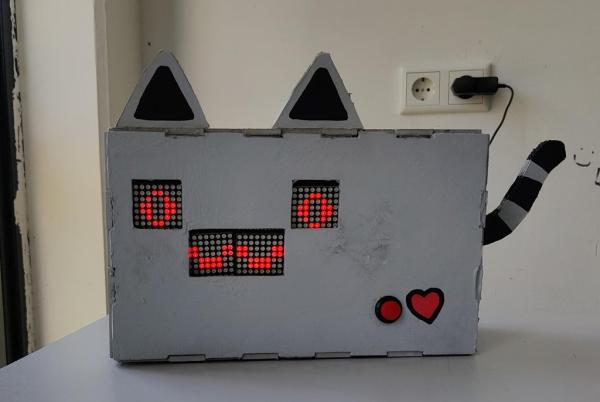
Welcome to RoboCat, a cute pet without the mess! The RoboCat responds to any sounds above a certain range and if you press the red button you can give him some love. He doesn’t say much, but he’s guaranteed to make you feel a little better while working on an intense programming project.
Supplies
- Arduino UNO
- MAX7219 8×8 Matrix Display
- SparkFun Sound Detector
- 16mm Panel Mount Button (red)
- Piezo Buzzer
- Adafruit Speaker 8 Ohm
- Resistor 10 kΩ
- 5v adapter
- 4cm MDF Board
- 4 cm Cardboard
- Dupont Cables
- Posca Pens (red & black)
- Light Grey Spraypaint
- Gluegun
Step 1: Concept

I wanted to make a “Desk Buddy”, something I could talk to while frustrated at my desk, as a programmer does while talking to a rubber ducky. I wanted him to be able to respond to me (with text to speech sentences) and have a simple face with LED lights. I originally wanted to make the display out of individual LEDs, but decided against it (seeing as there are much better options around).
As it turns out, MP3 sounds on Arduino are pretty difficult to deal with and an MP3 shield is pretty expensive. What I thought I’d do instead is have it make little cute bleepy sounds. Much cuter, more like a robot and much less difficult to deal with. I did this with a Piezo Buzzer that I got in my Arduino starter kit.
Step 2: The Display [part 1]
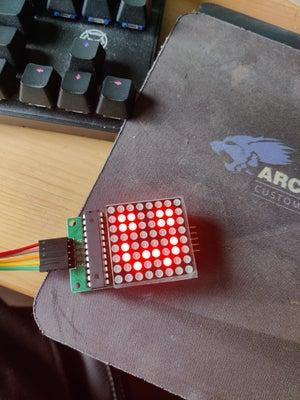
After looking online for a while, I found an LED face display that was perfect for my project. I opted to use 4 displays instead of 5, and planned on adding my own animations. First, using a tutorial, I connected one of the displays to try and figure out how to use it. I then added my own little face to it.
After trying to connect the rest of the displays, I noticed it wouldn’t display anything at all, just pure red light. Turns out, after some trouble shooting (and help from my lovely lecturers at my college) I found out I needed a 5v adapter to power it. It then worked perfectly fine! You can find the code I used here. I changed it to add my own little faces and animations.
Step 3: Adding Sound
Because the MP3 shield was a no go, I was advised to use a Piezo Buzzer. Unfortunately I couldn’t exactly make the right tones I wanted on my own. I found this tutorial by Adafruit with pre-made animal sounds, which I really liked! This gave me the idea to make this thing a cute cat-like robot. I primarily use the “mew” function which lets out a high pitched beep sound, very vaguely resembling a meow. Good enough!
Step 4: Interaction
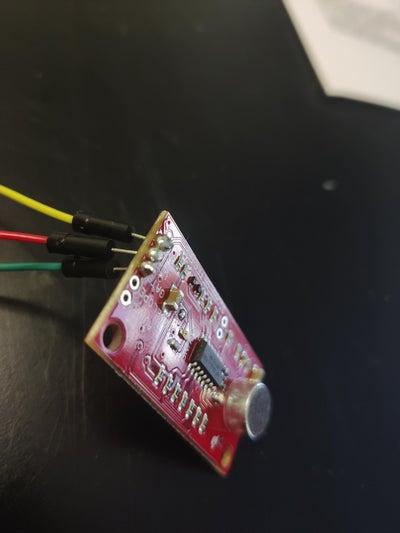
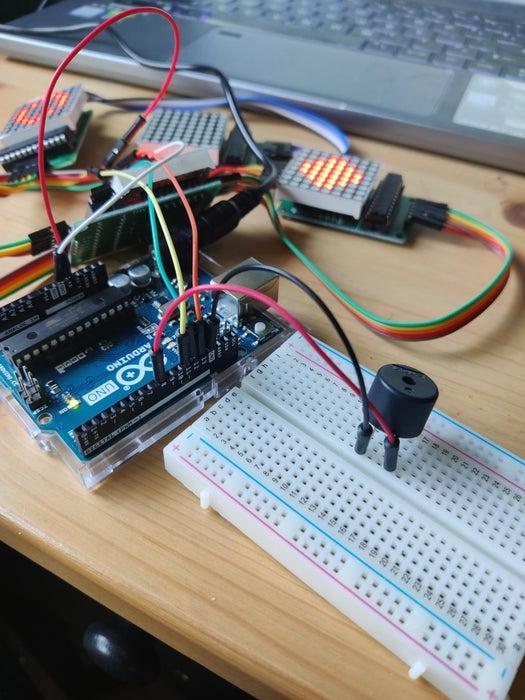
To make the project more interactive, I purchased a SparkFun sound detector. The component lights up as it hears any sound, and luckily it’s very sensitive too. My project uses the “envelope” connection and leaves the “audio” one alone. The code to get it running is from SparkFun’s site. I edited it slightly to suit my project.
I also added a speaker and soldered it, making the bleeps and bloops much louder.
I also added a button (see code and schematic for how I did that) because I wanted to add a little more interaction, instead of it only detecting sound. My idea was is that it would be a way to give love to this little robot.
Step 5: The Display [part 2]
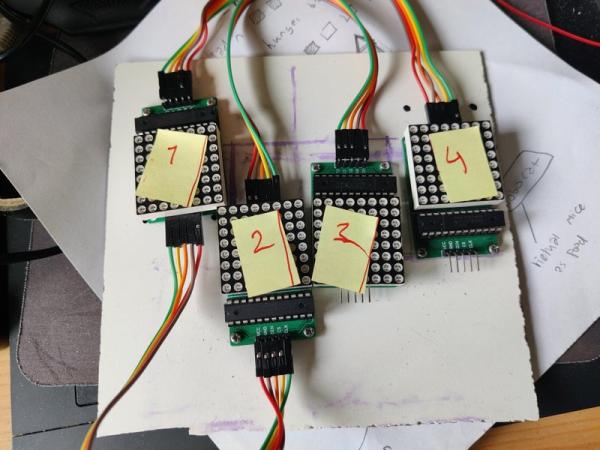
To attach the displays I first cut out a piece of plexiglass to attach them to, but it was far too thick. I then used a piece of wood (I’m unsure what kind) but this was just too rigid and annoying to cut. In the end I just used a piece of thick cardboard I could easily cut with a knife to create holes for the wires. I numbered the displays so I would remember in what order to attach them later on, and so I could more easily code in the animations.
Step 6: The Case
I lasercutted the case using MDF board. This went wrong once (I didn’t measure it correctly) but I then had some scrap MDF left to cut out the rest. I then spray painted it light grey at home (and as well as the case, I also spray painted the table in the backyard, whoops…) Then I added a little heart with a red posca pen next to the red button to indicate what it could do.
Because I had no wood glue in the house (and I was not able to get any) I hot glued the MDF pieces together. It looked quite sloppy, but it really did the job just fine. Then I screwed in the button and tested it out: it worked! The face wasn’t quite right yet, but I changed that quickly.
Step 7: Schematic
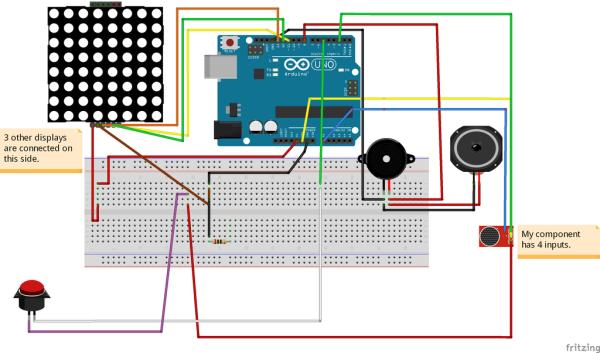
Not pictured in the schematic are the other 3 Matrix displays. The SparkFun sound detector that is pictured here is not exactly accurate to the one I purchased. Mine has an “envelope” connection I used, instead of the “audio” one found here.
Step 8: Code [part 1]
Variables
//include libraries
#include "LedControl.h"

LedControl lc = LedControl(13, 12, 11, 4); //Pin 13 = DIN, Pin 12 = CLK, Pin 11 = CS. 5 = number of displays

//SOUND DETECTOR VARIABLES
#define PIN_GATE_IN 2
#define IRQ_GATE_IN  0
#define PIN_ANALOG_IN A0

//SOUND VARIABLES
#define SPEAKER   8   // Piezo Speaker pin (positive, other pin to ground)
#define POT       A0
// define serial if using debug on Uno/Leo/Mega, Trinket/Gemma comment out
#define SERIAL


//BUTTON VARIABLES
int buttonPin = 5;
int buttonState = 0;
Face Displays
/FACE DISPLAY VARIABLES

byte heart_eye_right[8] =
                  {
                  B0000000,
                  B0011100,
                  B0111100,
                  B1111000,
                  B1111000,
                  B0111100,
                  B0011100,
                  B0000000

                  };

byte heart_eye_left[8] =
{
                  B0000000,
                  B0111000,
                  B0111100,
                  B0011110,
                  B0011110,
                  B0111100,
                  B0111000,
                  B0000000

                  };

byte cat_eye[8] =
                {
                B0000000,
                B0011000,
                B0111100,
                B1000010,
                B1000010,
                B0111100,
                B0011000,
                B0000000
                };

byte XD_eye[8] =
                {
                B0000000,
                B0011000,
                B0011000,
                B1100110,
                B1100110,
                B11000011,
                B11000011,
                B0000000
                };

byte blink_eye[8] =
                 {
                B0000000,
                B0011000,
                B0011000,
                B0011000,
                B0011000,
                B0011000,
                B0011000,
                B0000000
                 };
//cat mouth
byte normal_mouth[16] = //part 1
                      {
                      B0001100,
                      B0001100,
                      B0110000,
                      B0110000,
                      B0110000,
                      B0110000,
                      B0001100,
                      B0001100,

                      //part2
                      B0110000,
                      B0110000,
                      B0001100,
                      B0001100,
                      B0001100,
                      B0001100,
                      B0110000,
                      B0110000
                      };


byte open_mouth[16] = //part 1
                      {
                      B0001100,
                      B0001100,
                      B0110000,
                      B0110000,
                      B0110000,
                      B0110000,
                      B11001100,
                      B11001100,

                      //part2
                      B0110000,
                      B0110000,
                      B0001100,
                      B0001100,
                      B0001100,
                      B0001100,
                      B0110011,
                      B0110011
                      };
Setup
void soundISR()
{
  int pin_val;

  pin_val = digitalRead(PIN_GATE_IN);
}

void setup()
{
  //initialize displays (configure light intensity and clear all)
  lc.shutdown(0, false);
  lc.setIntensity(0, 1);
  lc.clearDisplay(0);
  lc.shutdown(1, false);
  lc.setIntensity(1, 1);
  lc.clearDisplay(1);
  lc.shutdown(2, false);
  lc.setIntensity(2, 1);
  lc.clearDisplay(2);
  lc.shutdown(3, false);
  lc.setIntensity(3, 1);
  lc.clearDisplay(3);
  lc.shutdown(4, false);
  lc.setIntensity(4, 1);
  lc.clearDisplay(4);

  //start serial communication


#ifdef SERIAL
  Serial.begin(19200);
#endif

  pinMode(SPEAKER, OUTPUT); // important to set pin as output

  pinMode(buttonPin, INPUT);

  //SOUND DETECTOR
  // configure input to interrupt
  pinMode(PIN_GATE_IN, INPUT);
  attachInterrupt(IRQ_GATE_IN, soundISR, CHANGE);

  // Display status
  Serial.println("START");


}
Main loop & setting up the pixels on the display
//**********
// Main Loop
//**********
void loop()
{

  //set buttonState to read the state of the button
  buttonState = digitalRead(buttonPin);


 //print the state of the button in the serial monitor for debugging purposes
  Serial.println(buttonState);

  //let the robot wait for a response
  WaitingForResponse();

}

//********************
// FACE DISPLAY FUNCTIONS
//********************

//change eyes
//go through every pixel of the matrix and set the colour for every single one
void display_eyes(byte right_eye[], byte left_eye[]) {
  for (int i = 0; i < 8; i++) {
    lc.setRow(0, i, left_eye[i]);
    lc.setRow(1, i, right_eye[i]);
  }
}

//go through every pixel of the matrix and set the colour for every single one
//change mouth
void display_mouth(byte mouth[]) {
  for (int i = 0; i < 8; i++) {
    lc.setRow(2, i, mouth[i]);
    lc.setRow(3, i, mouth[i + 8]);
    lc.setRow(4, i, mouth[i + 16]);
  }
}
Main Robot functions!
//********************
// ROBO FUNCTIONS
//********************


//button functionality: if buttonState == 1 -> go to Loving function
void ButtonClick()
{
  if (buttonState == HIGH)
  {
    Serial.println("working");
   Loving();

  } else
  {
    Serial.println("nothing");
  }
}

void Loving()
{
  display_eyes(heart_eye_left, heart_eye_right);
  display_mouth(open_mouth);
  ruff();
}

void WaitingForResponse()
{
  //set face display
  display_eyes(cat_eye, cat_eye);
  display_mouth(normal_mouth);


//********************
// SOUND DETECTING
//********************
  int value;

  // Check the envelope input
  value = analogRead(PIN_ANALOG_IN);
  Serial.println(value);

  // Convert envelope value into a message
  Serial.print("Status: ");


  if(value <= 10)
  {
    Serial.println("Quiet.");

  }
  else if( (value > 10) && ( value <= 50) )
  {
    Serial.println("Moderate.");

  }
  else if(value > 50 )
  {

    if(millis() > 3000)
    {
      Serial.println("Loud.");
     HeardResponse();
    }
  }

  //if(millis()> 3000)
  //{

    //Blink();
  //}
  ButtonClick();
}

//I used to have it blink, but I couldn't get it to work on time
void Blink()
{
    display_eyes(blink_eye, blink_eye);
}

void HeardResponse()
{
  display_eyes(XD_eye, XD_eye);
  display_mouth(open_mouth);
  chirp();

  //after 2 seconds, go back to waiting for a response
  if(millis() > 2000)
  {
    WaitingForResponse();
  }
}
Buzzer functionality
//********************
// MAKING BUZZER SOUNDS
//********************

void varyFrequency() {
  //  use potentiometer to produce one tone per value of pot
  //  good for getting pitch value to use in making sound routines
  int reading;
  const uint8_t scale = 1; // 1 for high frequencies, scale up to 15 for lowest freqs

  reading = scale * analogRead(POT);
  playTone(reading, 1000);
#ifdef SERIAL
  Serial.print("Freq = ");
  Serial.println(reading);
#endif
}

void chirp() {  // Bird chirp
  for (uint8_t i = 200; i > 180; i--)
    playTone(i, 9);
}

void meow() {  // cat meow (emphasis ow "me")
  uint16_t i;
  playTone(5100, 50);       // "m" (short)
  playTone(394, 180);       // "eee" (long)
  for (i = 990; i < 1022; i += 2) // vary "ooo" down
    playTone(i, 8);
  playTone(5100, 40);       // "w" (short)
}

void meow2() {  // cat meow (emphasis on "ow")
  uint16_t i;
  playTone(5100, 55);      // "m" (short)
  playTone(394, 170);      // "eee" (long)
  delay(30);               // wait a tiny bit
  for (i = 330; i < 360; i += 2) // vary "ooo" down
    playTone(i, 10);
  playTone(5100, 40);      // "w" (short)
}

void mew() {  // cat mew
  uint16_t i;
  playTone(5100, 55);      // "m"   (short)
  playTone(394, 130);      // "eee" (long)
  playTone(384, 35);       // "eee" (up a tiny bit on end)
  playTone(5100, 40);      // "w"   (short)
}

void ruff() {   // dog ruff
  uint16_t i;
  for (i = 890; i < 910; i += 2) // "rrr"  (vary down)
    playTone(i, 3);
  playTone(1664, 150);        // "uuu" (hard to do)
  playTone(12200, 70);        // "ff"  (long, hard to do)
}

void arf() {    // dog arf
  uint16_t i;
  playTone(890, 25);         // "a"    (short)
  for (i = 890; i < 910; i += 2) // "rrr"  (vary down)
    playTone(i, 5);
  playTone(4545, 80);        // intermediate
  playTone(12200, 70);       // "ff"   (shorter, hard to do)
}

// play tone on a piezo speaker: tone shorter values produce higher frequencies
//  which is opposite beep() but avoids some math delay - similar to code by Erin Robotgrrl

void playTone(uint16_t tone1, uint16_t duration) {
  if (tone1 < 50 || tone1 > 15000) return; // these do not play on a piezo
  for (long i = 0; i < duration * 1000L; i += tone1 * 2) {
    digitalWrite(SPEAKER, HIGH);
    delayMicroseconds(tone1);
    digitalWrite(SPEAKER, LOW);
    delayMicroseconds(tone1);
  }
}

// another sound producing function similar to  http://web.media.mit.edu/~leah/LilyPad/07_sound_c...
void beep (int16_t frequencyInHertz, long timeInMilliseconds) {
  long x;
  long delayAmount = (long)(1000000 / frequencyInHertz);
  long loopTime = (long)((timeInMilliseconds * 1000) / (delayAmount * 2));
  for (x = 0; x < loopTime; x++) {
    digitalWrite(SPEAKER, HIGH);
    delayMicroseconds(delayAmount);
    digitalWrite(SPEAKER, LOW);
    delayMicroseconds(delayAmount);
  }
}

void scale() {
  for (uint16_t i = 50; i < 15000; i++)  {
    playTone(i, 20);
  }
}

Source: RoboCat: a Pet Without the Mess