Summary of ISS Overhead
The ISS Overhead is an ambient glow display that lights when the International Space Station passes overhead, reminding viewers there are people in space. The project uses an Electric Imp (April Breakout + Imp Card), NeoPixels, a DC barrel jack and power supply, and a laser-cut enclosure; it takes a few hours and requires basic soldering skills.
Parts used in the ISS Overhead:
- ISS Overhead Enclosure
- April Breakout Board
- Imp Card
- DC Barrel Jack
- 5V 2A Power Supply
- 9 NeoPixels
- Soldering Iron, Solder, and Wire
- Wire Strippers / Cutters
- Hobby Knife (optional)
- Double Sided Foam Tape
- Plastic Cement
- Vellum Paper (optional)
The ISS Overhead is an ambient display that glows whenever the International Space Station is flying overhead.
It is designed to act as an occasional reminder that there are people living and working in space!
This project should take you somewhere between 2 hours to an afternoon to complete. It assumes you know how to solder, and are somewhat familiar with Electric Imp. If you haven’t worked with Electric Imp before, I recommend you get a basic familiarity by working through Electric Imp’s Getting Started Guide before completing this project.
Let’s get started!
Step 1: Tools & Components
Components:
For this project, you are going to need the following components:
- 1x ISS Overhead Enclosure – http://www.ponoko.com/design-your-own/products/iss-overhead-v2-11701
- 1x April Breakout Board – http://www.adafruit.com/products/1130
- 1x Imp Card – http://www.adafruit.com/products/1129
- 1x DC Barrel Jack – http://www.adafruit.com/products/610
- 1x 5V 2A Power Supply – http://www.adafruit.com/products/276
- 9x NeoPixels – https://www.adafruit.com/products/1376
Total Cost: About $85 + Shipping
Tools:
You are also going to need the following tools and supplies:
- Soldering Iron, Solder, Wire
- Wire Strippers / Cutters
- Hobby Knife (optional, but helpful)
- Double Sided Foam Tape – http://www.amazon.com/Scotch-Mounting-5-Inch-75-I…
- Plastic Cement – http://www.amazon.com/Cement-For-Plastic-Value-Pa…
- Vellum Paper (optional) – http://www.amazon.com/Strathmore-Translucent-Vellum-inkjet-printers/dp/B000KNHRTE/
Step 2: Inlay the Clear ISS Insert
The first thing we’re going to do is inlay the clear acrylic ISS:
- Pop the ISS out of the black acrylic front piece.
- Use a hobby knife (or other fine object) so carefully push the clear ISS out of the acrylic*
- Lay the clear ISS into the black front piece, and spread some glue around the edges.
* The ISS pieces are somewhat breakable, so be gentle. If you break the first one, don’t worry – that’s why we printed two of them!
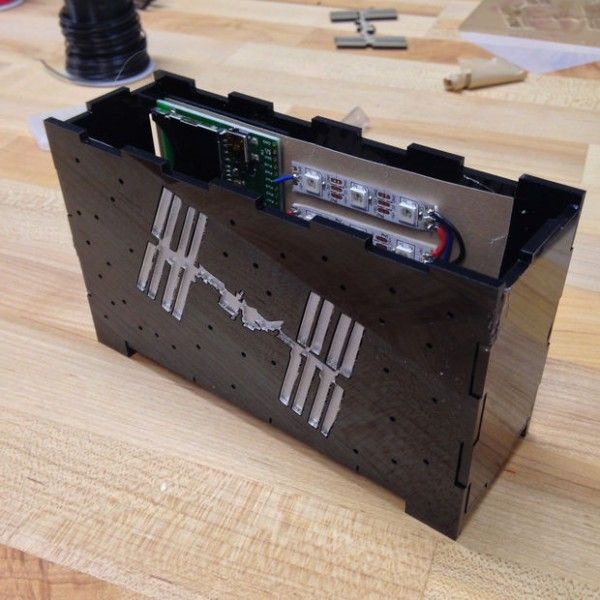
Step 3: Place and Solder the Electronics
The next thing we’re going to do is place our electronic components and solder them! Don’t worry, there isn’t anything too tricky in here.
DC Barrel Jack:
- Screw the DC barrel jack on the back piece of the enblosure
- Solder two red wires to the lead connected to the back piece of the DC barrel jack
- Solder two black wires to the other two leads, then solder those two leads together.
Placing the imp:
- Add a piece of double sided foam tape to the back of the April Board.
- Use the side panel with a slot in it to guide where the April board should be placed
- Remove the other side of the double sided tape, and affix the April Board.
For more detail: ISS Overhead
- What is the ISS Overhead?
An ambient display that glows whenever the International Space Station is flying overhead. - How long does the project take?
It should take somewhere between 2 hours to an afternoon to complete. - Do I need soldering skills?
Yes, the project assumes you know how to solder. - What electronics are required?
An April Breakout Board, an Imp Card, a DC barrel jack, a 5V 2A power supply, and 9 NeoPixels are required. - Is Electric Imp familiarity required?
The guide assumes some familiarity with Electric Imp and recommends completing Electric Imp's Getting Started Guide if you haven't used it before. - How is the clear ISS piece installed?
Pop the ISS out of the black acrylic, carefully push the clear ISS out, lay it into the black front piece, and spread glue around the edges. - How do I mount the April Board?
Add double sided foam tape to the back of the April Board, use the side panel with a slot for alignment, then remove the tape backing and affix the board. - How are the DC barrel jack wires soldered?
Screw the DC barrel jack to the back piece, solder two red wires to the lead connected to the back piece, and solder two black wires to the other two leads and then solder those two leads together.