
Summary of IR Controller for Air Conditioner
This project aims to enhance window AC efficiency and performance by integrating it into a home automation system. The author uses an ATtiny85 or Arduino Nano to control the AC's physical remote buttons, initially testing IR signal emulation and temperature-based triggering with a DHT11 sensor. Future phases involve adding an ESP8266 for remote smartphone control, data logging to Thingspeak, and integration with weather APIs and smart home platforms like SmartThings to optimize cooling schedules based on occupancy and forecasts.
Parts used in IR Controller for Air Conditioner:
- Atmel ATTiny85
- Everything ESP ESP8266 ESP-01
- Arduino Nano R3
- L78L33 voltage regulator
- S8050 PNP transistor
- DHT11 temperature/humidity sensor
- IR LED
- IR receiver/blaster test board
- Two AA batteries
| Hardware components: | ||||||
 |
|
× | 1 | |||
 |
|
× | 1 | |||
 |
|
× | 1 | |||
STORY
My goal is to make my window AC units more functional. Currently they use an on-board thermostat to turn on when the room gets above a certain temperature (‘duh). I feel like there is a lot I can do to improve on both the efficiency (less electricity usage) and performance (cooler house throughout the day).
I’m going to break this out into phases and post my progress along the way. I plan on incorporating this into a current Home Automation project I’m working on, so when I have the final version I will create a new project with start to finish build instructions.
Phase I
Control the existing remote with an Arduino (or ATtiny85). I just want to build a platform that I can add additional sensors and communication abilities to.
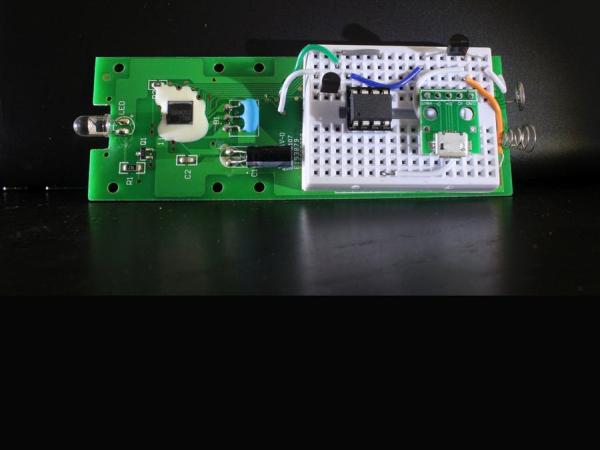
I took apart the remote and it looks easy enough to hack. It’s powered by two AA batteries in series (3vDC) and the buttons each have their own through holes on the PCB. I used an L78L33 voltage regulator to drop the USB 5v to 3.3v for the remote power (it gets really hot, so I’ll be replacing that in the next phase). The brain is an ATtiny85 with pin6 driving an S8050 PNP transistor to open/close the circuit for the Air Conditioner power button on the remote. Right now it’s just sending the IR power signal every 30 seconds as a test.
I also added a DHT11 temperature/humidity sensor and adapted my AV Cabinet Fan Controller code to work as a simple thermostat from across the room.
Phase II
I have the arduino closing the connections for the tempup and tempdown buttons on the remote to put the thermostat at the min or max setting. The AC unit is always powered on, but by adjusting the thermostat I can make the compressor and fan kick on while letting it use the built in cooldown settings. On standby the unit pulls less than 2 watts.
I would rather not rely on the physical remote to turn on/off the AC unit so the next step is to emulate the IR signal using just an Arduino Nano. I followed the IR tutorial from Lady Ada to get the raw IR signal from the remote and use those to drive an IR LED directly, emulating the signal from the remote.
One hurdle I had was simulating a long press using the IR signal since my AC unit beeps each time a button is pressed. I did this using a “for” loop in the Arduino sketch but the delay required a bit of trial and error, so I used my IR receiver/blaster test board to try several different configurations.
Phase III (in development)
Now that the we have a stand alone ‘dumb’ temp controller, I need to give this some real intelligence. By adding an ESP8266 I can remotely control this from my phone and send the current temperature to thingspeak.com or my central home automation server to be logged and graphed.
IR Blaster Schematic IR Controller for Air Conditioner
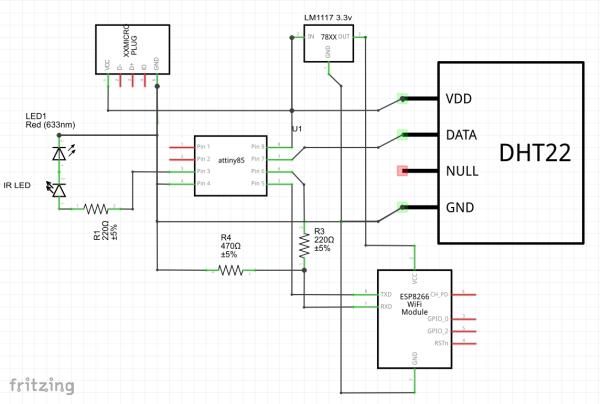
My home automation project pulls weather data from the wunderground API to work out the most efficient time to kick on the AC based on the hourly heat forecast for the day. It is also being integrated with my SmartThings and Frontpoint systems to know who is home, if there are any windows open, and which rooms are occupied. HAI can use all of this data to manually override the thermostat and turn on or off the AC through this connected IR controller.
Read More: IR Controller for Air Conditioner
-
How is the remote powered in Phase I?
The remote is powered by two AA batteries in series providing 3vDC. -
What component drives the circuit for the power button?
Pin 6 of the ATtiny85 drives an S8050 PNP transistor to open or close the circuit. -
How was the USB 5v converted to 3.3v for the remote?
An L78L33 voltage regulator was used to drop the voltage, though the author noted it gets hot. -
What sensor was added to create a simple thermostat?
A DHT11 temperature and humidity sensor was added to adapt code for room monitoring. -
How did the author simulate a long press using the IR signal?
A for loop in the Arduino sketch was used to generate the necessary delay for simulating a long press. -
What is the power consumption of the AC unit on standby?
The unit pulls less than 2 watts while on standby. -
Which service can be used to log and graph temperature data in Phase III?
Temperature data can be sent to thingspeak.com or a central home automation server. -
What API does the home automation project use to pull weather data?
The project pulls weather data from the wunderground API to determine efficient AC activation times.
