
The Adafruit Feather nRF52832 has a BLE (Bluetooth Low Energy) functionality that has a lot of potential to be used in many different projects. In this Instructable, I will be stepping through a project where I created an iOS application that would receive data sent from the Feather and graph it.
Just a few things to note before we begin.
This app was made with the following versions:
- macOS Big Sur (Version 11.1)
- Xcode (Version 12.4)
- iOS (Version 14.4)
For different software versions, especially Xcode, some of my instructions may not apply exactly. For the most part, slight version differences should be okay, but if you encounter issues, Google is your best friend.
Here is a link to my code (both Arduino and iOS) for your reference: https://github.com/shaqattack13/iOS-BLE
Alright, let’s get into it!
Supplies
- Adafruit Feather nRF52832
- Arduino Application
- Xcode Application (only available on Macs)
- Apple device (iPhone / iPad / iPod)
Step 1: Setting Up the Arduino Code
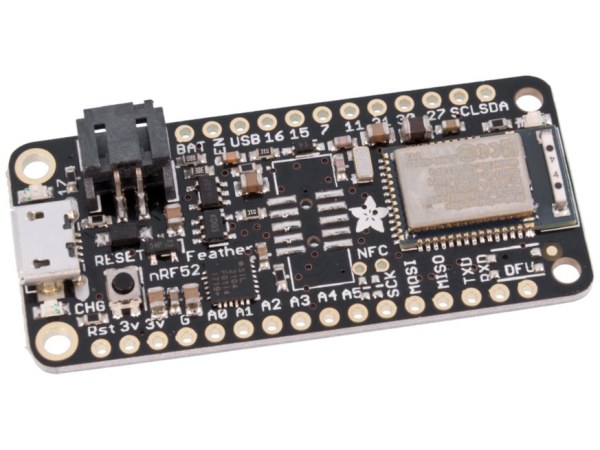
Before getting started on the iOS app development, I had to set up the Adafruit Feather nRF52832 first. I did this by uploading code to it via the Arduino IDE because the Feather is compatible with Arduino. In order to do this, I needed to download the board definition for the nRF52832.
Downloading the nRF52 Board Definition
Navigate to the Arduino Preferences menu.
On Macs: Arduino -> Preferences -> Additional Boards Manager URLs (located at bottom of the window)
On Windows: File -> Preferences -> Additional Boards Manager URLs (located at bottom of the window)
Copy and paste the following links into “Additional Boards Manager URLs.” Make sure each link is in its own separate line.
- https://adafruit.github.io/arduino-board-index/pac…
- https://sandeepmistry.github.io/arduino-nRF5/packa…
- https://raw.githubusercontent.com/sparkfun/Arduino…
- https://www.adafruit.com/package_adafruit_index.js…
Now, open the Arduino IDE and go to Tools -> Board -> Boards Manager. Search for “Adafruit nRF52”. When found, install the board definition (shown in image). This step is necessary if you want to upload code to the Feather.
Update the nRF52832 Bootloader
https://learn.adafruit.com/bluefruit-nrf52-feather…
Note: Your bootloader version will be different than what’s in the picture. Don’t worry about that.
Code Changes to bleuart.ino
The nRF52832 board definition includes a nice example code that I slightly altered to make the Feather collect data from one of its pins and send it to the iOS app. In order to find this code, make sure the Adafruit Feather nRF52832 board is selected:
Tools -> Board -> Adafruit nRF52 Boards -> Adafruit Feather nRF52832
Then, you will be able to find the example code here:
File -> Examples -> Adafruit Bluefruit nRF52 Libraries -> Peripheral -> bleuart
I made a few changes to this file, which I’ve described below (describing code changes in words is difficult, so I have attached screenshots as a guide).
The first change is at the “void loop()” function (near line 103). Replace “delay(20); … bleuart.write( buf, count );” lines (near lines 109-113) with this code:
delay(500);
char buf[64];
itoa(analogRead(A0), buf, 10);
bleuart.write( buf, 1 );
This will essentially read the value at the analog pin A0, convert the value into text form, and send the text to the app.
Another change we should make is the while loop condition: while (Serial.available()). Currently, the while-loop will run only when something is typed and entered into the Serial monitor. However, it would be better to automate the process of reading the data from the Feather and sending it to the app. So, I created a variable that would keep track of whether or not the Feather and app are connected. Here is what I did:
line 23 (under BLEBas blebas;) -> add this line: bool BLEisConnected = false;
line 107 -> Change while loop condition from while (Serial.available()) to while (BLEisConnected)
line 136 (in void connect_callback() function) -> add this line: BLEisConnected = true;
line 152 (in void disconnect_callback() function) -> add this line: BLEisConnected = false;
Upload this code to the Feather.
Now that we have the Feather set up, we will dive into the iOS part of this project.
Step 2: Open New IOS Project

Open the Xcode Application and create a new project. Our app will just be a generic app on the iPhone, which runs on the iOS operating system. In the project template display, choose the iOS platform, select App, and click Next.
The following screen shows various basic settings that must be completed to create the project. Pick any name for the Product Name.
Select a development team if you have one. If you don’t have one, sign up here: (https://developer.apple.com/programs/). This will be needed if you want to run the app on your iPhone. The bluetooth functionality will not work on the simulator so running the app on the iPhone/iPad is highly recommended.
For the Organization Identifier, enter something in the form of “com.”. I used my username here. This Organization Identifier, in combination with the Product Name, will be used to create a Bundle Identifier, which is a unique identifier specific to the app. This Bundle Identifier is needed if you submit your app to the App Store.
The other settings should remain as default; refer to the screenshot to ensure that all settings match. The Interface we’re using is Storyboard. This will be the best option for beginners. There is only one Life Cycle option: UIKit App Delegate. This is essentially a system that manages the various screens associated with the app. Finally, we will be using the Swift language which is easier to read and learn than Objective-C. Do not select “Use Core Data” and do not “Include Tests”. Once all settings are confirmed, click Next.
Save your project at any location you’d like. Click Create when you’ve found the chosen folder.
Step 3: Configure Necessary Settings
Set up Info.plist
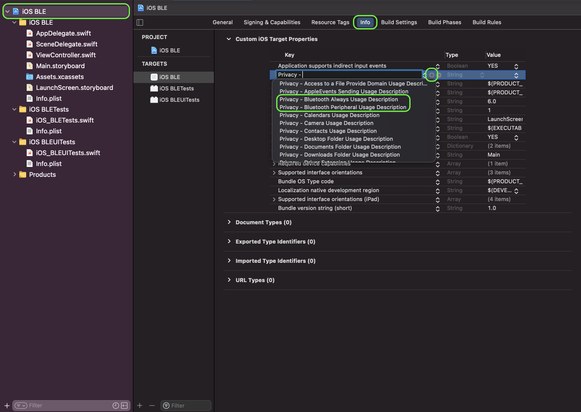
Before getting started on the actual project, there are some settings that need to be configured first. At this point, you should see a bigger settings page. If not, click on the blue icon with your project name in the top left. Click the Info tab. Next, if you hover over any of the Keys, you’ll see a + sign appear. Once you click on it, search for the Privacy – Bluetooth Always Usage Description key. Repeat the same process for the Privacy – Peripheral Usage Description key. The reason for adding these two keys is to allow the app to notify the user that the Bluetooth service needs to be turned on in order to proceed with the app as well as connect to peripherals.
Install CocoaPods
In order to import frameworks (or library/module), CocoaPods must be installed first. Open the terminal and “cd” into the project’s directory. If you run the “ls” command, you should see the .xcodeproj file for your app. Then, check if you have an Intel or an M1 Mac. Click the Apple Logo in the top left corner of your screen, then select “About this Mac.” You should see “Intel” or “Apple M1” somewhere on the dialog box.
Intel Macs
Source: https://cocoapods.org/
Type the following command into terminal and click enter.
sudo gem install cocoapods
M1 Macs
Source: https://medium.com/p-society/cocoapods-on-apple-si…
Type the following commands into Terminal and hit enter. These are 3 different commands, so enter each command separately.
sudo arch -x86_64 gem install ffi
sudo gem install cocoapods
arch -x86_64 pod init
Installing Charts Module
For the next phase, we will be importing a framework, which is basically Swift’s equivalent of a library or module. This framework, Charts, can be used to make all sorts of graphs, but we will be using only the Line Chart feature. In order to import this, you first need to open terminal and “cd” into the project’s directory. If you run the “ls” command, you should see the .xcodeproj file.
Follow the short clip below to help you install the module (Watch from 2:15 to 4:20).
Once the Charts module is installed, you’re ready to begin the programming part!
Step 4: Design the User Interface With Storyboard
With the general settings configured, we will now enter the Xcode environment and start creating the app.
In the File Explorer (left side), select the Main.storyboard file. A blank iPhone screen should appear. We will be adding a few basic controls to this screen. I will be referring to this screen as the Storyboard.
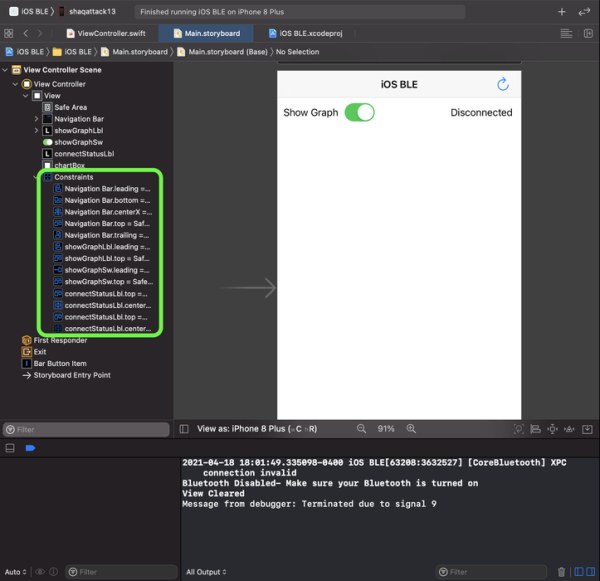
At the very bottom, you should see the words “View as: iPhone 11 (wC hR)“. Click on that. In this section, you will be able to choose the device that you’d like to design on. You can also change the orientation, which we’ll come back to later. Because I own an iPhone 8 Plus, I will be selecting that device; however, yours may be different. Because Apple has made many different devices with various sizes, you will be able to make slightly different designs for different iPhones/iPads as well as for different orientations.
Next, click the + sign at the top right. Find the navigation bar object. Click and drag that object towards the top of the Storyboard. Double-click on the word Title. You should be able to change it to whatever you want. I named mine “iOS-BLE”. In a similar manner, you should add an arrow.clockwise (refreshBtn), 2 labels (showGraphLbl and connectStatusLbl), and a switch (showGraphSw). The process is shown in the video. It is important that you press enter after typing to confirm what you typed; otherwise it won’t get saved. You can see my mistake with the refreshBtn in the video, where the name didn’t get saved. We will be utilizing all of these objects in our app.
Now that we’ve got the necessary objects on the Storyboard, we will need to specify where exactly these objects will be located on the screen.
Next, let’s add constraints for each object. The attached video should be sufficient to guide you through the constraints for the Navigation Bar. Note that you must uncheck the Constrain to margins box before making constraints. Otherwise, the constraints will be measured relative to edge of the screen instead of nearby objects. We do not want that for our purposes.
In addition, you should check the constraints that you’ve made by clicking on the Constraints drop-down in the middle left portion of the screen (shown in picture). If you encounter any warnings or error regarding constraints, here is one way to fix it.
If you see a constraint in the form of “Safe View.* = “, then fix it. You can do that by selecting the constraint you want to alter, clicking the Size Inspector tab (half triangle icon) on the top right and fix it manually. In the best case scenario, all you have to do is switch the two items. You can do this by clicking the drop-down button of First Item and selecting “Reverse First and Second Item.” In other cases, you may have to delete the constraint and redo it. Use your best judgment and you can even play around with it to see what works best for you.
Step 6: Show Graph Label Constraints
The attached video should be sufficient to guide you through the showGraphLbl constraints. Note that you MUST uncheck the Constrain to margins box before making constraints.
Again, if you need to fix any constraints, please refer to the process described in Step 4.
Step 7: Show Graph Switch Constraints
The attached video should be sufficient to guide you through the showGraphSw constraints. Note that you MUST uncheck the Constrain to margins box before making constraints.
Again, if you need to fix any constraints, please refer to the process described in Step 4.
Step 8: Connect Status Label Constraints
The attached video should be sufficient to guide you through the connectStatusLbl constraints. Note that you MUST uncheck the Constrain to margins box before making constraints.
Again, if you need to fix any constraints, please refer to the process described in Step 4.
With all the constraints for each object done, you are now ready to start interfacing these objects with the code!
Step 9: Begin Swift Programming
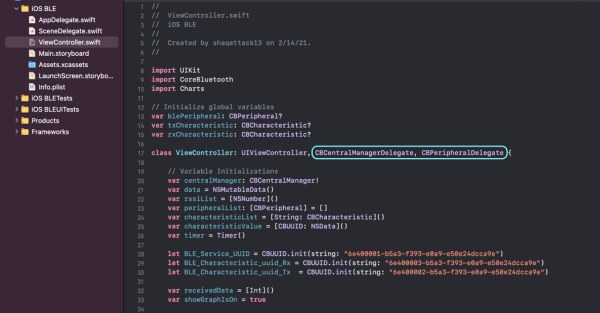
Open the ViewController.swift file. The main code you write will be in here. First, let’s import some important frameworks: CoreBluetooth and Charts. CoreBluetooth allows you to utilize objects and functions related to bluetooth communication. Charts provides you with various objects and functions that allow you to visualize data nicely.
We will also begin initializations of some variables. They are listed in the screenshot. For each variable I’ve listed below, I recorded its data type and briefly described it. If you’d like a more in-depth explanation of CoreBluetooth, UUID, and how Bluetooth works in this context, Adafruit does a great job here:
https://learn.adafruit.com/build-a-bluetooth-app-u…
- curPeripheral, CBPeripheral? – Current peripheral that was just found
- txCharacteristic, CBCharacteristic? – TX (Transmit) characteristic found in the peripheral
- rxCharacteristic, CBCharacteristic? – RX (Receive) characteristic found in the peripheral
- centralManager, CBCentralManager! – Manager object that allows us to use Bluetooth related functions
- rssiList, [NSNumber] – List of RSSI (Received Signal Strength Indicator) values from found peripherals
- peripheralList, [CBPeripheral] – List of peripherals that were found
- characteristicValue, [NSData] – Data object containing info of characteristic
- timer, Timer() – Timer object used to make certain lines of code run at a specific time
- BLE_Service_UUID, CBUUID – Constant Bluetooth UUID object containing UUID value specifically for Adafruit Feather nRF52832
- BLE_Characteristic_uuid_Rx, CBUUID – Constant Bluetooth UUID object containing the necessary UUID value
- BLE_Characteristic_uuid_Tx, CBUUID – Constant Bluetooth UUID object containing the necessary UUID value
- receivedData, [Int] – Buffer array of integers holding data received from the peripheral
- showGraphIsOn, Boolean – Whether or not graph should be shown
Now, let’s create the connections between the storyboard objects and your swift code. Follow the video to get this set up. Once you do this, you will be able to refer to the storyboard objects in your swift code just by using their Outlet variable name or by calling the corresponding Action function. Note: The “arrow.clockwise” object at the top right corner of the screen works like a button only because I placed it in the Navigation Bar at the top. If you want to make a refresh button in the body of the Storyboard, use the actual Button object.
Source: IOS App for Adafruit Feather NRF52832