
Summary of Humidity And Temperature monitoring Using Arduino With The IoT
This article details a project for monitoring humidity and temperature using an Arduino microcontroller, a DHT-11 sensor, and an ESP8266 Wi-Fi module. The system collects data from the sensor and transmits it via the internet to the ThingSpeak cloud platform for graphical analysis accessible globally. The setup is designed to be user-friendly for beginners in IoT, allowing for remote monitoring and potential integration with other sensors or actuators based on threshold values.
Parts used in Humidity and Temperature Monitoring Project:
- Arduino MCU
- DHT-11 sensor
- ESP8266 Wi-Fi module
- ThingSpeak platform account
- Arduino IDE software
- DHT sensor library
- Computer or smartphone with internet connection

Using the Internet of Things (IoT) in homes and industries it is possible to control any electrical or electronic equipment. Moreover, you can get the information from any sensor and analyse it graphically or in any user-defined format from anywhere in the world. The IoT using Arduino microcontroller (MCU) is easy and fun for those who are new to the field. Presented here is a humidity and temperature monitoring using Arduino.
In this article, humidity and temperature information from DHT-11 sensor is analysed graphically on ThingSpeak platform using Arduino MCU and ESP8266 Wi-Fi module. Block diagram of the whole setup is shown in Fig. 1.
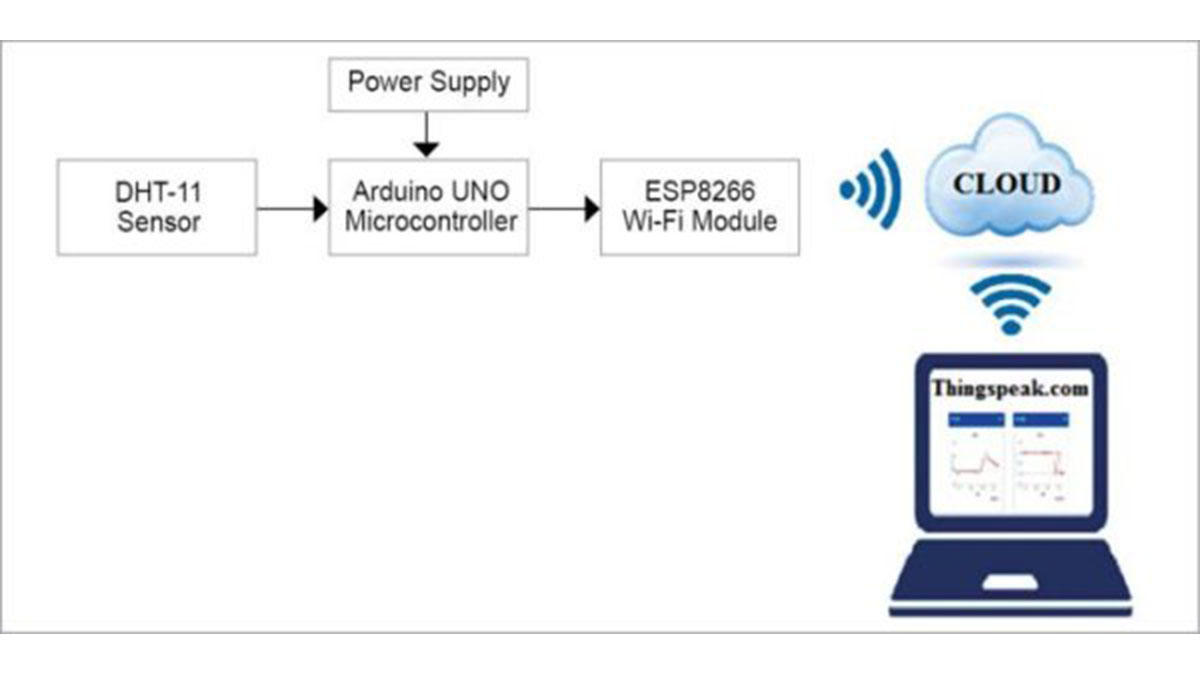
Block diagram of humidity and temperature monitoring using Arduino with ESP8266
Circuit and working
Circuit diagram for monitoring humidity and temperature is shown in Fig. 2. It is built around Arduino MCU, DHT11 sensor and ESP8266 Wi-Fi module.
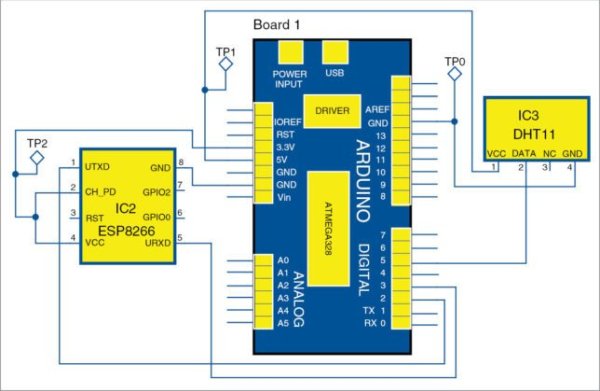
Circuit diagram humidity and temperature monitoring using Arduino with ESP8266
The DHT11 sensor senses humidity and temperature, and sends the information to digital pin 5 of Arduino MCU, as shown in Fig. 2. From Arduino MCU, humidity and temperature values are uploaded to the Cloud at regular intervals of time through ESP8266 Wi-Fi module. From the Cloud, humidity and temperature values can be seen graphically on ThingSpeak platform (http://thingspeak.com) from anywhere in the world.
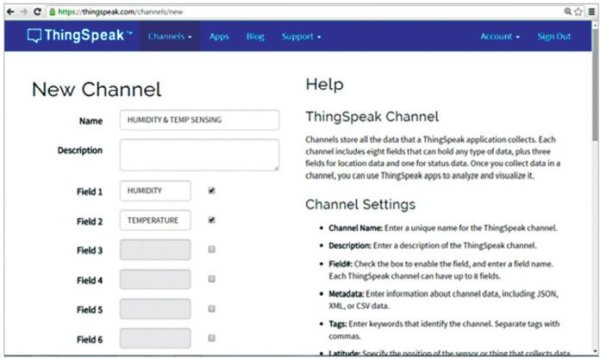
New channel on ThingSpeak platform
Construction and testing
 ThingSpeak is an open source data platform but you need to register to use it. After registering, login to your account and create a new channel with humidity as one field and temperature as another, as shown in Fig. 3. Once a new channel is created, it will generate two API keys, namely, write API key and read API key. Replace the line given below in the program with your write API key:
String apiKey = “ NTIM1RXET6YVUVWF “;
Next, substitute Host_Name and Password with your Wi-Fi name and Wi-Fi password in the two lines given below in the program (IoT.ino):
String Host_Name = “Jonah”;
String Password = “2569696”;
The program should be verified with your Wi-Fi setup. It uses DHT library. If DHT library is not present in your Arduino folder, download it from https://github.com/adafruit/DHT-sensor-library. To import DHT library in Arduino IDE, select Sketch→Import library→Add library→Select the library that you have downloaded.
Compile the sketch/program and upload it to Arduino MCU through Arduino IDE. Ensure that Wi-Fi modem and the Internet connection in your PC/smartphone are working properly.
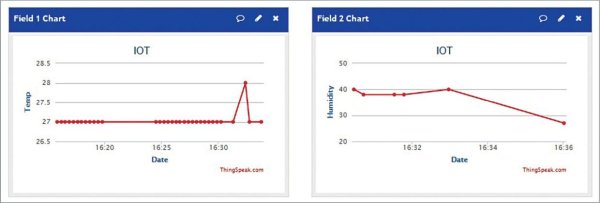
Graphical view of humidity and temperature on ThingSpeak platform
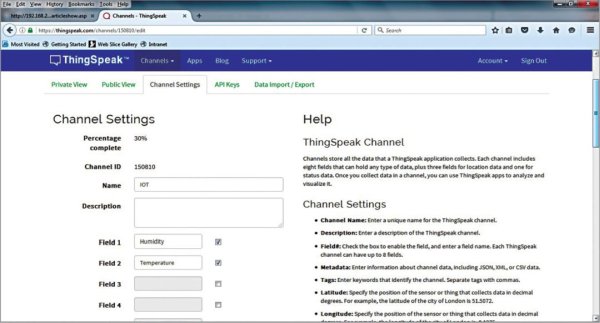
Channel Settings
Once sketch uploading is done, it will upload humidity and temperature values on ThingSpeak platform and you will be able to see it graphically in Private View window, as shown in Fig. 4. If you want to change channel or field name, you can change it from Channel Settings (Fig. 5). Author’s prototype is shown in Fig. 6.
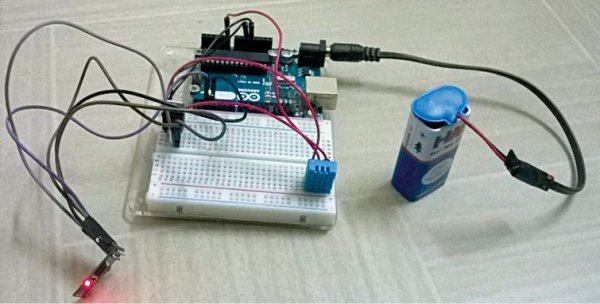
Author’s prototype of the humidity and temperature monitoring using Arduino with ESP8266
Other applications
Along with temperature and humidity sensor, other sensors like gas, voltage, current and energy can be used based on the requirement. Moreover, it is also possible to take further actions by controlling the actuators from the Internet once the sensor values are going above/below predetermined values.
Download Source folder
Read More Detail:Humidity And Temperature monitoring Using Arduino With The IoT
-
What components are required to build this humidity and temperature monitor?
The project requires an Arduino MCU, a DHT-11 sensor, and an ESP8266 Wi-Fi module. -
How does the system transmit data to the cloud?
Humidity and temperature values are uploaded to the Cloud at regular intervals through the ESP8266 Wi-Fi module. -
Where can the collected data be viewed graphically?
Data can be seen graphically on the ThingSpeak platform from anywhere in the world. -
Do I need to register to use the ThingSpeak platform?
Yes, you must register and login to create a new channel before using the open source data platform. -
Which digital pin connects the DHT-11 sensor to the Arduino?
The DHT-11 sensor sends information to digital pin 5 of the Arduino MCU. -
What steps are needed if the DHT library is missing in Arduino IDE?
You must download the library from GitHub and import it by selecting Sketch, Import library, Add library, and then selecting the downloaded file. -
Can other types of sensors be integrated into this project?
Yes, other sensors like gas, voltage, current, and energy can be used based on requirements. -
Is it possible to control actuators remotely with this setup?
Yes, it is possible to take further actions by controlling actuators from the Internet once sensor values exceed predetermined limits.
