Summary of How to use an array with Arduino
This article explains how to use an array in Arduino code to control LEDs on non-contiguous or non-sequential pins. Unlike standard for loops, this method allows pin order flexibility by storing pin numbers in an array. The project connects six LEDs with resistors to digital pins 2 through 7, demonstrating sequential and reverse lighting patterns based on the array's defined order rather than physical wiring sequence.
Parts used in the Array LED Control Project:
- Arduino Board
- 6x 220 ohm resistors
- 6x LEDs
- Hook-up wire
- Breadboard
This variation on the For Loop example shows how to use an array. An array is a variable with multiple parts. If you think of a variable as a cup that holds values, you might think of an array as an ice cube tray. It’s like a series of linked cups, all of which can hold the same maximum value.
The For Loop example shows you how to light up a series of LEDs attached to pins 2 through 7 of the Arduino, with certain limitations (the pins have to be numbered contiguously, and the LEDs have to be turned on in sequence).
This example shows you how you can turn on a sequence of pins whose numbers are neither contiguous nor necessarily sequential. To do this is, you can put the pin numbers in an array and then use for loops to iterate over the array.
This example makes use of 6 LEDs connected to the pins 2 – 7 on the board using 220 Ohm resistors, just like in the For Loop. However, here the order of the LEDs is determined by their order in the array, not by their physical order.
This technique of putting the pins in an array is very handy. You don’t have to have the pins sequential to one another, or even in the same order. You can rearrange them however you want.
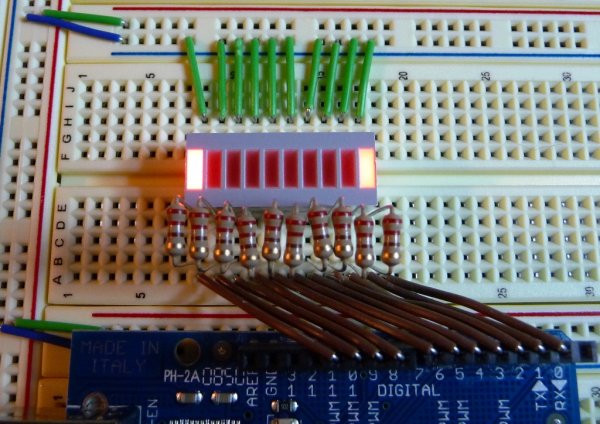
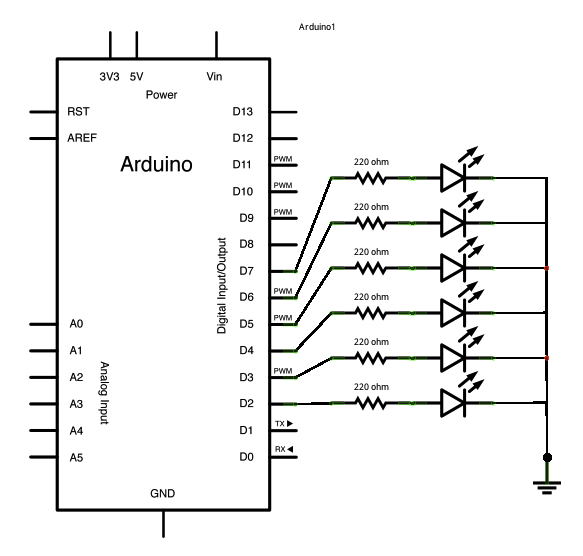
Circuit
Connect six LEDS, with 220 ohm resistors in series, to digital pins 2-7 on your Arduino.
image developed using Fritzing. For more circuit examples, see the Fritzing project page
Schematic:
Code
Arrays
Demonstrates the use of an array to hold pin numbers
in order to iterate over the pins in a sequence.
Lights multiple LEDs in sequence, then in reverse.
Unlike the For Loop tutorial, where the pins have to be
contiguous, here the pins can be in any random order.
The circuit:
* LEDs from pins 2 through 7 to ground
Hardware Required
- Arduino Board
- (6) 220 ohm resistors
- (6) LEDs
- hook-up wire
- breadboard
For more detail: How to use an array with Arduino
- How does using an array change pin control compared to a standard For Loop?
An array allows you to light up pins that are neither contiguous nor necessarily sequential. - What determines the order of the LEDs in this project?
The order is determined by their position in the array, not their physical order. - Can I rearrange the pins however I want in an array?
Yes, you can rearrange them however you want without needing them to be sequential. - What components are required to build this circuit?
You need an Arduino board, six 220 ohm resistors, six LEDs, hook-up wire, and a breadboard. - Which pins are used to connect the LEDs in this example?
The LEDs are connected to digital pins 2 through 7 on the board. - What type of resistors are used with the LEDs?
Six 220 ohm resistors are connected in series with the LEDs. - Does the code allow LEDs to light in reverse?
Yes, the code lights multiple LEDs in sequence and then in reverse.