Summary of How to Display Images on OLED Using Arduino
This article guides users on displaying custom bitmap images on a 0.96” OLED screen using an Arduino Mega. It covers hardware connections, necessary software libraries, and how to convert images to bitmap code using the Image2Cpp tool. The tutorial includes example Arduino code to initialize the display and draw a bitmap image. The project encourages users to create personalized displays and share their results on social media.
Parts used in the How to Display Images on OLED Using Arduino:
- 0.96” OLED Display (Banggood/Gearbest/Amazon India)
- Arduino Mega (Banggood/Amazon India)
- Connecting wires (SCL, SDA, VCC, GND)
- Computer with Arduino IDE
- Image2Cpp tool (software)
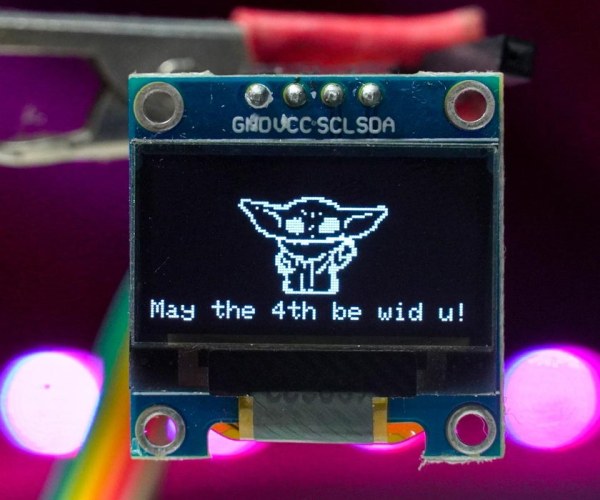
Hello there fellow learners, in one of our previous blog on OLED, we learnt how to wire and code OLED. We also learnt to display simple text using Arduino code. So today in this blog, we will learn how we can use images and custom bitmaps to display logos or anything we want using our 0.96” OLED screen and Arduino!
Supplies
Hardware:
- OLED ( banggood ) / OLED ( gear best ) / OLED ( amazon india )
- Arduino Mega ( banggood ) / Arduin Mega ( Amazon India )
Software:
Step 1: Watch the Video!
Step 2: Connections!
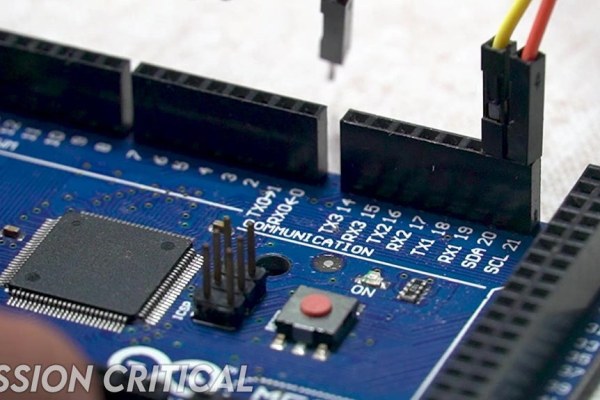
First thing we need to do is complete the connections. Connections are very simple, just 4 wires, SCL, SDA, VCC and GND. We just have to connect SCL to SDA and SDA to SCL of Arduino and power pins to VCC and ground of Arduino.
Connections for OLED to Arduino
Vcc – 5V
Gnd – Gnd
SDA – SDA
SCL – SCL
Step 3: Code Skeleton
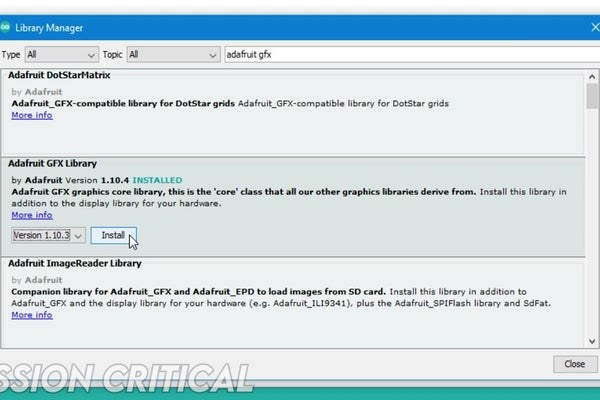
We can use this Code Skeleton for almost every or any image!
Open the Arduino IDE.
If you are using OLED for the first time or don’t have necessary libraries, go to sketch, include library and manage library option. Now you can search for SSD1306 and Adafruit GFX, if you don’t have these libraries, install them by clicking on install button.
Start a new sketch.
we will start by adding 4 required libraries or dependencies like Wire, SPI, Adafruit GFX and Adafruit SSD1306.
#include <SPI.h>
#include <Wire.h>
#include <Adafruit_GFX.h>
#include <Adafruit_SSD1306.h>
We also need to define reset parameters
#define OLED_RESET 4
Adafruit_SSD1306 display(OLED_RESET);
which u need to simply copy paste.
Now we will go to Void Setup loop to Begin the display using display.begin in bracket SSD under scroll switch cap vcc comma 0x3c.
display.begin(SSD1306_SWITCHCAPVCC, 0x3c);
this 0x3c is the i2c address for your OLED display. Now if you use multiple i2c devices your i2c address would be different, you can use I2C scanner code and find the i2c address of your device.
Next we will clear display using display.clearDisplay(); command.
display.clearDisplay();
Add a small delay and that’s all for setup.
delay(200);
In Void Loop, we need to use bitmap which is basically code version of an Image. For this we will use the following command.
display.drawBitmap(0, 0, myBitmap, 128, 64, WHITE);
display dot drawbitmap in brackets 0, 0 which is location of bitmap or cursor.
Next parameter is variable name or say bitmap name, for our example, we will name it as mybitmap and last parameter is width and height of bitmap.
At last we will display the following image using display.display command.
display.display();
I2C Scanner code can be found here!
Step 4: Convert Image to Bitmap
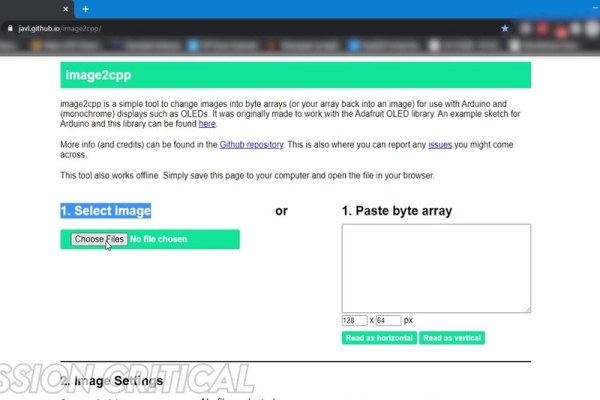
The last thing we need to do in this code is to add the actual bitmap for which we need to convert our required image to bitmap or code. We will use image2cpp tool to convert image to bitmap, link to it can be found here!
First step to using this bitmap tool is selecting the image from your PC or Mac. Simply choose the image file.
Next important thing is to defineour canvas size. Since I am using a 0.96 inch OLED display whose resolution is 128 pixels by 64 pixels, I will set the canvas size same as resolution to use the entire screen.
After that there are 3 options to select from in background, depending on image, you would need to adjust it, for our example of baby yoda, I want black background. I ticked the black background option, but our yoda has black outline and white background, so we will use invertto fix it.
Another important parameter is scaling, for which we need to select “scale to fit, keeping proportions” option.
Now in the preview box, checkout the result and adjust brightness threshold to fix detailing according to your satisfaction. It’s just matter of trial and error to get your desired output for bitmap.
Once you are satisfied with all settings, go to output setting and select code output format as Arduino code and hit generate code.
Step 5: Final Code!
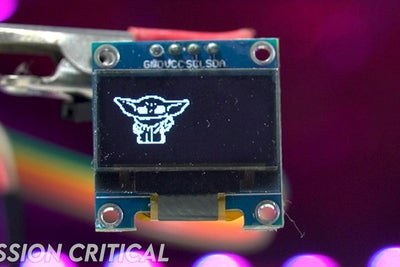
after we converted our Image to Bitmap to Code, we will copy the output from Image2Cpp tool and paste it code skeleton above Void Setup loop and upload the code!
#include <SPI.h>
#include <Wire.h>
#include <Adafruit_GFX.h>
#include <Adafruit_SSD1306.h>

#define OLED_RESET 4
Adafruit_SSD1306 display(OLED_RESET);

// this is the bitmap, change this variable for your specification.
const unsigned char myBitmap [] PROGMEM =

{
  0x00, 0x00, 0x00, 0x00, 0x00, 0x00, 0x00, 0x00, 0x00, 0x00, 0x00, 0x00, 0x00, 0x00, 0x00, 0x00,
  0x00, 0x00, 0x00, 0x00, 0x00, 0x00, 0x00, 0x00, 0x00, 0x00, 0x00, 0x00, 0x00, 0x00, 0x00, 0x00,
  0x00, 0x00, 0x00, 0x00, 0x00, 0x00, 0x00, 0x00, 0x00, 0x00, 0x00, 0x00, 0x00, 0x00, 0x00, 0x00,
  0x00, 0x00, 0x00, 0x00, 0x00, 0x00, 0x00, 0x00, 0x00, 0x00, 0x00, 0x00, 0x00, 0x00, 0x00, 0x00,
  0x00, 0x00, 0x00, 0x00, 0x00, 0x00, 0x00, 0x00, 0x00, 0x00, 0x00, 0x00, 0x00, 0x00, 0x00, 0x00,
  0x00, 0x00, 0x00, 0x00, 0x00, 0x00, 0x00, 0x00, 0x00, 0x00, 0x00, 0x00, 0x00, 0x00, 0x00, 0x00,
  0x00, 0x00, 0x00, 0x00, 0x00, 0x00, 0x00, 0x00, 0x00, 0x00, 0x00, 0x00, 0x00, 0x00, 0x00, 0x00,
  0x00, 0x00, 0x00, 0x00, 0x00, 0x00, 0x00, 0x00, 0x00, 0x00, 0x00, 0x00, 0x00, 0x00, 0x00, 0x00,
  0x00, 0x00, 0x00, 0x00, 0x00, 0x00, 0x00, 0x00, 0x00, 0x00, 0x00, 0x00, 0x00, 0x00, 0x00, 0x00,
  0x00, 0x00, 0x00, 0x00, 0x00, 0x00, 0x00, 0x00, 0x00, 0x00, 0x00, 0x00, 0x00, 0x00, 0x00, 0x00,
  0x00, 0x00, 0x00, 0x00, 0x00, 0x00, 0x00, 0x00, 0x00, 0x00, 0x00, 0x00, 0x00, 0x00, 0x00, 0x00,
  0x00, 0x00, 0x00, 0x00, 0x00, 0x00, 0x00, 0x00, 0x00, 0x00, 0x00, 0x00, 0x00, 0x00, 0x00, 0x00,
  0x00, 0x00, 0x00, 0x00, 0x00, 0x00, 0x00, 0x00, 0x00, 0x00, 0x00, 0x00, 0x00, 0x00, 0x00, 0x00,
  0x00, 0x00, 0x00, 0x00, 0xff, 0x80, 0x00, 0x00, 0x00, 0x00, 0x00, 0x00, 0x00, 0x00, 0x00, 0x00,
  0x00, 0xf0, 0x00, 0x07, 0xc1, 0xf0, 0x00, 0x00, 0x00, 0x00, 0x00, 0x00, 0x00, 0x00, 0x00, 0x00,
  0x01, 0x8f, 0xf0, 0x1c, 0x00, 0x1c, 0x00, 0x00, 0x00, 0x00, 0x00, 0x00, 0x00, 0x00, 0x00, 0x00,
  0x01, 0x80, 0x7f, 0x70, 0x00, 0x06, 0x00, 0x03, 0x80, 0x00, 0x00, 0x00, 0x00, 0x00, 0x00, 0x00,
  0x00, 0xc2, 0x07, 0xe0, 0x00, 0x03, 0xff, 0xff, 0xc0, 0x00, 0x00, 0x00, 0x00, 0x00, 0x00, 0x00,
  0x00, 0x60, 0x60, 0x00, 0x80, 0x00, 0x00, 0x00, 0x40, 0x00, 0x00, 0x00, 0x00, 0x00, 0x00, 0x00,
  0x00, 0x30, 0x1c, 0x00, 0x49, 0x00, 0x00, 0x70, 0xc0, 0x00, 0x00, 0x00, 0x00, 0x00, 0x00, 0x00,
  0x00, 0x18, 0x06, 0x00, 0x08, 0x00, 0x0f, 0x81, 0x80, 0x00, 0x00, 0x00, 0x00, 0x00, 0x00, 0x00,
  0x00, 0x08, 0x03, 0x01, 0x00, 0x7c, 0x30, 0x03, 0x00, 0x00, 0x00, 0x00, 0x00, 0x00, 0x00, 0x00,
  0x00, 0x0c, 0x01, 0x3f, 0x00, 0x7e, 0x60, 0x06, 0x00, 0x00, 0x00, 0x00, 0x00, 0x00, 0x00, 0x00,
  0x00, 0x06, 0x01, 0x7f, 0x80, 0xfe, 0x40, 0x0c, 0x00, 0x00, 0x00, 0x00, 0x00, 0x00, 0x00, 0x00,
  0x00, 0x02, 0x01, 0x3f, 0x89, 0xfe, 0x40, 0x0c, 0x00, 0x00, 0x00, 0x00, 0x00, 0x00, 0x00, 0x00,
  0x00, 0x03, 0x00, 0x3f, 0x91, 0xfe, 0x00, 0x18, 0x00, 0x00, 0x00, 0x00, 0x00, 0x00, 0x00, 0x00,
  0x00, 0x01, 0xc0, 0x1f, 0x81, 0xf8, 0x00, 0x70, 0x00, 0x00, 0x00, 0x00, 0x00, 0x00, 0x00, 0x00,
  0x00, 0x00, 0x70, 0x00, 0x00, 0x00, 0x81, 0xc0, 0x00, 0x00, 0x00, 0x00, 0x00, 0x00, 0x00, 0x00,
  0x00, 0x00, 0x3c, 0x00, 0x00, 0x01, 0x9f, 0x00, 0x00, 0x00, 0x00, 0x00, 0x00, 0x00, 0x00, 0x00,
  0x00, 0x00, 0x03, 0xc0, 0x00, 0x3f, 0xf0, 0x00, 0x00, 0x00, 0x00, 0x00, 0x00, 0x00, 0x00, 0x00,
  0x00, 0x00, 0x01, 0x3f, 0xff, 0xf0, 0x78, 0x00, 0x00, 0x00, 0x00, 0x00, 0x00, 0x00, 0x00, 0x00,
  0x00, 0x00, 0x01, 0x1e, 0xe0, 0x00, 0xf8, 0x00, 0x00, 0x00, 0x00, 0x00, 0x00, 0x00, 0x00, 0x00,
  0x00, 0x00, 0x01, 0x80, 0x00, 0x01, 0x98, 0x00, 0x00, 0x00, 0x00, 0x00, 0x00, 0x00, 0x00, 0x00,
  0x00, 0x00, 0x00, 0xc0, 0x00, 0x07, 0x8c, 0x00, 0x00, 0x00, 0x00, 0x00, 0x00, 0x00, 0x00, 0x00,
  0x00, 0x00, 0x00, 0xe0, 0x00, 0x1d, 0x0c, 0x00, 0x00, 0x00, 0x00, 0x00, 0x00, 0x00, 0x00, 0x00,
  0x00, 0x00, 0x01, 0x98, 0x00, 0xcd, 0x3c, 0x00, 0x00, 0x00, 0x00, 0x00, 0x00, 0x00, 0x00, 0x00,
  0x00, 0x00, 0x03, 0x8f, 0x81, 0x99, 0xf0, 0x00, 0x00, 0x00, 0x00, 0x00, 0x00, 0x00, 0x00, 0x00,
  0x00, 0x00, 0x03, 0x4b, 0x9f, 0x19, 0x30, 0x00, 0x00, 0x00, 0x00, 0x00, 0x00, 0x00, 0x00, 0x00,
  0x00, 0x00, 0x03, 0x72, 0x68, 0x2c, 0x60, 0x00, 0x00, 0x00, 0x00, 0x00, 0x00, 0x00, 0x00, 0x00,
  0x00, 0x00, 0x03, 0x92, 0x48, 0x4c, 0xc0, 0x00, 0x00, 0x00, 0x00, 0x00, 0x00, 0x00, 0x00, 0x00,
  0x00, 0x00, 0x01, 0xd0, 0x48, 0xdf, 0xc0, 0x00, 0x00, 0x00, 0x00, 0x00, 0x00, 0x00, 0x00, 0x00,
  0x00, 0x00, 0x03, 0x7c, 0x09, 0x9e, 0x00, 0x00, 0x00, 0x00, 0x00, 0x00, 0x00, 0x00, 0x00, 0x00,
  0x00, 0x00, 0x01, 0xf8, 0x0b, 0x1c, 0x00, 0x00, 0x00, 0x00, 0x00, 0x00, 0x00, 0x00, 0x00, 0x00,
  0x00, 0x00, 0x00, 0x60, 0x88, 0x0c, 0x00, 0x00, 0x00, 0x00, 0x00, 0x00, 0x00, 0x00, 0x00, 0x00,
  0x00, 0x00, 0x00, 0x20, 0x88, 0x0c, 0x00, 0x00, 0x00, 0x00, 0x00, 0x00, 0x00, 0x00, 0x00, 0x00,
  0x00, 0x00, 0x00, 0x20, 0x88, 0x0e, 0x00, 0x00, 0x00, 0x00, 0x00, 0x00, 0x00, 0x00, 0x00, 0x00,
  0x00, 0x00, 0x00, 0x70, 0x88, 0x0e, 0x00, 0x00, 0x00, 0x00, 0x00, 0x00, 0x00, 0x00, 0x00, 0x00,
  0x00, 0x00, 0x00, 0x60, 0x88, 0x0e, 0x00, 0x00, 0x00, 0x00, 0x00, 0x00, 0x00, 0x00, 0x00, 0x00,
  0x00, 0x00, 0x00, 0x60, 0x88, 0x0e, 0x00, 0x00, 0x00, 0x00, 0x00, 0x00, 0x00, 0x00, 0x00, 0x00,
  0x00, 0x00, 0x00, 0x78, 0xc8, 0x1e, 0x00, 0x00, 0x00, 0x00, 0x00, 0x00, 0x00, 0x00, 0x00, 0x00,
  0x00, 0x00, 0x00, 0x3f, 0xff, 0xfc, 0x00, 0x00, 0x00, 0x00, 0x00, 0x00, 0x00, 0x00, 0x00, 0x00,
  0x00, 0x00, 0x00, 0x00, 0x00, 0x00, 0x00, 0x00, 0x00, 0x00, 0x00, 0x00, 0x00, 0x00, 0x00, 0x00,
  0x00, 0x00, 0x00, 0x00, 0x00, 0x00, 0x00, 0x00, 0x00, 0x00, 0x00, 0x00, 0x00, 0x00, 0x00, 0x00,
  0x00, 0x00, 0x00, 0x00, 0x00, 0x00, 0x00, 0x00, 0x00, 0x00, 0x00, 0x00, 0x00, 0x00, 0x00, 0x00,
  0x00, 0x00, 0x00, 0x00, 0x00, 0x00, 0x00, 0x00, 0x00, 0x00, 0x00, 0x00, 0x00, 0x00, 0x00, 0x00,
  0x00, 0x00, 0x00, 0x00, 0x00, 0x00, 0x00, 0x00, 0x00, 0x00, 0x00, 0x00, 0x00, 0x00, 0x00, 0x00,
  0x00, 0x00, 0x00, 0x00, 0x00, 0x00, 0x00, 0x00, 0x00, 0x00, 0x00, 0x00, 0x00, 0x00, 0x00, 0x00,
  0x00, 0x00, 0x00, 0x00, 0x00, 0x00, 0x00, 0x00, 0x00, 0x00, 0x00, 0x00, 0x00, 0x00, 0x00, 0x00,
  0x00, 0x00, 0x00, 0x00, 0x00, 0x00, 0x00, 0x00, 0x00, 0x00, 0x00, 0x00, 0x00, 0x00, 0x00, 0x00,
  0x00, 0x00, 0x00, 0x00, 0x00, 0x00, 0x00, 0x00, 0x00, 0x00, 0x00, 0x00, 0x00, 0x00, 0x00, 0x00,
  0x00, 0x00, 0x00, 0x00, 0x00, 0x00, 0x00, 0x00, 0x00, 0x00, 0x00, 0x00, 0x00, 0x00, 0x00, 0x00,
  0x00, 0x00, 0x00, 0x00, 0x00, 0x00, 0x00, 0x00, 0x00, 0x00, 0x00, 0x00, 0x00, 0x00, 0x00, 0x00,
  0x00, 0x00, 0x00, 0x00, 0x00, 0x00, 0x00, 0x00, 0x00, 0x00, 0x00, 0x00, 0x00, 0x00, 0x00, 0x00,
  0x00, 0x00, 0x00, 0x00, 0x00, 0x00, 0x00, 0x00, 0x00, 0x00, 0x00, 0x00, 0x00, 0x00, 0x00, 0x00
};


void setup()
{
  display.begin(SSD1306_SWITCHCAPVCC, 0x3C);  // here the 0x3c is the I2C address, check your i2c address if u have multiple devices.
  display.clearDisplay();
  delay(2000);

}

void loop()
{
  display.drawBitmap(0, 0, myBitmap, 128, 64, WHITE);
  display.display();
}
Once successfully uploaded, our OLED powers up and shows us a cute little baby yoda on screen!
you can also find the code in .ino format here!
Step 6: Challenge!
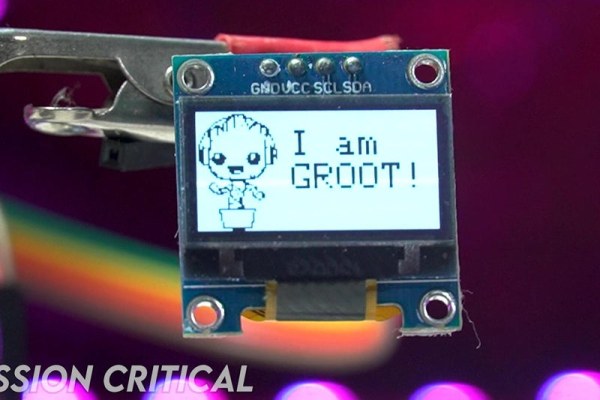
May the force be with you and may u learn how to display custom images on oled using arduino!
I have a little challenge for you guys, I want you to draw your favorite bitmap images on your OLED and share the picture on Instagram tagging @officialmissioncritical. I am extremely excited to see what my subscribers have made!
If you enjoyed this blog post or project, consider supporting our work by subscribing to our YouTube channel and following our Social media handles, your support means a lot to us and motivates us to keep making awesome content!
Social Media Handles: Patreon, Twitter, Instagram, Facebook.
With that being said, I will see you guys in next project, until that keep learning and stay safe! goodbye 🙂
Source: How to Display Images on OLED Using Arduino
