Summary of How to Build a Midbar ESP8266 Version
Midbar ESP8266 is a single-user hardware password manager that encrypts eight passwords and four credit cards using combined 3DES + AES + Blowfish + Serpent, Serpent, or 3DES, and verifies login integrity with HMAC-SHA256. It stores encrypted data in the ESP8266 EEPROM, requires generating unique keys, flashing custom firmware, and assembling simple hardware (OLED, rotary encoder, buttons). The device alerts on integrity failure and uses a constrained cell mapping to fit records into 4 KB. Firmware, libraries, and RNG tools are provided for setup and key generation.
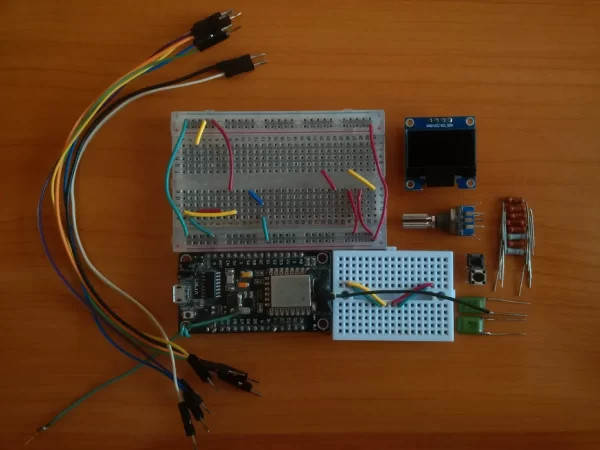
Parts used in the Midbar:
- ESP8266 x1
- 0.96 Inch OLED SSD1306 Display x1
- EC11 Rotary Encoder x1
- 4.7k resistors x7
- 22nf capacitors x2
- 330 Ohm resistor x1
- Buttons x2
A while ago, I made the ESP32 version of Midbar which later evolved into a multi-user Cipherbox. While developing the Cipherbox, I realized that even the Lite version of it might be too expensive and too redundant for some people, so I “resurrected” the single-user Midbar project and made an ESP8266 version of it.

The purpose of Midbar is to significantly increase the cost of unauthorized access to its user’s personal data.
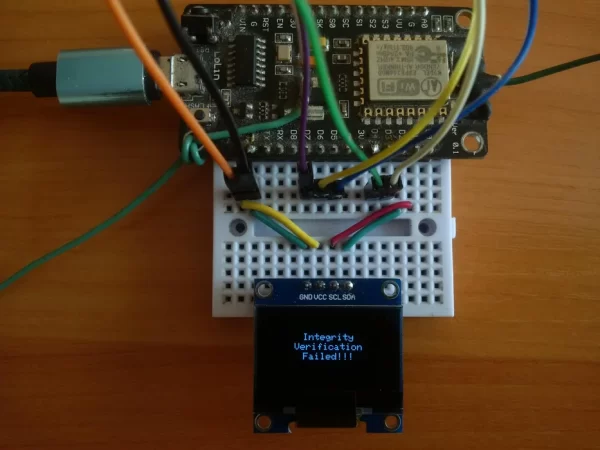
ESP8266 version of Midbar utilizes the 3DES + AES + Blowfish + Serpent encryption algorithm alongside the ESP8266’s built-in memory to store eight passwords and four credit cards in the encrypted form. It also utilizes the HMAC SHA-256 to verify the integrity of the stored logins, which means that if at least one bit of an encrypted login gets flipped, Midbar will inform you about it by displaying the following alert: “Integrity Verification Failed!!!”
In case you’ve missed the original Midbar or just want to know why I called it Midbar in the first place – Midbar (מדבר) is a Hebrew word that means “pasture,” “uninhabited land,” “wilderness,” “large tracts of wilderness (around cities),” “desert.” I had two reasons for choosing the word Midbar as the name of this project. First – while working on my previous projects, I noticed that the so-called “device that keeps your personal data secure in an encrypted form” market is pretty much a “desert around the oasis of the password manager market.” Second – I couldn’t find a better word to describe that project. At first, I wanted to call it a “Password Vault,” but then I realized that it’s more than just a password vault. So, I just called it Midbar!
Supplies
- ESP8266 x1
- 0.96 Inch OLED SSD1306 Display x1
- EC11 Rotary Encoder x1
- 4.7k resistors x7
- 22nf capacitors x2
- 330 Ohm resistor x1
- Buttons x2
Step 1: Encryption Algorithms
ESP8266 version of Midbar utilizes three encryption algorithms:
- 3DES + AES + Blowfish + Serpent;
- Serpent;
- 3DES.
Let me briefly describe the implementation of each algorithm:
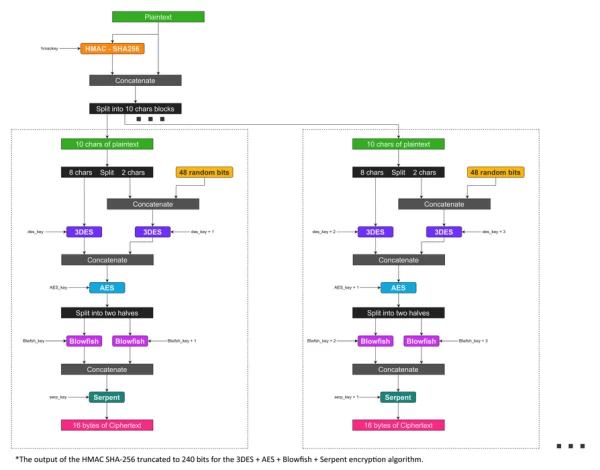
- 3DES + AES + Blowfish + Serpent is the strongest encryption algorithm utilized by this device. It’s a combined encryption algorithm that’s composed of four cryptographically strong encryption algorithms. It splits its input into 80-bit long blocks and then separately encrypts each block, infusing 48 random bits into each block. It produces the 128-bit (16 bytes) long output. That encryption algorithm performs superencryption;
- The serpent is an encryption algorithm that was competing in the Advanced Encryption Standard contest against Rijndael (now AES) and other algorithms. It takes a 64-bit long input, adds 64 random bits, and produces the 128-bit long output;
- 3DES is an outdated encryption algorithm. You can still use it to encrypt your data, but if I were you, I wouldn’t be using it for anything important. It takes a 32-bit long input, adds 32 random bits, and produces the 64-bit long output.
Step 2: Integrity Verification
Integrity verification is an essential feature absent in the previous version of Midbar, leaving it vulnerable to the block-swapping attack.
Before I get to the description of the integrity verification feature, I would like to clarify where it’s present and where it’s absent.
It’s present in:
- Logins;
- 3DES + AES + Blowfish + Serpent encryption algorithm;
- Serpent encryption algorithm.
It’s absent in:
- Credit Cards;
- 3DES encryption algorithm.
The backbone of the integrity verification feature is the Hash-based Message Authentication Code constructed from the SHA-256.
For the sake of convenience, I’ve truncated the output of the HMAC SHA-256 for the 3DES + AES + Blowfish + Serpent encryption algorithm to 240 bits because that algorithm takes 80-bit long blocks as input.
As for logins, HMAC SHA-256 takes a concatenation of title, login, password, and website alongside the key as an input and produces a 256-bit output. That 256-bit long output of HMAC is then truncated to 240 bits and encrypted with 3DES + AES + Blowfish + Serpent.
When Midbar decrypts the record, it also decrypts the tag. It then computes a new tag for the decrypted credentials and compares the new tag with the decrypted tag. If these two don’t match, Midbar displays the following alert: “Integrity Verification Failed!!!”
Step 3: Cell Mapping (Memory Allocation)
Since ESP8266 only has 4 KB of memory available for the user data, I had to remap it several times to fit as many records as possible.
Eventually, I came up with these results:
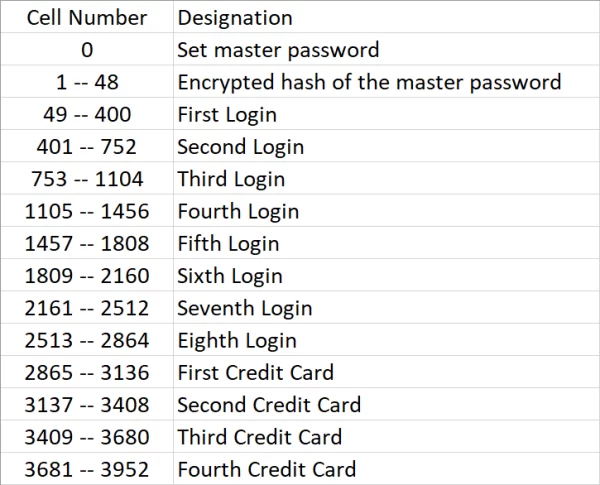
- The value stored in the first cell indicates whether the master password is set or not;
- Cells 1 – 48 store the encrypted hash of the master password;
- Cells 49 – 3952 store the encrypted logins and credit cards.
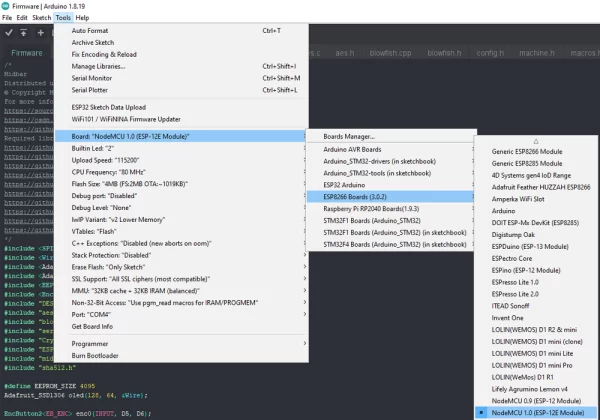
Step 4: Install Drivers and Configure Arduino IDE *Optional
If you’ve never flashed ESP8266 before you’ll need to configure Arduino IDE and install drivers to upload the firmware to the boards, you can find drivers here:
CH340 driver: https://sparks.gogo.co.nz/ch340.html
CP210x driver: https://www.silabs.com/developers/usb-to-uart-brid…
In case you don’t have Arduino IDE, you can download it here:
https://www.arduino.cc/en/software/
Configuring IDE isn’t a part of this tutorial, you can read about it here:
https://randomnerdtutorials.com/how-to-install-esp…
Step 5: Download Firmware
You can download the firmware for Midbar from one of these sources.
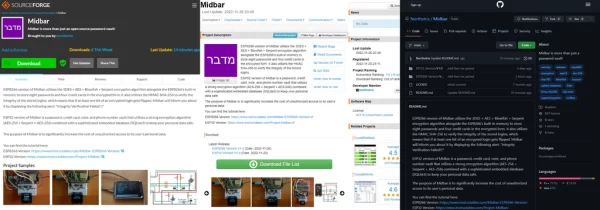
SourceForge: https://sourceforge.net/projects/midbar/
OSDN: https://osdn.net/projects/midbar/
GitHub: https://github.com/Northstrix/Midbar
If you just need the firmware for the device alongside the RNG, then I would advise you to download a 0.15 MB archive either from SourceForge or OSDN.
But if you need the firmware for all versions of Midbar alongside the extra code, photos, and diagrams, in that case, I would advise you to download the 34.9 MB archive from GitHub.
Step 6: Download and Install the Libraries
Adafruit-GFX-Library: https://github.com/adafruit/Adafruit-GFX-Library
Adafruit_SSD1306: https://github.com/adafruit/Adafruit_SSD1306
Adafruit_BusIO: https://github.com/adafruit/Adafruit_BusIO
EncButton: https://github.com/GyverLibs/EncButton
The process of unpacking libraries is typical. You can unpack the content of the archive into the folder: …\Arduino\libraries. Or open the Arduino IDE, click Sketch -> Include Library -> Add .ZIP Library… and select every archive with the library.
Step 7: Clear EEPROM
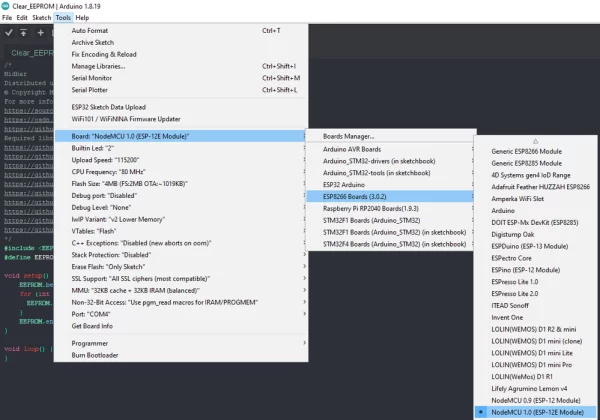
To ensure that Midbar will work as intended, you must clear the EEPROM before uploading the firmware.
To clear the EEPROM upload the sketch from the “Clear_EEPROM” folder into the ESP8266, and then reboot the board.
Step 8: Generate Keys
To make the unauthorized deciphering of your data computationally infeasible – It is crucial to generate your own keys and never reuse them.
The best way to generate the keys is to throw 20-sided dice.
If you get a number from 1 to 9, write it down.
If you get a number from 10 to 15, write down a letter corresponding to that number.
10 = A;
11 = B;
12 = C;
13 = D;
14 = E;
15 = F.
If you get 20, write down 0.
If you get something else, don’t write anything and throw the dice again.
There’s also an easier option.
I modified one of my previous projects to work as a random number generator, the generated output seems “random enough” for me, but I haven’t run any tests. So, I can’t guarantee that it’s random.
Use it at your own risk.
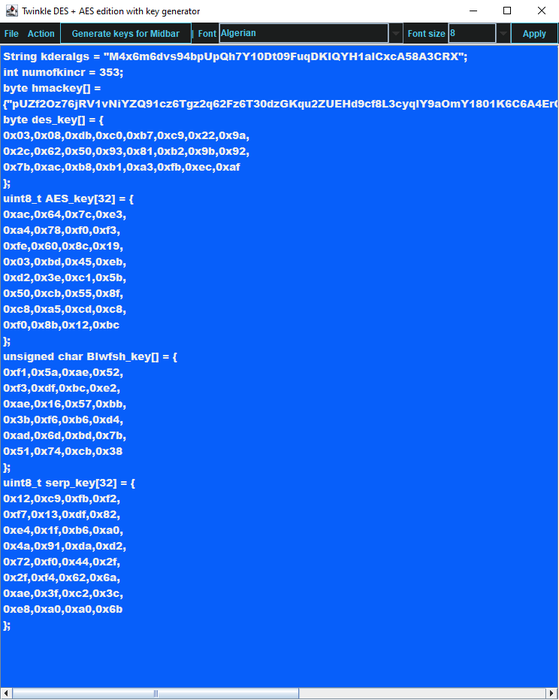
To generate the keys – launch gen.exe from the “Untested RNG” folder and then click the “Generate keys for Midbar” button. The background turns blue when you press that button.
Step 9: Modify the Firmware
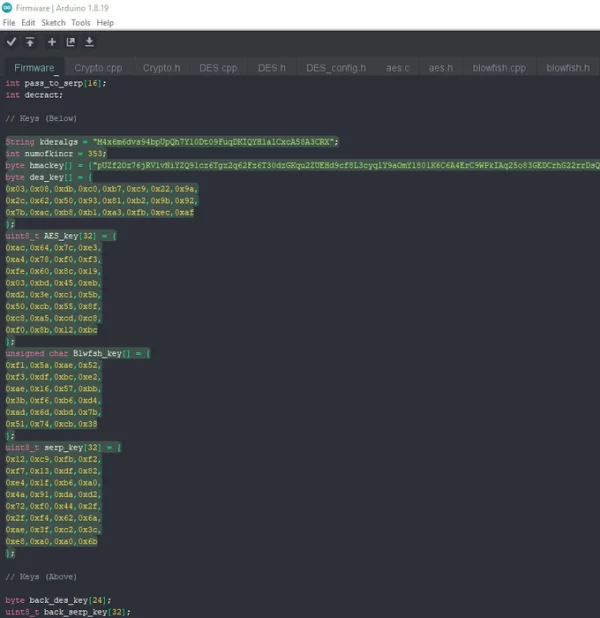
Open the file “Firmware.ino“, scroll down a bit, and then replace my values of the kderalgs, numofkincr, hmackey, des_key, AES_key, Blwfsh_key, serp_key with yours.
Step 10: Flash the ESP8266
Step 11: Assemble Midbar
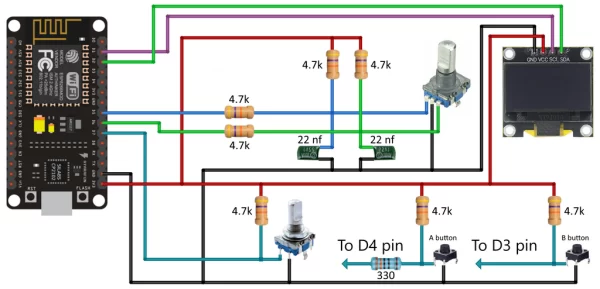
Assembling the Midbar shouldn’t be hard. In my opinion, the hardest part of the process is to connect the encoder.
As for the possible component replacements:
- You can replace the 330-Ohm resistor with a 220-Ohm – 1k resistor;
- You can replace 4.7k resistors with 4.7k – 10k resistors;
- And you can replace the capacitors with 22nf – 100nf capacitors.
Step 12: Set Your Password
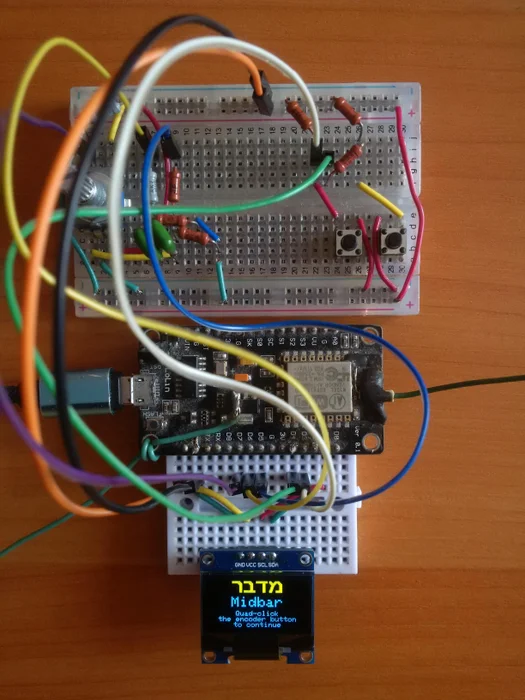
To use the Midbar, you first need to set the password (or should I call it the “Master Password”?).
To do so:
- Power up Midbar;
- Quad-click the encoder button;
- Enter the password that you would like to use to unlock the Midbar. You can’t change your password. And Midbar won’t be able to decrypt your data without your password because the keys for the encryption algorithms are partially derived from your password. Perhaps, it won’t even unlock without the correct password. Beware of it;
- Quad-click the encoder button.
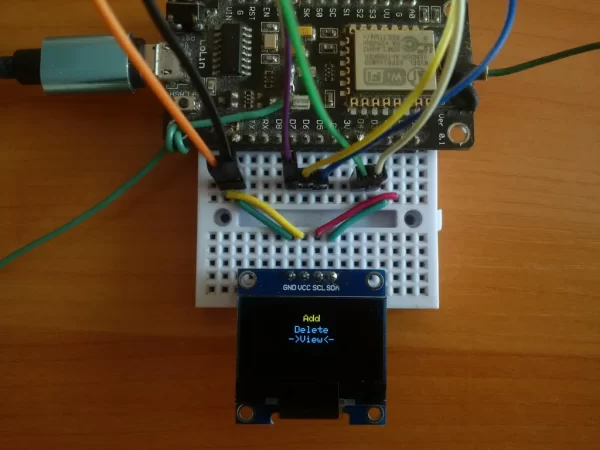
After you’ve unlocked the Midbar and got the main menu:
- Turn the rotary encoder to the right to go down the menu.
- Turn the rotary encoder to the left to go up the menu.
- Press the “A” button to open the selected menu.
- While in the submenu, press the “B” button to return to the main menu.
While entering a text in a tab:
- Click the encoder button four times to continue;
- Click the encoder button five times to cancel the current operation.
*If the hex value decreases when you rotate the encoder to the right, I would advise you to swap the wires connected to the D5 and D6 pins.
Step 13: Add Login
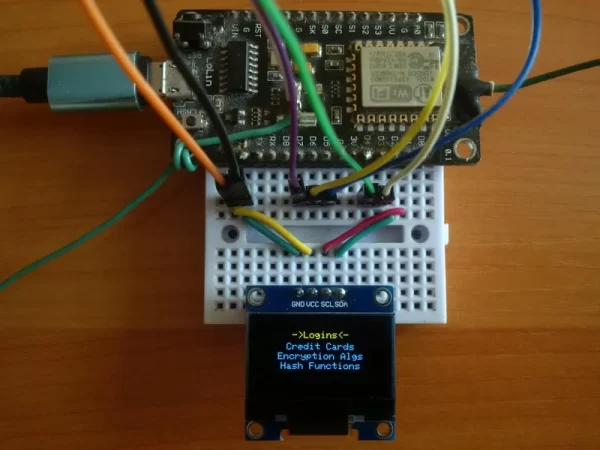
As I’ve mentioned In the introduction, this version of Midbar can store eight passwords and four credit cards in encrypted form.
To add a login:
- Select the “Logins” line in the main menu;
- Press the “A” button;
- Select the “Add” line;
- Press the “A” button;
- Choose the slot you want to put the login to by rotating the encoder;
- Press the “A” button;
- Enter title;
- Quad-Click the encoder button;
- Enter login;
- Quad-Click the encoder button;
- Enter password;
- Quad-Click the encoder button;
- Enter website;
- Quad-Click the encoder button.
Step 14: View Login
To view a login:
- Select the “Logins” line in the main menu;
- Press the “A” button;
- Select the “View” line;
- Press the “A” button;
- Choose the login you want to view by rotating the encoder;
- Press the “A” button;
- Press any button to view the next field.
Step 15: Delete Login

To delete a login:
- Select the “Logins” line in the main menu;
- Press the “A” button;
- Select the “Delete” line;
- Press the “A” button;
- Choose the login you want to delete by rotating the encoder;
- Press the “A” button.
Source: How to Build a Midbar ESP8266 Version
- What encryption algorithms does Midbar ESP8266 use?
It uses 3DES + AES + Blowfish + Serpent, Serpent, and 3DES. - How many passwords and credit cards can the device store?
It stores eight passwords and four credit cards in encrypted form. - Does Midbar verify integrity of stored logins?
Yes, logins use HMAC SHA-256 for integrity verification and Midbar alerts on failure. - Where are records stored on the ESP8266?
Cell 0 indicates if master password is set; cells 1–48 store encrypted master hash; cells 49–3952 store encrypted logins and credit cards. - How do you set the master password?
Power up, quad-click the encoder button, enter the password, then quad-click the encoder button again; the password cannot be changed. - How are keys supposed to be generated?
The article recommends generating keys with 20-sided dice or using the provided gen.exe RNG tool and never reusing keys. - What must be done before uploading firmware?
Clear the EEPROM by uploading the Clear_EEPROM sketch and reboot the board. - Can some components be substituted?
Yes: 330 Ohm can be 220–1k, 4.7k resistors can be 4.7k–10k, and capacitors can be 22nf–100nf. - Where can the firmware be downloaded?
Firmware is available on SourceForge, OSDN, and GitHub. - How do you add a login to Midbar?
From main menu select Logins → Add, choose a slot, then enter title, login, password, and website, confirming each with a quad-click.