Summary of How to Build a 2048 Game on Arduino
This article details the creation of a portable 2048 game console using an Arduino. The project features a Nokia 5110 LCD for display, a hacked PlayStation joystick and tact switches for controls, and a buzzer for audio feedback. Power is supplied by two rechargeable 18650 batteries regulated by an LM7805. The system runs on a DIY Atmega328P board, with custom PCBs designed in Eagle CADsoft and fabricated using Toner Transfer Paper.
Parts used in the 2048 Game Console:
- Nokia 5110 Graphic LCD
- Hacked PlayStation Controller Joystick
- Tact Switches (four units)
- Buzzer
- DIY Arduino Board (Atmega328P)
- LM7805 Voltage Regulator
- Two 18650 Rechargeable Batteries
- Toner Transfer Paper
I had think of making a game on Arduino quite a while. An idea strikes to my mind while I was playing a quite popular game which is available on apps and pc, 2048. 2048 is actually a game created by Gabriele Cirulli, aged 19, Itallian web developer. The objective of this game is to slide the tiles and combine them to create the tile of 2048. Source: Wiki
This game can be quite addictive and challenging which also makes me thought of how the game works. You can play the pc version at http://gabrielecirulli.github.io/2048/. Then I took some time to figure out the basic of idea of the game operation, so that I can make one on Arduino. Isn’t it cool to create it on Arduino and create a different playing platform?
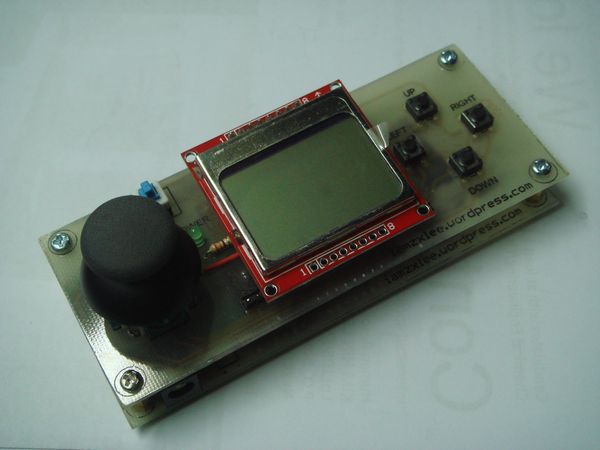
For this project, I decided to make a game console for it, which is also part of my to-do-list before. But to create the user interface, it requires a display that able to show all the numbers yet small in size. Therefore I decided to use Nokia 5110 Graphic LCD. Nokia 5110 can be obtained at low price from China sellers. Nokia 5110 LCD is cheap and easy to use, you should consider of using it in your next project.
Some of the features of 5110 LCD:
– 84 x 48 pixels
– Size: 43.6mm x 43.1mm (WxH)
– Power supply voltage : 2.7-3.3V
– Data interface level: 2.7-3.3V
– Available either white or blue backlight
After deciding the display unit, I need to decide to use what kind of user interface. I wanted to create something with the combination of Gameboy Advance and Playstation Controller. My final idea is to replace the direction button of Gameboy Advance into Playstation Controller’s Joystick.
I obtained my joystick by hacking an unused Playstation controller and de-soldered it from the PCB. A joystick consists of 2 potentiometers which is used for 2 axis control and also a tact switch .
Besides of having the joystick as control, there are also four tact switches which is used for user inputs. Therefore, you can actually play 2048 on Arduino by either using joystick or buttons.
Then, I have included a buzzer for my game console which is used to notify the player when they combined one or more tiles.
As I mentioned before, everything is controlled by using an Arduino, for my case, a DIY Arduino. I am using Atmega328P running with Arduino Uno bootloader, 16Mhz.
Being a portable game console, I need a portable power source too. 9V battery might be the choice but it is unable to provide sufficient current and one time use only. Furthermore, I am using LM7805 which has 2V dropout voltage. When the 9V battery reaches below 7V, I have to replace a new one. Therefore, the solution I made is using two 18650 batteries, each providing around 3.7V. The advantage of using 18650 battery is they are rechargeable, a good source of portable power supply.
After explaining all the electronics part, let me explain the design on my game console. I decided to make two PCBs where one is for the user interface, the other one is microcontroller and power supply board. I designed the PCB using Eagle Cadsoft.
I will show and explain some of the photos I have taken during the making of PCB. I made the PCB by using Toner Transfer Paper. This allows me to make nets that are thin enough to pass between two IC’s pins. Toner Transfer Paper allows you to make a neat and complex circuit in a short time. However, I was rushed at some time which cause some damages during the iron process. Luckily, the toner had been transferred, phew.
For more detail: 2048 on Arduino
- What display was chosen for the user interface?
The Nokia 5110 Graphic LCD was selected because it can show numbers while remaining small in size. - How is the control interface designed?
The design combines a joystick from a hacked PlayStation controller with four tact switches for user inputs. - Does the game provide audio feedback?
Yes, a buzzer is included to notify the player when they combine one or more tiles. - What microcontroller powers the device?
A DIY Arduino board featuring an Atmega328P running with an Arduino Uno bootloader at 16Mhz is used. - Why were 18650 batteries chosen over a 9V battery?
18650 batteries are rechargeable and provide sufficient current, whereas a 9V battery has insufficient current and cannot be reused. - How were the custom PCBs manufactured?
The PCBs were made using Toner Transfer Paper to create thin nets between IC pins. - What software was used to design the circuit boards?
Eagle Cadsoft was used to design the two separate PCBs for the user interface and the microcontroller. - Can the game be played without the joystick?
Yes, players can use either the joystick or the four tact switches to play 2048.