Summary of Getting Started With ESP-MESH and 8266 -8266
This article details an ESP-MESH project using NodeMCU (ESP8266) to interconnect devices for controlling appliances and monitoring environmental data. The system utilizes a self-organizing network where nodes relay data without a central router, supporting up to 87 nodes. It involves setting up Arduino IDE with specific libraries, configuring three distinct nodes with sensors and LEDs, and programming them to broadcast temperature/humidity data or respond to button inputs based on defined thresholds.
Parts used in the ESP-MESH Appliance Control Project:
- NodeMCU (ESP8266)
- DHT11 Sensor
- Yellow LED
- Green LED
- Red LED
- Push Button
- Arduino IDE
- DHT Library
- painlessMesh Library
- ArduinoJson Library
- TaskScheduler Library
- ESPAsyncTCP Library
Introduction
ESP-MESH is a networking protocol built on the top of the Wi-Fi protocol. ESP-MESH allows numerous devices (generally referred as nodes) spread over a large physical area to be interconnected under a single WLAN. ESP-MESH allows multiple nodes to communicate with each other under a single wireless local area network. It is supported on the ESP32 and ESP8266 boards. In this project, controlling appliances using NodeMCU (ESP8266) with ESP-MESH is explained.
What is Mesh Networking?
Mesh networking is a local network topology in which nodes are directly, dynamically and non-hierarchically connected to each other and cooperates with one another to efficiently route the data from/to clients. Mesh network supports auto-networking meaning when the user setup a mesh network, any node can scan access point and can connect easily. 87 nodes can be connected with a single router.
ESP – MESH Network Architecture
In this, the nodes don’t need to connect to a central node. Nodes are responsible for relaying each others transmissions. This allows multiple devices to spread over a large physical area. The nodes can self-organize and dynamically talk to each other to ensure that the packet reaches its final node destination. If any node is removed from the network, it is able to self-organize to make sure that the packets reach their destination. ESP-MESH network has much greater coverage area as nodes can achieve inter-connectivity without needing to be in range of the central node. Here, stations are NodeMCU’s.
Step 1: Arduino IDE
Firstly, install all the required libraries for Mesh n/w. In this, 5 libraies are required namely DHT, painlessMesh, ArduinoJson, TaskScheduler and ESPAsyncTCP.
To install the libraries. Open Arduino IDE > go to Tools > Manage Libraries
1. Install DHT sensor library
2. Install painlessmesh library
3. Install ArduinoJson library
4. Install TaskScheduler library
5. Install ESPAsyncTCP library
After installing all the libraries next step is to setup ESP-8266 for Arduino IDE
Step 2: ESP8266 Setup
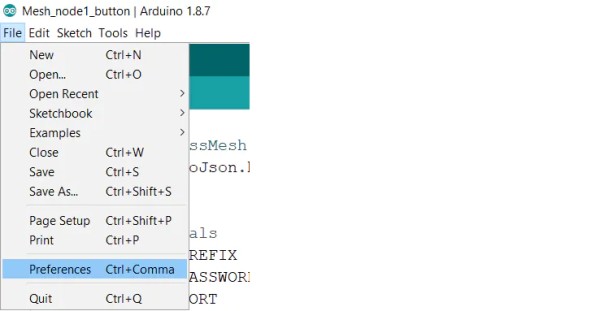
1. Open the Arduino IDE and go to File > Preferences
2. For adding ESP8266 Board manager use the URL as shown below :
http://arduino.esp8266.com/stable/package_esp8266com_index.json
3. For selecting the board go to Tools > Board > Board Manager and search for esp8266.
4. Once installed you will able to see the NodeMCU board in Tools > Board
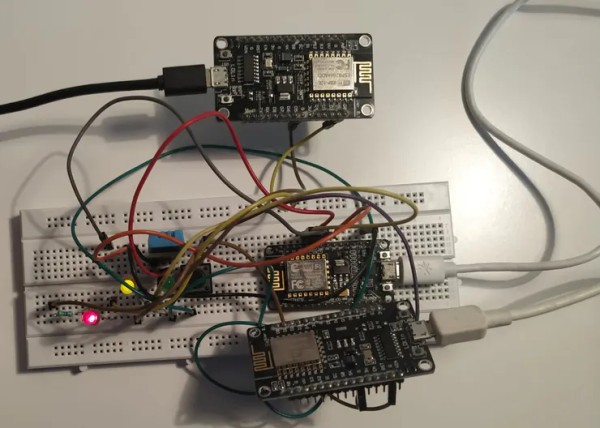
Step 3: Different Nodes Using NodeMCU8266
Node 1
It has a DHT11 sensor and 1 LED. It will send temperature and humidity data to Node2 and Node3.
Connections
DHT11 ==> NodeMCU
- Gnd ==> Gnd
- Vcc ==> 3V3
- Data ==> D4
YellowLED ==> NodeMCU
- +VE ==> D5
- -VE ==> GND
Node 2
It has 1 push button to control LED on the 1st Node and 1 LED to know data is sent.
Connections
Pushbutton ==> NodeMCU
- +VE ==> D4
- -VE ==> Gnd
GreenLED ==> NodeMCU
- +VE ==> D5
- -VE ==> Gnd
Node 3
It has one LED and it receive button state, temperature and humidity data from other nodes. The LED will glow if temperature or Humidity is more than certain threshold.
Connections
RedLED ==> NodeMCU
- +VE ==> D5
- -VE ==> Gnd
Step 4: Program
#define   MESH_PREFIX     "Meshname"
#define   MESH_PASSWORD   "meshpassword"
#define   MESH_PORT       5555 // default port
- The MESH_PREFIX is the name of the mesh. You can change it to whatever you like.
- The MESH_PASSWORD is the mesh password. You can change it to whatever you like.
- The MESH_PORT is the TCP port that you want the mesh server to run on. The default is 5555.
Note:- All nodes in the mesh should use the same MESH_PREFIX and MESH_PASSWORD.
Scheduler userScheduler;
This line creates a new Scheduler called userScheduler
painlessMesh mesh;
Create a painlessMesh object called mesh to handle the mesh network
Task taskSendMessage( TASK_SECOND * 1 , TASK_FOREVER, &sendMessage );
Create a task called taskSendMessage responsible for calling the sendMessage() function every second as long as the program is running.
The sendMessage() function sends the JSON string with the readings to all nodes in the network (broadcast).
DynamicJsonDocument doc(1024);
For sending values to the network using JSON. DynamicJsonDocument is used. We define an instance to use this with the size of the document.
doc["TEMP"] = t;<br>doc["HUM"] = h;
Then, store the values in two different doc variables as shown above.
String msg ;<br>serializeJson(doc, msg);
This doc data is then converted into a string using serializeJson() function.
mesh.sendBroadcast( msg );<br>taskSendMessage.setInterval((TASK_SECOND * 1, TASK_SECOND * 10));
After that, mesh.sendBroadcast() is used to send this message in the mesh network after a fixed interval.
void receivedCallback( uint32_t from, String &msg ) {<br>String json;
DynamicJsonDocument doc(1024);
json = msg.c_str();
DeserializationError error = deserializeJson(doc, json);
Whenever there will be a message in the network, receivedCallback() comes in the action. The receivedCallback() function prints the message sender (from) and the content of the message using msg.c_str(). As data is serialized in sending function, it must be de-serialized while receiving.
void newConnectionCallback(uint32_t nodeId) {<br>Serial.printf("--> startHere: New Connection, nodeId = %u\n", nodeId);
}
The newConnectionCallback() runs whenever a new node joins the network. This function prints the chip ID of the new node.
void changedConnectionCallback() {<br>Serial.printf("Changed connections\n");
}
The changedConnectionCallback() runs whenever a connection changes on the network that is when a node joins or leaves the network.
void nodeTimeAdjustedCallback(int32_t offset) {<br>Serial.printf("Adjusted time %u. Offset = %d\n", mesh.getNodeTime(), offset);
}
The nodeTimeAdjustedCallback() runs when the network adjusts the time, so that all nodes are synchronized.
mesh.setDebugMsgTypes( ERROR | STARTUP );<br>mesh.init( MESH_PREFIX, MESH_PASSWORD, &userScheduler, MESH_PORT );
- Here, debug function is used to get any error occurred while making a connection with the nodes.
- Initialize the mesh bypassing the SSID, password, port number and scheduler address
mesh.onReceive(&receivedCallback);
When a new node make connection this callback is called.
mesh.onNewConnection(&newConnectionCallback);
When there is a change in mesh topology this callback is called.
mesh.onChangedConnections(&changedConnectionCallback);
Local time is adjusted to synchronize it with mesh time.
mesh.onNodeTimeAdjusted(&nodeTimeAdjustedCallback);
In this, scheduler executes the task and send the appropriate message to nodes.
userScheduler.addTask( taskSendMessage );
The scheduler is responsible for handling and running the tasks at the right time.
taskSendMessage.enable();
Enable the taskSendMessage to start sending the messages to the mesh.
In Arduino IDE,
- first select the boardGo to Tools > Board > NodeMCU
- To upload the code to NodeMCU’s select the port
Go to Tools > Port > select the port
Source: Getting Started With ESP-MESH and ESP-8266
- What is ESP-MESH?
It is a networking protocol built on top of Wi-Fi that allows numerous devices to be interconnected under a single WLAN. - How many nodes can be connected with a single router?
Up to 87 nodes can be connected with a single router. - Can nodes connect to a central node in this architecture?
No, nodes do not need to connect to a central node; they are responsible for relaying each others transmissions. - Which five libraries are required for this project?
The required libraries are DHT, painlessMesh, ArduinoJson, TaskScheduler, and ESPAsyncTCP. - What is the default TCP port for the mesh server?
The default port is 5555. - Does every node need the same MESH_PREFIX and MESH_PASSWORD?
Yes, all nodes in the mesh should use the same MESH_PREFIX and MESH_PASSWORD. - What happens when a new node joins the network?
The newConnectionCallback function runs and prints the chip ID of the new node. - How does the Red LED on Node 3 behave?
The Red LED glows if the received temperature or humidity data exceeds a certain threshold. - What function is used to send JSON data to all nodes?
The mesh.sendBroadcast function is used to send the serialized JSON message to all nodes. - How is the board selected in Arduino IDE for this project?
You select the board by going to Tools > Board > NodeMCU.