
Who wouldn’t want Gandalf’s Magic Wizard Staff?
Turns out Gandalf had various staffs and either lost, broke or upgraded them frequently! This provides us with multiple staff designs and there are plenty of methods of constructing your own Magic Gandalf Staff depending upon your resources and skills.
In this Instructable, I will show you how I split the wood, made a removable extension, hid the electronics, and used FIMO clay to set the crystal onto the staff. A magic ring controls the audio and lighting of the staff as well as streaming audio to an external Bluetooth speaker for that ultimate crack of thunder !
What’s in a Magic Staff like Gandalf’s?
- Crystal – Every good Magic Staff needs a big crystal. (though not all Gandalf’s did)
- Light – Like, serious light. A job for a NeoPixel something.
- Sound – Kids said “YOU SHALL NOT PASS” and requested a thunder hack.
- Magic – Only works in your hands! Control crystal’s light with hidden switches.
The supplies for your Magic Staff will depend on a few things;
- Which steps you want to complete,
- which style of staff you use,
- and which specific components you prefer.
For an overview of this Instructable, check out the List of Steps after Supplies below.
Supplies
Crystal – See “Choosing a Crystal” in step 2
Staff – See “Choosing a Staff” in step 3
FIMO Clay. – See Hardening Clay in step 4
Electronics
- Basic Build Items
- 6 x or more magnetic Reed switches to make the magic happen.
- 2 x small Rare earth magnets – (1mm x 1mm) for power switch
- 1 x medium rare earth Magnets (1mm x 5 mm) for the ring(s)
- 1 x Pixel Ring to light up the crystal – 16 NeoPixel Ring.
- 1 x Rechargeable battery – 3.7v Li-Poly battery.
- 1 x Arduino compatible microcontroller – Pro Trinket 3 volt , (or Feather, Nano, Boron ).
- 1 x Battery Charging system – Li-Poly Backpack – ( sometimes integrated in board above).
- 3 x Transistors – 2N4401 NPN – (only 1 for basic build).
- 2 x Relays – HK23f 5vdc 1A – (only 1 for basic build).
- 4 x Resistors – (only 2 for basic build)
- Advanced Build Items
- 1 x LED Cluster (the insides of an LED flashlight)
- 1 x MP3 Sound Device – MusicMaker Featherwing, mp3 device or Thor’s Hammer.
- 1 x Blue Tooth Module – I used this one.
Electrical Tools and Consumables:
- Soldering Iron and solder
- Wire cutter and/or stripper
- Shrink tube for wire
- Wire – some different colours is handy, Ribbon cable is tidy.
- Needle nose pliers. (2 pairs is handy.)3rd and fourth hand. (Stand, magnifying and helper hands)
- Glue gun and glue sticks
Shop Tools and Consumables: (depending on staff construction Step XYZ)
- a vise, drill and drill bits
- some carving tools for digging into the wood
- Saws (hand and hacksaw)
- 2 part epoxy (love this stuff)
- propane soldering torch and solder- for staff extension
- scraps of metal, brass or nail for staff extension(see section XYZ for more info on staff construction)
Software
- Complete software is just below…
Step 1: Steps in This Instructable ( Table of Contents )
Getting started – Some people may use different materials, or not want sounds in their Magic Staff. So I have included notes and diagrams to cover variations wherever I can.
- List of Steps
- Choose a Crystal
- Choose a Staff – Link to section.
- Make Fake Branches
- Make the Ring
- Electronics Overview
- Arduino Setup
- Magic Buttons and Software
- NeoPixel Lighting
- Relays and Transistors as switches
- Battery, Charging and On/Off Switch
- Center Light aka LED Array
- Prep and Place Music Player
- Bluetooth streaming device
- Staff Construction Part 1
- Staff Construction Part 2 – Extension
- Prepare and place relays
- Prepare and place switches
- Tie Up Loose Ends
- Final Software notes.
Step 2: Choosing a Crystal
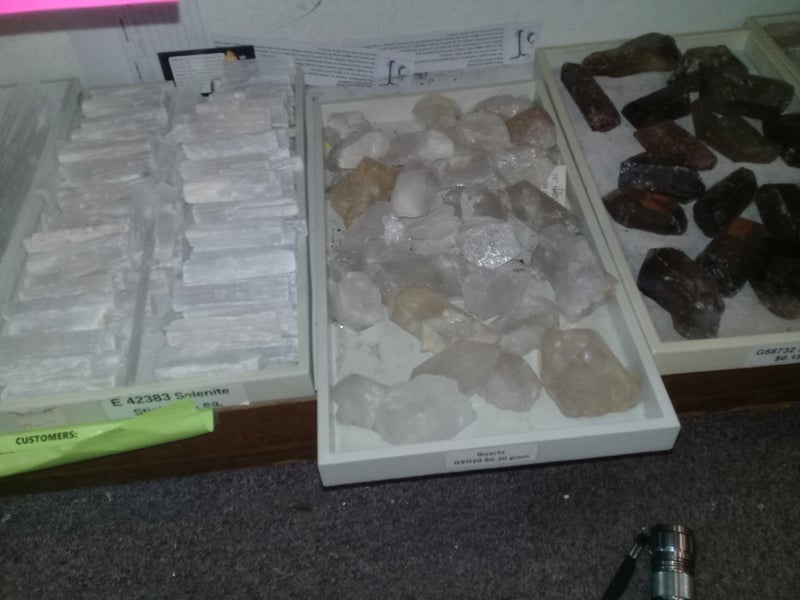
There are a multitude of types of crystals, and looking around the house I had some rose quartz pieces that looked fantastic with a flashlight shining through them, but they seemed too small. I had a rock salt light that I figured I could hack, but my wife would not have been very happy about that. A quick internet search for crystals resulted in too much choice and no feel for size and availability.
Find a store.
At your search engine, Use keywords like gems, rocks or crystals. Also add your local city
I typed: rocks gems Vancouver, turned up a fantastic rock and gem store (images).
Choosing the Crystal
I took a small flashlight and the 16-pixel NeoPixel ring with me to the store. I wanted a crystal around 4 inches and would let the light through in a pleasing way.
The NeoPixel ring will be covered with Fimo Bake Clay so exact fit is not super important.
Step 3: Choosing a Staff
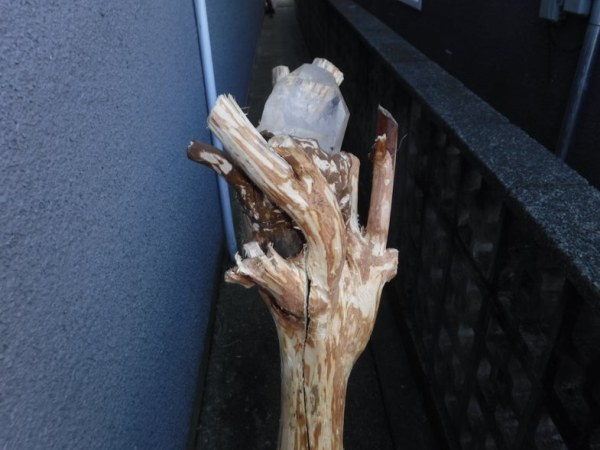
Choosing a Staff | Back to List of Steps
I decided to find a natural stick/sapling and eventually found a good candidate. But there are numerous ways to make your own Magic Gandalf Staff.
Here are some different methods and materials to make your staff.
- 3D print a Staff – Precise, detailed. ~~ But need a printer and drawing, size issues.
- Hack an existing staff – Cheap, re-use is good. ~~ have to find it, .
- Wrap a stick in foam/clay. – Easy to find/hide switches ~~ paint, artwork, durability.
- Use plastic pvc pipe. – Easy to find, cheap ~~ needs covering/artwork.
- Wooden Staff (stock lumber) – Cheap, easy to work, easy to split ~~ artwork, naturalization.
- Wooden Staff (natural) – Could be sweet, free ~~ harder to split, have to find.
Things to keep in mind when choosing a material for Wizard Staff.
- The staff needs a spot for light under your crystal.
- The staff will need to hold/hide the electronics.
- You will need to plug it in to recharge/reprogram it.
- You will need to hide switches for making the magic.
- Baking clay and 5 minute epoxy are your friend.
- Choose a construction method based on your resources and skills.
Step 4: Making Fake Branches to Fasten the Crystal and Electronics
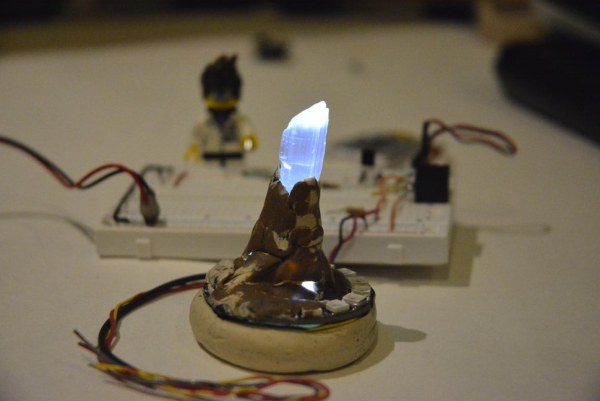
I used FIMO baking clay to fashion fake branches to cradle the crystal and hold the lighting components underneath. Although I originally forgot to photograph this part, I put together some images of a side branch and a light tower to show how I did it.
The tricky part here is, the staff is too big to fit in the oven, and it’s wood! There is also the impact of the heat on the crystal or electronics. To solve this, form the clay where needed, then carefully remove the clay, bake it separately , and epoxy it back into place. In the images, you will see how I made a mini crystal tower with an LED array and a pixel ring.
Once you have completed your electronics and staff preparation, some bake-able modeling clay will hold it all together.
Making fake wooden branches – look like peeled bark.
- Use dark FIMO clay to fashion the interior(filler) of the fake branch
- wrap that piece in a light colour,
- wrap those two with a brown (bark) colour.
- Then using a knife, carve away bits of the outer layer until it has the right look.
- Fashion the clay piece to fit onto staff
- Fashion the clay to hold the crystal
- Carefully separate the clay branch from crystal and staff
- Bake it at recommended temp and time
- Epoxy the crystal onto fake branch and epoxy onto staff
Hiding the Electronics –
- Follow above steps, and
- Be sure you can separate clay from electronics for baking
- Leave holes for pulling out wires before baking
- I sliced my clay branch in half, wrapped the crystal and then formed it on top of the LED array.
Step 5: The Magic Ring
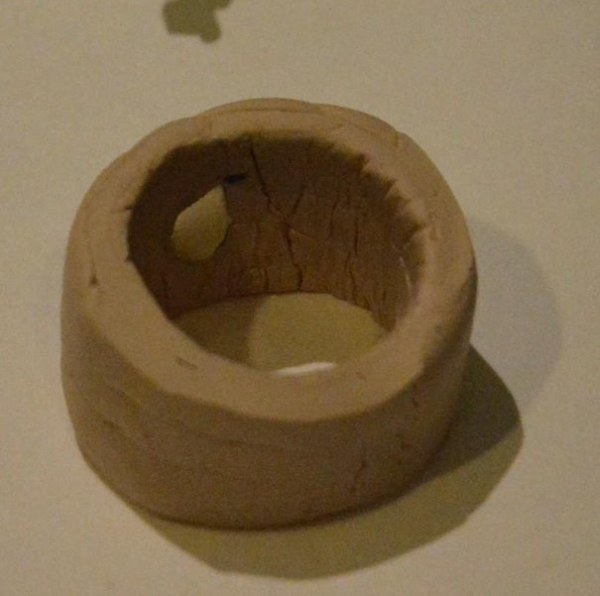
The idea is to have a magnet under your hand so when you pass your hand over a hidden switch, something magical happens.
I went super easy route and used FIMO.
- rolled out some FIMO
- sandwiched the magnet between 2 layers.*
- trimmed to width and length
- joined the ends to make loop
- baked at recommended settings.
* This is where we use a bigger magnet. It will need to trigger the reed switch through the wood.
There are lots of other great materials and methods to make your magic ring.
- Wood
- Metal
- Plastic (3D printed would be wicked)
- Under your skin ( like special effects skin)
Step 6: Electronics – Overview
Inside the staff we will have a 3.7 volt rechargeable battery connected to a charging and switching circuit (power On/Off) that will power the Pro Trinket. The Pro Trinket will respond to various click events from 4 hidden magnetic switches. The Pro Trinket will control the Neopixel ring, Flashlight LEDs, MP3 Sounds and the Bluetooth module.
Depending on the build you choose, testing and placing of components will likely occur differently. It is a good idea to rough wire and test components before permanently placing into your staff.
I have tried to break down the electronics parts of the build into sections, hoping to help everyone build their personal version of Gandalf’s Magic Staff.
Basic Magic Staff (Steps 7-11 below)
- Arduino controller to monitor inputs and control devices. (step 7)
- Software Libraries Needed: NeoPixel, OneButton. (step 7)
- Using switches – Multiple click events using OneButton. (step 8)
- Reed Switches – The magic is in the magnetic switches. (step 8)
- NeoPixel – Lights the crystal with thousands of colours. (step 9)
- Relay, Transistor, flyback Diode – Isolates power from Arduino (step 10)
- Battery with a charging system – Keeps the magic going. (step 11)
Uber Light (Step 12 below)
- LED Array(flashlight),
- Relay, Transistor, flyback Diode.
MP3 Sound (Step 13 below)
- Featherwing, speaker
- Libraries needed: MusicMaker
BlueTooth Sound Broadcasting (Step 14 below)
- Bluetooth Module
- Transistor
Step 7: Arduino Setup

Having some experience with the Arduino IDE and coding will make this easier. However, I have added as many links and references as I can.
Arduino Setup – If you are not already handy with the Arduino IDE,
Libraries/Examples – These are needed for the sparkles and magic of the Gandalf Staff..
- NeoPixel Library The magic of the lights
- NeoPixel examples. – from Instructables
- Multi-Tasking Arduino – Using neopixels outside the loop()
- OneButtonLibrary – Get the most out of buttons with click events
- OneButtonLibrary Details – Excellent samples and description.
- MusicMaker Library – Adafruit’s library for VS1053
Software samples
- Test button Library see step ___
- Test Neopixel – See Step ___
- Test Musicmaker – See Step ___
- The whole code is just below as a text file. Download, Open, Cut_and_Paste into Arduio IDE
Step 8: Magic Is in the Buttons and the Software
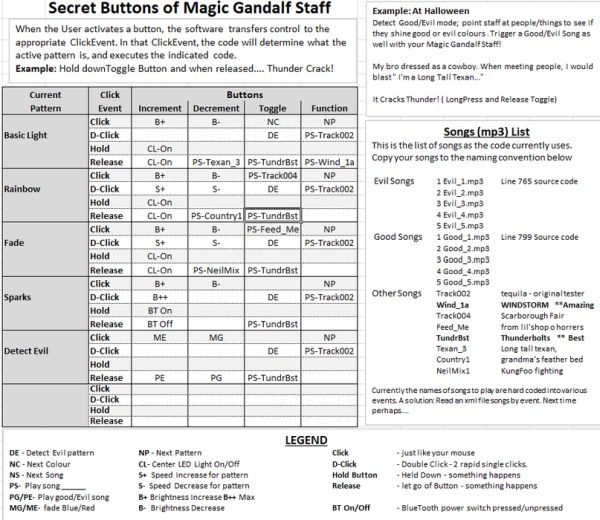
Ultimately the Magic of my Gandalf Staff comes down to moving a magnet across hidden momentary switches(buttons) connected to a ProTrinket. The sound, LED array and NeoPixel are controlled by the ProTrinket depending on the current pattern, the button clicked and how it was clicked.
The software defines several “Patterns” and there are 4 buttons, each with various click events as illustrated in the diagram above.
Patterns
- Solid Colour – This is one of thousands of colours at a certain brightness
- Swirling Rainbow pattern – ROYGBIV across pixels
- Larson Scanner – old school Cylon or Kitt style Larson Scanner
- Flickering Stars – twinkly random lights
- Fade – Al pixels one colour and fade through ROYGBIV
- Detect Evil – Switch the crystals colour from red to blue magically
- other
Examples – see chart above
- Single-Click the Function button in ANY pattern, and code will activate the next pattern.
- Hold the Increment button in Sparks pattern sends power the BlueTooth switch.
- Hold the Increment button in a non-Sparks pattern switches Center Light Off.
- Release the Toggle button in a Any pattern switches Cracks Thunder (code snippet below)
- –
void btn_Toggle_longPressStop()   // Line 1078 of code
{
   // fire thunder
    musicPlayer.stopPlaying();
    musicPlayer.setVolume(1,1);                           // crank it up.
    musicPlayer.startPlayingFile("/tundrBst.mp3");

} //
Below is the Full Source Code, Click Event Chart and Fritzing for my hardware build.
Source: Gandalf’s Magic Staff