Summary of ESP32 TTGO WiFi Signal Strength
This tutorial demonstrates how to display WiFi network signal strength using an ESP32 TTGO board and the Visuino software. The project involves configuring WiFi credentials, setting up the display orientation, and creating visual elements like text fields and dynamic rectangles to represent signal levels. By connecting various components such as pulse generators and value converters, the system updates the screen in real-time upon power-up.
Parts used in the ESP32 TTGO WiFi Signal Strength Project:
- TTGO ESP32
- Visuino program
- Pulse Generator component
- Add Analog Value component
- Analog To Integer component
- Text Field element
- Draw Rectangle element
- Draw Text element

In this tutorial we will learn how to display a WiFi network signal strength using ESP32 TTGO board.
Watch the video!
Step 1: What You Will Need
- TTGO ESP32
- WiFi connection
- Visuino program: Download Visuino
Step 2: Start Visuino, and Select the Arduino TTGO T-Display ESP32 Board Type
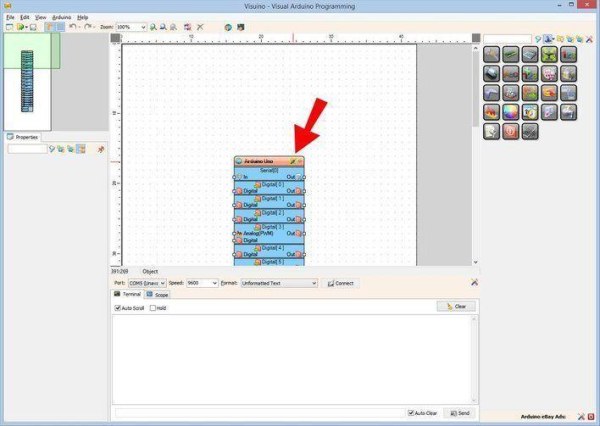
The Visuino: https://www.visuino.eu needs to be installed. Start Visuino as shown in the first picture Click on the “Tools” button on the Arduino component (Picture 1) in Visuino When the dialog appears, select “TTGO T-Display ESP32” as shown on Picture 2
Step 3: In Visuino Set WiFi
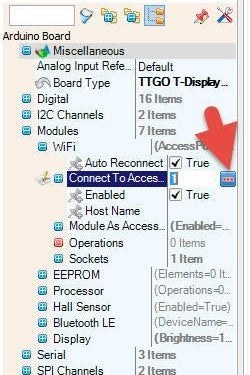
- Select TTGO T-Display ESP32 board and in the properties window expand “Modules>WiFi>Connect To Access Points
- Click on the Connect To Access Points 3 Dots
- In the AccessPoints window drag “WiFi Access Point” to the left side
- In the properties window set SSID (name of your WiFi hotspot or router)In the properties window set Password (password of your WiFi hotspot or router)
- Close AccessPoints window
- Select TTGO T-Display ESP32 board and in the properties window expand “Modules” > “WiFi” > “Operations” and click on the 3 dots button
- .In “Operations” window drag “WiFi Signal Strength” to the left side
- Close the “Operations” window
Step 4: In Visuino Set Display
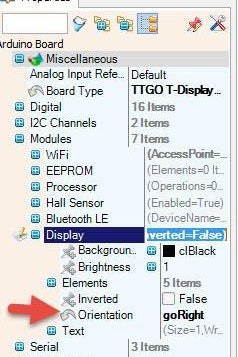
- Select TTGO T-Display ESP32 board and in the properties window expand “Modules>Display>Orientation
- Set Orientation to:goRight
- Select TTGO T-Display ESP32 board and in the properties window expand “Modules>Display>Elements
- Click on the Elements 3 Dots
In the Elements window:
Drag “Text Field” to the left side and in the properties window set size to 2, X to 138, Y to 60
Drag “Draw Rectangle” to the left side and in the properties window set size to 2, X to 30, Y to 60, height to 40, color to aclDodgerBlue, Fill Color to aclDodgerBlue and select width and click on the pin icon and select Float Sink Pin
Drag another Drag “Draw Rectangle” to the left side and in the properties window set size to 2, X to 28, Y to 47, height to 45,width to 105, Fill Color to aclBlack
Drag “Draw Text” to the left side and in the properties window set Color to aclAzure, Size to 2, Text to “WiFi Signal”, X to 30
Close the elements window
Step 5: In Visuino Add Components
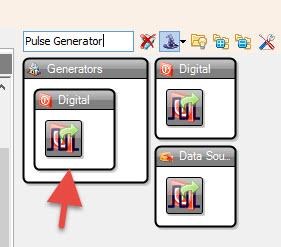
- Add “Pulse Generator” component
- Add “Add Analog Value” component
Now select “AddValue1” and in the properties window set value to 100 - Add “Analog To Integer” component
Step 6: In Visuino Connect Components
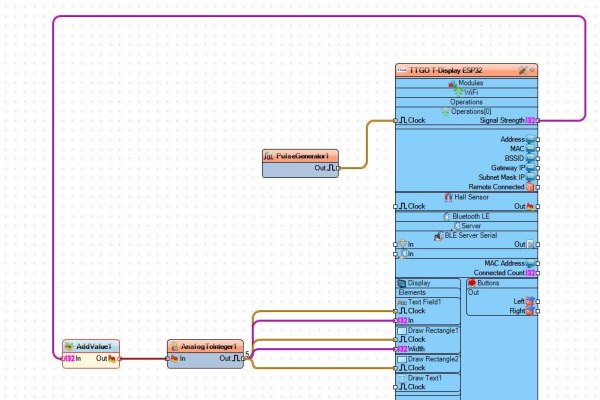
- Connect PulseGenerator1 pin Out to TTGO T-Display ESP32 > Operations[0] pin Clock
- Connect TTGO T-Display ESP32 > Operations[0] pin Signal Strength to AddValue1 pin In
- Connect “AddValue1” pin Out t AnalogToInteger1 pin In
IMPORTANT: Connect the Following in the exact Order
- Connect AnalogToInteger1 pin Out to TTGO T-Display ESP32 > Display > Text Field1 pin In
- Connect AnalogToInteger1 pin Out to TTGO T-Display ESP32 > Display > Text Field1 pin Clock
- Connect AnalogToInteger1 pin Out to TTGO T-Display ESP32 > Display > Draw Rectangle2 pin Clock
- Connect AnalogToInteger1 pin Out to TTGO T-Display ESP32 > Display > Draw Rectangle1 pin Width
- Connect AnalogToInteger1 pin Out to TTGO T-Display ESP32 > Display > Draw Rectangle1 pin Clock
Step 7: Generate, Compile, and Upload the Code
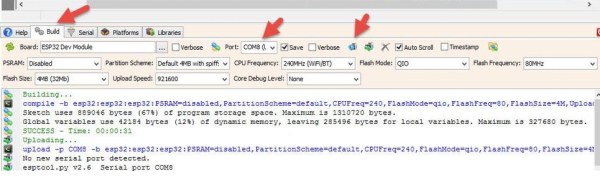
In Visuino, at the bottom click on the “Build” Tab, make sure the correct port is selected, then click on the “Compile/Build and Upload” button.
Step 8: Play
If you power the TTGO ESP32 module it will connect to the network and display the WiFi Signal strength.
Congratulations! You have completed your project with Visuino. Also attached is the Visuino project, that I created for this Instructable, you can download it and open it in Visuino: https://www.visuino.eu
Source: ESP32 TTGO WiFi Signal Strength
-
What is the primary goal of this tutorial?
The goal is to learn how to display a WiFi network signal strength using an ESP32 TTGO board. -
How do you select the correct board type in Visuino?
You click the Tools button on the Arduino component and select TTGO T-Display ESP32 from the dialog. -
Where do you set the WiFi SSID and Password?
You expand Modules, then WiFi, then Connect To Access Points, drag WiFi Access Point to the left, and set the details in the properties window. -
How is the display orientation configured?
In the properties window under Modules and Display, set the Orientation to goRight. -
Which components are added to process the signal data?
The project adds a Pulse Generator, Add Analog Value, and Analog To Integer components. -
What is the specific connection order for the AnalogToInteger1 pin Out?
It must connect to Display Text Field1 In, Display Text Field1 Clock, Draw Rectangle2 Clock, Draw Rectangle1 Width, and Draw Rectangle1 Clock in that exact order. -
How do you finalize and run the code?
Select the Build tab, ensure the correct port is chosen, and click Compile/Build and Upload. -
Can I download the project file used in the tutorial?
Yes, the Visuino project file created for this article can be downloaded from the provided link.