Summary of ESP32 CAM WEB Server and Getting Started Guide
This article guides users in setting up an ESP32 CAM web server to stream live video via a web application. It covers hardware requirements, Arduino IDE configuration, wiring with an FTDI module, and flashing the CameraWebServer sketch. The project enables real-time monitoring using the AI-Thinker camera model and requires a stable Wi-Fi connection.
Parts used in the ESP32 CAM Webserver:
- Breadboard
- ESP32 CAM
- FTDI Module
- Wires
- WIFI Connection
This Instructables is all about setting up ESP32 CAM Webserver.
The goal here is to connect ESP32 CAM with FTDI Module and program it with the CAM WEB SERVER sketch which will allow us to monitor the camera feed via a web app.
The Next Level of this project is to make a ROCK SOLID WIFI SECURITY CAMERA!
which is coming soon.
Watch the video-
Supplies
These are the things that you will need for this built/setup
- Breadboard
- ESP32 CAM
- FTDI Module
- Wires
- WIFI Connection
Step 1: ESP32 CAM INTRO
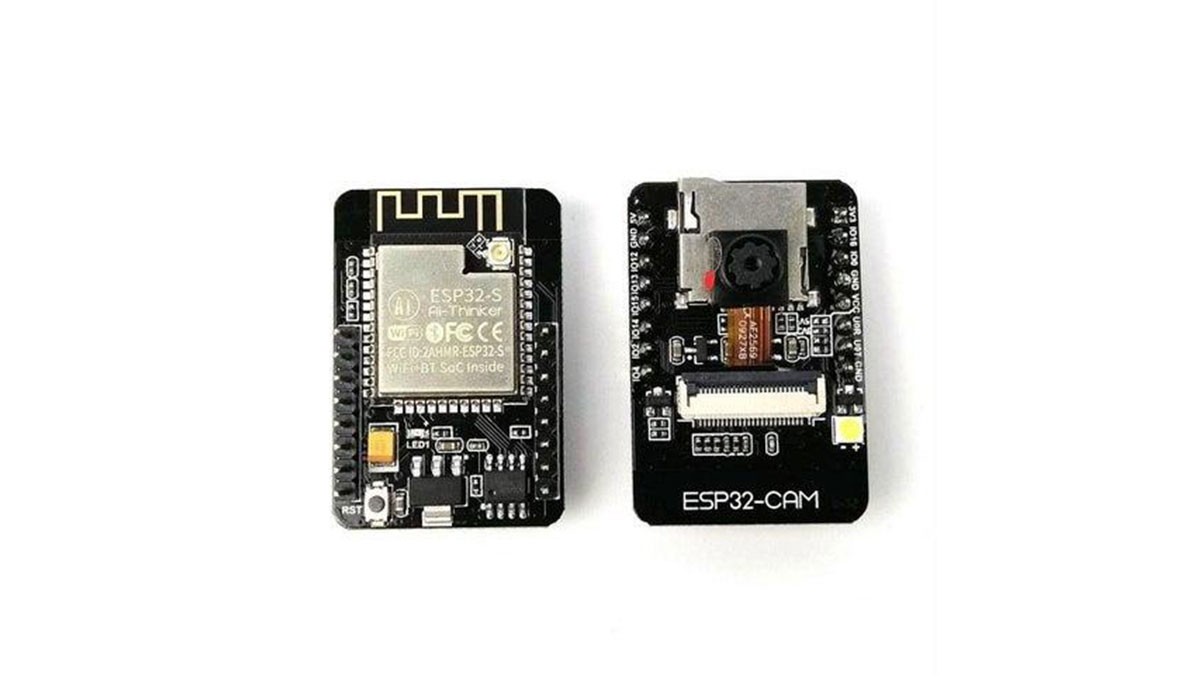
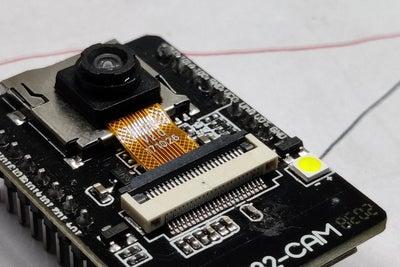
The ESP32 CAM is Basically an ESP32 without a CP2102 Chip. Instead, it is equipped with a 2MP OV2640 camera module and an SD Card Reader on the bottom side of the board.
Also, the camera module is switchable, which means we can upgrade this camera from 2MP to 5MP or Higher.
It cost around 10$ which is a pretty sweet price tag for such a capable Microcontroller.
The WIFI module used in this Version is ESP-32S which has a built-in 32Mbit of Flash and 512KB Internal plus external 4M PSRAM.
It has 9 IO Ports and its default baud rate is 115200bps. Also, it’s five volts tolerance which means we can hook it up with an external 5V Charger setup but a voltage above 5V will kill the module.
Its specs are somewhat similar to generic ESP32 so I won’t be listing the whole spec chart.
Step 2: Installing ESP32 Boards for Arduino IDE
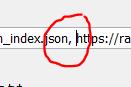
For Installing Third parties Dev Board on Arduino IDE, we have to copy their JSON URL which in our case is this- https://dl.espressif.com/dl/package_esp32_index.json
- copy the above URL and paste it in the additional board manager URL which is in the Preferences of Arduino IDE.
(If you already have other dev board URL in the additional board manager, you can put a comma in between two URLs)
- After putting the URL, open the board manager and search ESP32 in, and then download the ESP32 Board package.
- After doing all this, you need to Restart the Arduino IDE and the new ESP32 Board will appear in the board manager menu.
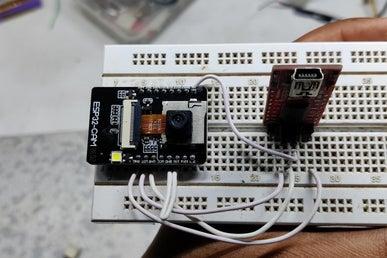
Step 3: Connecting the FTDI With ESP32 CAM/Wiring
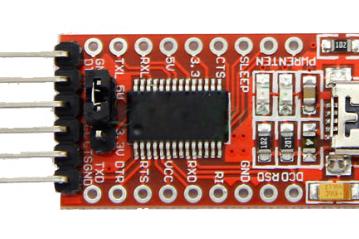
ESP32 CAM doesn’t have an onboard programming chip which is a bummer, because of this we have to add an external USB to Serial Programming module.
For That, I will be using this USB to Serial module. This Module is based around the FTDI FT232 chip. you can use other serial converters as well, wiring will remain the same for them as we only have to connect TX and RX with the ESP32.
- Set FTDI output to 5V
- Connect the FTDI’s VCC (which is 5V) to 5V of ESP32 CAM
- GND to GND
- RX to U0T
- TX to U0R
- GPIO0 which is IO0 to GND (this will put the ESP32 CAM in Flash Mode)
Step 4: Flashing the ESP32
Before Flashing Process, you need to change few things in the example sketch.
- Go to Example> ESP32> Camera and open the CameraWebServer sketch
- Input your SSID and password
- Change the camera module from #define CAMERA_MODEL_WROVER_KIT to #define CAMERA_MODEL_AI_THINKER
- Now, Go to Tools and select the right board which is in our case AI-Thinker ESP32-CAM.
- Select the right port and hit upload.
Now, when the ESP32 Starts its uploading process you will see the connecting message with dots and dashes. press the reset button on the bottom side of the board which dots and dashes start.
If you have encountered an error during this setup that says unable to connect, this means your timing was not good, try again and when the first dot appears in the debugging menu, long-press the reset button for at least 1 second. After few seconds, your sketch will be uploaded.
- now plug out the USB from FTDI Module and remove the jumper between GPIO0 and GND.
- Plug in the USB and open up the serial monitor.
- ESP32 will get connected with WIFI (which would take 1min) and you will see the IP address of the ESP32 CAM.
Step 5: RESULT
I copied the IP Address of the board from the serial monitor and open it up in chrome and you will see the live video which is being streamed by ESP32 CAM.
Video-
Source: ESP32 CAM WEB Server and Getting Started Guide
- How do I install ESP32 boards for Arduino IDE?
Copy the JSON URL from espressif.com into the additional board manager URLs in Preferences, then download the package via the Board Manager. - Can I use other serial converters instead of FTDI?
Yes, you can use other serial converters as long as you connect TX and RX correctly. - What is the default baud rate of the ESP32 CAM?
The default baud rate is 115200bps. - Does the ESP32 CAM support 5V tolerance?
Yes, it has five volts tolerance, but voltage above 5V will kill the module. - Which camera model definition should I change in the sketch?
You must change the definition from CAMERA_MODEL_WROVER_KIT to CAMERA_MODEL_AI_THINKER. - What should I do if the upload process fails?
If unable to connect, try again and when the first dot appears, long-press the reset button for at least one second. - How do I put the ESP32 CAM in Flash Mode?
Connect GPIO0 (IO0) to GND to put the board in Flash Mode. - Where can I find the IP address after uploading?
The IP address appears in the serial monitor after the board connects to Wi-Fi.