
Summary of Use A Simple Cheap Webcam To Make DIY Microscope
Summary: A cheap USB webcam is converted into a DIY microscope by removing and inverting its lens, adding brighter illumination (a flashlight), and mounting it in a laser-cut stage. Focus is automated using an Arduino-controlled 9g micro servo to adjust specimen distance. The build follows Hackteria DIY microscopy designs and uses common webcam software for viewing. Target duration four days; suitable for all ages.
Parts used in the DIY Microscope:
- USB webcam with adjustable focus lens
- Flashlight (bright illumination)
- White LEDs (initially used)
- Laser-cut DIY microscope kit parts (Hackteria design)
- Arduino Uno
- Turnigy TG9e 9g micro servo
- Hot glue (or laser-cut servo holder)
- Computer or laptop with webcam software (VLC, AMCap, macam, guvcview, etc.)
- Laser cutter (for cutting stage parts)
- Tools for disassembly (screwdriver, pliers)
http://www.afrimakers.org/
Introduction
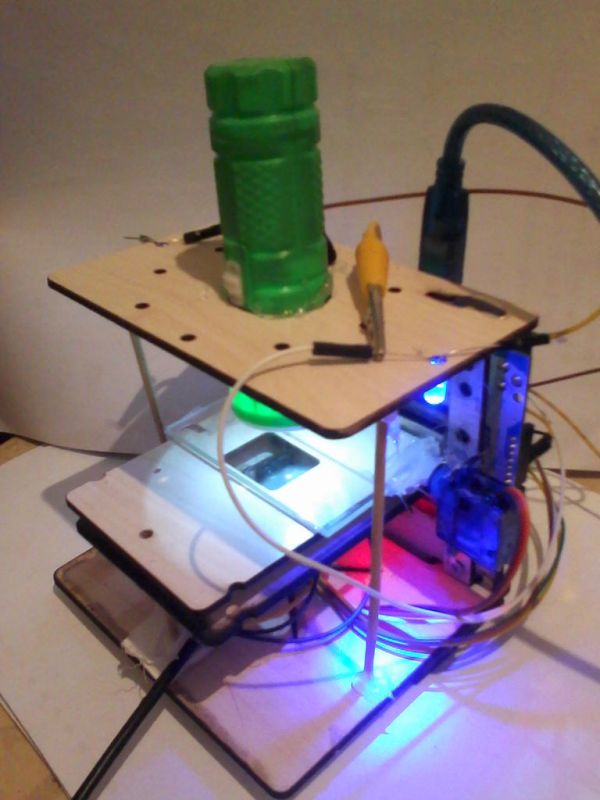
We used a simple cheap webcam to make a microscope. In short, a small hack to the optics of a standard webcam with an adjustable focus-lens, allows to create video data, with a magnification of around 100 to 400x (depending on the model) at a working distance of a few mm. The highest magnifications can be achieved by inverting (putting upside down) the lens. We used white LEDs at first but the picture wasn’t clear enough ,so we used A Flash Light for brighter and more clear view.
It’s Based On The DIY Microscope Here : http://hackteria.org/wiki/index.php/DIY_microscopy
Step 1: Objective
 Duration
4 DayTargeted age group
all
Step 2: Get A Webcam
Step 3: Disassemble The Webcam : Step 1
Step 4:
After you open it , make sure not to unplug or cut any wires . Make sure that you remove any screws attached to the webcam’s circuit.
Step 5:
Now You have got yourself your own microscope camera but still not yet ready to view Micro-stuff. Make sure that you don’t cut any wires while moving the circuit so the microscope works fine with no problems.
Step 6: Remove Webcam’s Lens
Step 7: Invert The Lens
Step 8: Webcam Test
Step 9: DIY Microscope Design : 3D Modeling
Step 10: Design Assembly
You can Watch A Short Animation Video For Assembly Here
Step 11: Laser Cutting
While Laser Cutting The DIY Microscope Parts Download PDF Cut File Here : () You can Import the pdf in any vector program like Inkscape , CorelDraw,….etc. Also There’s A Picture Of Top Part (Flash Light Holder)
Step 12: Arduino Focus Adjustment : Step 1
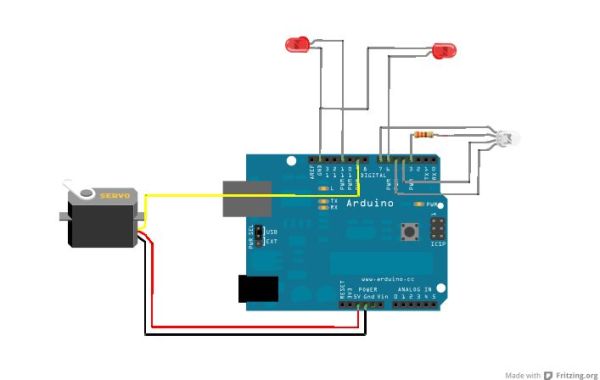
We used (Turnigy TG9e 9g / 1.5kg / 0.10sec Eco Micro Servo) To Control The Distance between the slide that we want to see under the Microscope and the webcam. Fix the Micro Servo at one side of the microscope kit using Hot Glue or you can laser cut a small holder for the motor if you want. The Micro Servo Motor can be controlled using Arduino Uno.
For more detail: Use A Simple Cheap Webcam To Make DIY Microscope
- How is magnification achieved with the webcam microscope?
By inverting the webcam lens and using the camera close to the specimen, achieving around 100 to 400x magnification depending on the model. - Can I use the webcam without modifying the lens?
No, the project requires removing and inverting the webcam lens to function as a microscope. - What lighting was found to work best?
A flashlight provided brighter and clearer views than the initially used white LEDs. - How is focus adjusted in this DIY microscope?
Focus is controlled by a micro servo (Turnigy TG9e 9g) driven by an Arduino Uno to change the distance between the slide and the webcam. - Do I need a laser cutter for this project?
The design uses laser-cut parts based on the Hackteria kit, so a laser cutter was used to produce the stage parts. - What software can I use to view the webcam microscope feed?
Any webcam software such as VLC, AMCap, macam, or guvcview can be used to view the feed. - Is this project suitable for all ages?
Yes, the targeted age group for the project is all ages. - How long does the project take?
The project duration is listed as 4 days.