You always wanted to be a Disc-Jockey. You know nothing about beats, delays or mixing but, damn, scratching is like the coolest thing ever invented!
If this is also your case, follow this instructable to build a low-fi DJ set: the DIY Turntable as featured on Gizmodo and Engadget, and take the chance to recycle your old cassette player into a new cool instrument.
Step 1: Materials
Minimum:
– Cassette player (better if it’s an old one)
– Wire and wire strippers
– Prototyping breadboard
– Soldering iron + solder
– Screwdriver
– 5 to 9V battery with battery holder
– Some kind of variable resistor or potentiometer
Advanced:
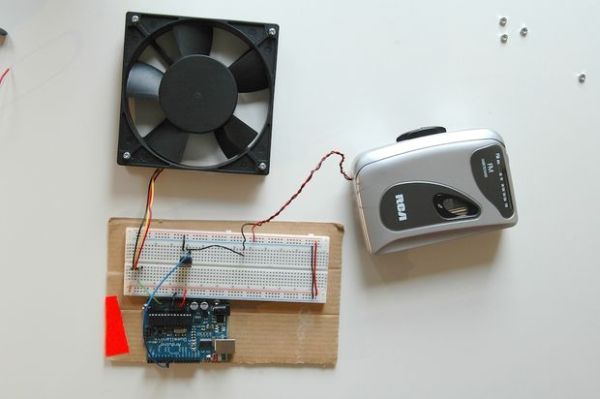
– Arduino with its USB cable
– IRF540 Mosfet (transistor)
– 5 LEDs
– 5 220ohm resistors (brown-red-red)
– one 1kohm resistor (red-black-brown)
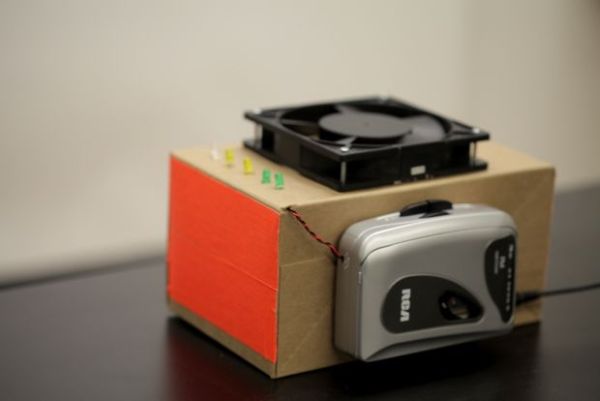
– Computer cooling fan
– Box or some kind of enclosure
This project is divided in two parts. By doing only the basics you’ll be able to control the speed of the music without even having to touch an Arduino or write a line of code. Almost zero budget and quite fun.
If you decide to follow to the advanced part, you’ll be able to have the pc fan act as a turntable (although it won’t be real scratching because the gears of the walkman won’t let you play backwards). You’ll have total control over the speed of the music and will add whatever effects you like, like the LED indicator.
Step 2: Walkman hacking
The core of this project is the following: In a cassette player, there’s a small DC motor that spins the tape. It’s powered by a battery that provides a constant voltage. Our goal is to supply our own voltage to the motor: higher than the battery to speed up the song or lower to slow it down.
Opening
Start by taking off the battery. Unscrew all the screws on the back case and inside the battery place and remove the case. Do it carefully because some parts like the volume gear are loose and you may have to place them again. Take a picture or remember where everything is.
The tricky part
Once you see the guts of your old player, you’ll have to find the two wires (red and black) that provide voltage and ground to the small, round-shaped DC motor that will usually be on the right side. If you’re lucky you’ll see the points where they are soldered, otherwise you’ll have to cut them
For more detail: DIY Turntable