
Summary of Cutting Mylar Solder Stencils from ExpressPCB and EagleCAD Files
This post explains how to cut mylar solder stencils on a CO2 laser cutter from ExpressPCB and EagleCAD designs, using stacked mylar sheets (one working sheet plus a sacrificial sheet) and tuned laser settings to cut through the top sheet but not fully through the bottom. It covers required software and tools, exporting tcream/bcream layers or DXF files, and warns that this method suits 0603/0805 parts rather than ultra-fine-pitch stencils.
Parts used in the Cutting Mylar Solder Stencils project:
- ExpressPCB or EagleCAD software
- ViewMate Gerber viewing software
- PDF printing software (e.g., PDFCreator)
- SketchUp, AutoCAD, or other DXF editor
- CO2 laser cutter (Full Spectrum 120W mentioned)
- Mylar sheets (5 mil)
- Two-sheet stacking method (working mylar sheet and sacrificial mylar sheet)
In this post I’ll be going over how to cut out solder stencils for both ExpressPCB and EagleCAD designs on a laser cutter. I recently had a need to create some stencils from both of these programs and spent quite a bit of time at the Dallas Makerspace working with their laser cutter to get the settings just right. I’ll be cutting some designs that are mostly 0603/0805 package sizes, so don’t expect ultra-tight pitch stencils from this technique!
What You’ll Need
- ExpressPCB or EagleCAD Software (If you’re doing any sort of serious PCB fabrication, or design really, then please stick to EagleCAD/Altium/OrCAD)
- ViewMate Gerber Viewing Software
- PDF Printing Software (such as PDFCreator)
- SketchUp, AutoCAD, or some other program that can view and edit .dxf files
- Laser Cutter – The one at the space is a Full Spectrum 120W CO2 model.
- Mylar Sheets (I used 5 mil sheets purchased via Amazon)
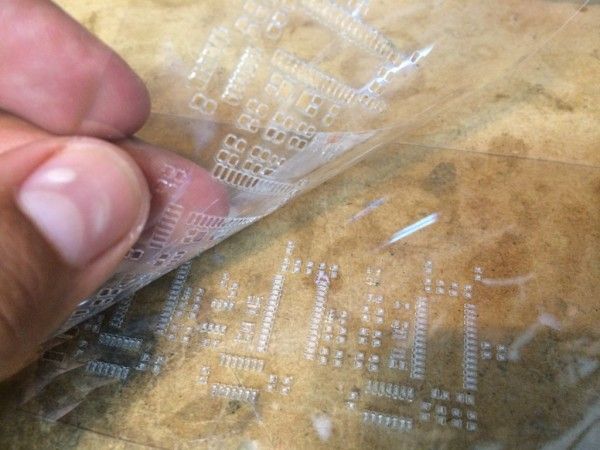
The technique that I chose to cut these stencils is to use two sheets stacked on each other to create the stencil. The first sheet is your actual stencil, and the second is a sacrificial sheet which will catch the melted pads of the first sheet and allow you to pull them off cleanly when you separate them. The trick here is to expose the mylar to just enough heat so that the first sheet cuts clear through, but the second doesn’t. You also don’t want to apply too much heat since that will cause small sections of the mylar to melt.
Exporting Files From PCB Design Software
The first step in the process is to export your design from your CAD software. If using EagleCAD, use the cam file here to export your top and bottom cream layers (aptly named tcream and bcream) just as if you were exporting gerbers for manufacturing. If using ExpressPCB, use the “Export DXF Mechanical Drawing” option under the File menu.
For more detail: Cutting Mylar Solder Stencils from ExpressPCB and EagleCAD Files
- What is the basic technique for cutting mylar solder stencils on a laser cutter?
Stack two mylar sheets, cut so the laser goes through the top sheet but not fully through the bottom sacrificial sheet, then separate sheets to pull melted pads off cleanly. - Which PCB design software does the article recommend for serious PCB work?
EagleCAD, Altium, or OrCAD are recommended for serious PCB fabrication or design. - How do you export stencil layers from EagleCAD?
Use the provided cam file to export the top and bottom cream layers named tcream and bcream as if exporting gerbers for manufacturing. - How do you export designs from ExpressPCB for laser cutting?
Use the Export DXF Mechanical Drawing option under the File menu in ExpressPCB. - What software is suggested to view gerbers before cutting?
ViewMate Gerber viewing software is suggested. - What thickness of mylar was used in the project?
Five mil mylar sheets were used. - What laser cutter model was used at the makerspace?
A Full Spectrum 120W CO2 model was used. - Is this method suitable for ultra-fine pitch stencils?
No, the method is intended for mostly 0603/0805 package sizes and not for ultra-tight pitch stencils.
