
Summary of CustomKeys using an Arduino
CustomKeys is a polyphonic, Arduino-based synthesizer using capacitive touch sensing. Users can select an 8-note scale and customize the body design using provided laser templates or creative materials like card stock. The project includes optional amplifier circuitry for louder output and relies on conductive keys to trigger tones via an Arduino Uno.
Parts used in CustomKeys Synthesizer:
- Arduino Uno
- CustomKeys library
- Conductive material keys (e.g., paperclips)
- Card stock paper
- Soldering iron
- Boxcutter or x-acto knife
- Stick glue
- Wire clippers and strippers
- Male header pins
- Electrical wire
- USB cable
- Breadboard
- 8 Ohm speaker
- Birch board (optional for laser cutter)
- n-type MOSFET (IRF9530) for amplifier
- Resistors (100 Ohm and 1.2K Ohm)
- .47uF film capacitor
- 220 uF electrolytic capacitor
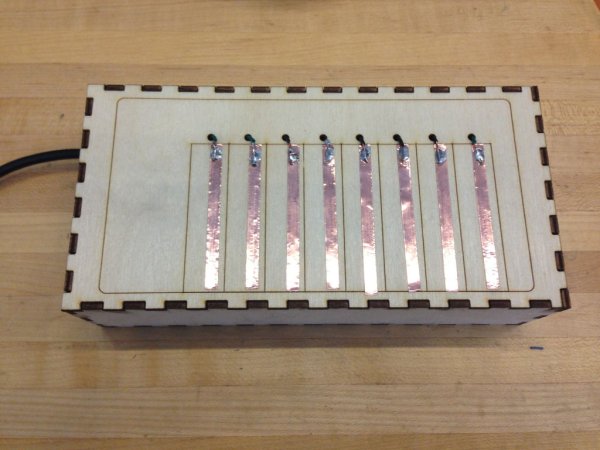
CustomKeys is a customizable, Arduino-based, polyphonic synthesizer. The CustomKeys keyboard uses capacitive touch sensing – each key is made of a conductive material which, when touched, signals the synthesizer to emit a tone from the speaker. The CustomKeys library allows the user to choose an 8-note musical scale for the keys. Furthermore, users have a creative choice on the body design of their CustomKeys synth – users can use a provided laser cutter template or use any other material long as the basic requirements for the system to function are met.
Special thanks to:
– Joe Marshall, whose code for the Arduino Octosynth (http://www.cs.nott.ac.uk/~jqm/?p=605) is the basis of the CustomKeys library
– Instructables user blinkyblinky for documenting how to assemble the Arduino Octosynth http://www.instructables.com/id/The-Arduino-OctoSynth/
– Jumper cables (preferable to wires, but wires work just fine)You may find that the output sound is too quiet with the speaker alone.
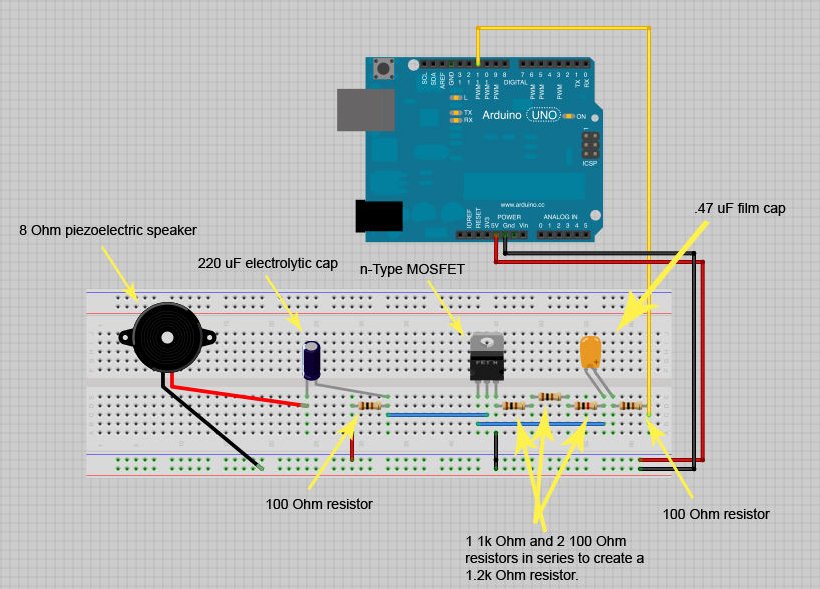
In this case, you may want to build an amplifier circuit. Here are the parts you will need:
– An n-type MOSFET (I used an IRF9530)
– Two 100 Ohm resistors
– A 1.2K Ohm resistor
– A .47uF film capacitor
– A 220 uF electrolytic capacitor*Part of the box template was made with Rahul Bhargava’s BoxMaker http://boxmaker.rahulbotics.com/
 box_template.pdf65 KB
 CustomKeys_library_051513.zip
Step 2: Keyboard Assembly (Without Laser Cutter Template)
If you’re using the laser cutter template, please skip to step 4.
Make a cool keyboard design using the colorful pieces of card stock. I like to fold my paper in half along the short edge, then along the long edge. Then, while it’s still folded, I cut my paper down the fold I made along the short edge (refer to the images for clarification). This yields two greeting card shaped pieces of paper. I only use one of them. Next, I take another color of cardstock, cut little rectangular shapes for the keys, and glue them onto one side of the card shaped paper (refer to the images).
Feel free to be creative with this part. Make a monster, a garden of flowers, or an original creation with card stock shapes. Try to make a design that will look nice with the conductive items that you will use for keys. **The folded part of the card shaped paper will be the top of the synth, so please plan your design accordingly. **
Materials
You Will Need:
– The CustomKeys Arduino library – updated 05/15/13 (download below)
– 8 bits of conductive material for the keys (paperclips, brads, conductive tape, etc.)
– Colorful card stock paper (unless you’re going the laser cutter route)
– A soldering iron
– A boxcutter or x-acto knife
– Stick glue
– Wire clippers and strippers
– A set of 8 male header pins
– Electrical wire
– An Arduino ( I used the Uno)
– A USB for the Arduino
– A breadboard
– An 8 Ohm speaker
If you have access to a laser cutter:
– 16″ x 20″ birch board with 1/8″ thickness
– The box template (download below)*
For more detail: CustomKeys using an Arduino
- How does the CustomKeys keyboard detect input?
It uses capacitive touch sensing where each key is made of conductive material that signals the synthesizer when touched. - Can users choose different musical scales?
Yes, the CustomKeys library allows the user to choose an 8-note musical scale for the keys. - What materials can be used for the body design?
Users can use the provided laser cutter template or any other material as long as basic system requirements are met. - How can I make the output sound louder?
You may build an amplifier circuit if the speaker alone produces sound that is too quiet. - What specific components are needed for the amplifier circuit?
The amplifier requires an n-type MOSFET, two 100 Ohm resistors, a 1.2K Ohm resistor, a .47uF film capacitor, and a 220 uF electrolytic capacitor. - Is the laser cutter template mandatory for assembly?
No, you can skip the laser cutter step and assemble the keyboard using colorful pieces of card stock instead. - What Arduino model was used in this project?
The article states that the author used an Arduino Uno. - Where can I find the box template file?
The box template is available as a downloadable PDF named box_template.pdf.
