Summary of Cup Cooler using an Arduino
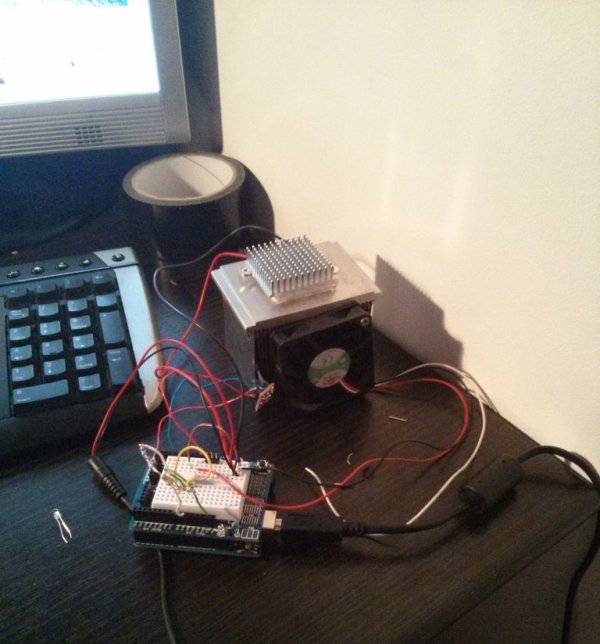
This article details a DIY Arduino-based cup cooler project using a TEC1-12704 thermoelectric cooler. The system achieves temperatures as low as -20°C, effectively cooling water below freezing point. It utilizes an LM335 temperature sensor for monitoring and an optocoupler to control the fan and TEC module via a 12V DC power source. The build requires basic soldering skills and minimal coding experience using Codebender.
Parts used in the Cup Cooler:
- Arduino uno
- Breadboard
- 220ohm resistor (or three 750 ohm resistors in parallel)
- 12v dc fan
- TEC1-12704 TEC Thermoelectric Cooler
- 12volt DC adaptor 2.5 amp
- Optocoupler 4N33
- jumper wires
- LM355Z Temperature Sensor
- Thermal Past
- Glue Gun
This is my first Instructable, so please judge harshly so that I can learn 🙂
Its a simple project minimal skills needed.
Drawings are made using: Fritzing
Code Written using Codebender
The cold plate got to -20c
Watter in the cup measured @ 5.5c compared to icecube @2.5c
Step 2: Wiring everything
Optocoupler 4N33
Pin1 – Digital I/O 9 via 220Ohm resistor
Pin2 – Ground
Pin4 – DC fan Positive
Pin5 – 12V positive
DC Fan
Ground – to 12v Ground
LM335 Temp sensor
Vin – 5V arudino
Grn – Ground arduino
Vout – Analog 0
TEC1-12704 TEC
Positive to 12v DC positive
Negative to 12v DC negative
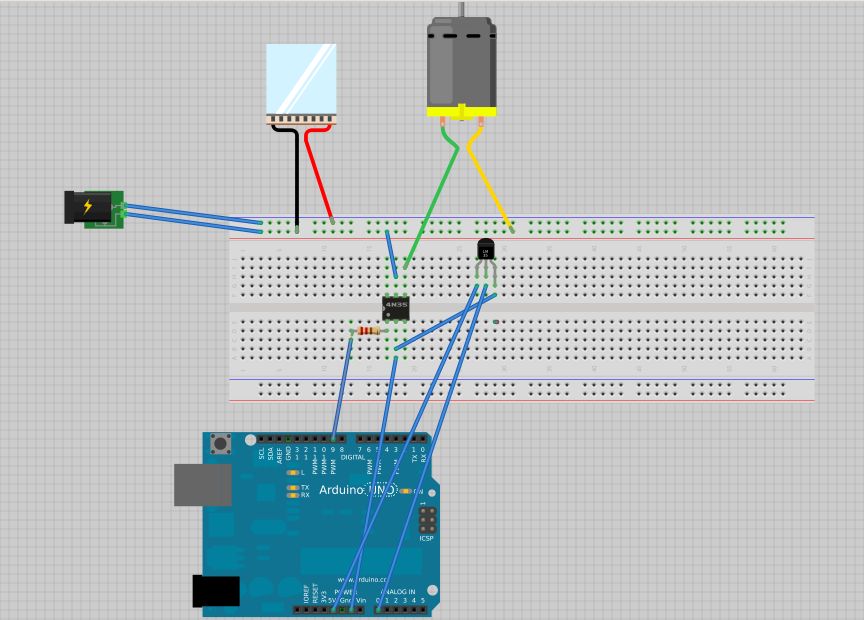
Better would to add a switch or another Optocoupler to turn ON/OFF
Things To Find
list of items i have used:
Arduino uno
Breadboard
220ohm resistor (i have used 3 x750 in parallel as couldn’t find anything smaller) anything from 100 to 220 will do.
12v dc fan 3 wire but 2wire will do the same job.
TEC1-12704 TEC Thermoelectric Cooler
12volt DC adaptor 2.5 amp
Optocoupler 4N33
jumper wires
LM355Z Temperature Sensor
Thermal Past
Glue Gun
For more detail: Cup Cooler using an Arduino
- What is the lowest temperature achieved by the cold plate?
The cold plate reached -20c. - How does the temperature of water compare to an icecube in this project?
Water measured at 5.5c while the icecube was at 2.5c. - Which pin on the Optocoupler connects to Digital I/O 9?
Pin1 connects to Digital I/O 9 via a 220Ohm resistor. - Can a 2-wire fan be used instead of the recommended 3-wire fan?
Yes, a 2-wire fan will do the same job as the 3-wire fan. - What voltage is required for the Vin pin of the LM335 Temp sensor?
Vin requires 5V from the arduino. - How can the user improve the project to turn it ON/OFF?
A switch or another Optocoupler should be added to turn the system ON/OFF. - What software was used to write the code for this project?
Code was written using Codebender. - What tool was used to create the drawings for this project?
Drawings were made using Fritzing.