Summary of Control an Arduino With a Wristwatch (TI eZ430 Chronos)
The article details connecting a Texas Instruments eZ430 Chronos watch to an Arduino. It explains the watch's sensors and RF capabilities, describes using a PC dongle for standard communication, and provides a tutorial on replacing the PC with an Arduino via USB host libraries. The guide covers hardware selection, library installation, code customization, and sketch creation to enable bidirectional data exchange between the wrist device and the microcontroller.
Parts used in the TI eZ430 Chronos to Arduino Project:
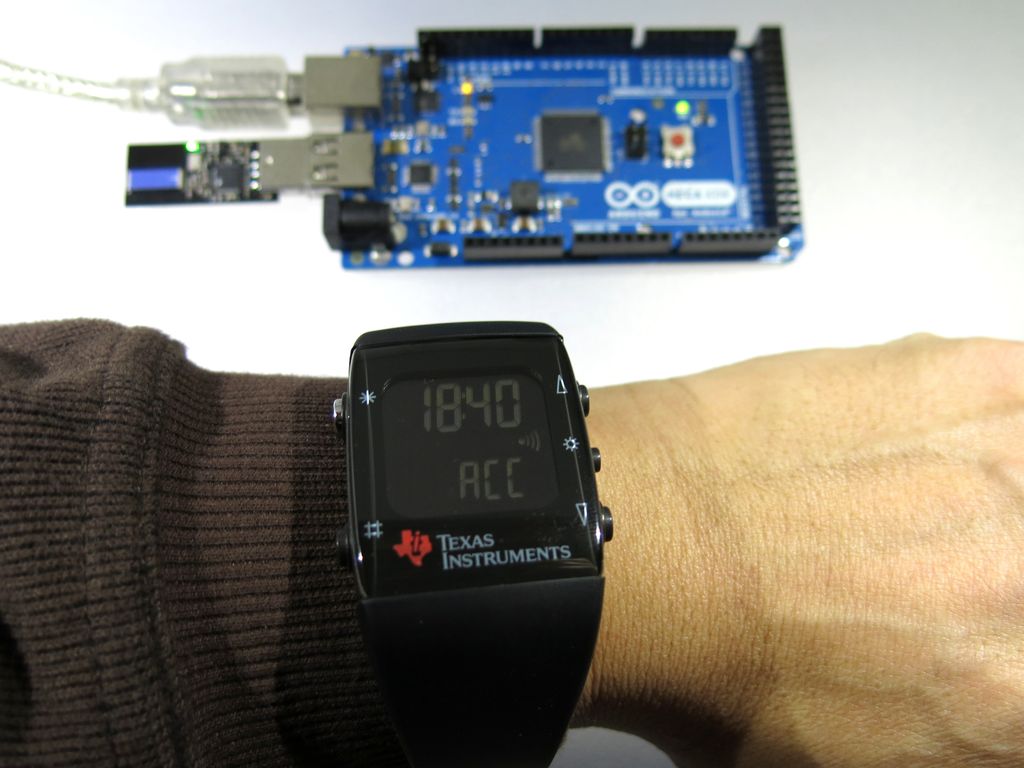
- Texas Instruments eZ430 Chronos watch
- RF access point dongle
- USB dongle for reprogramming (optional)
- Screwdriver for opening the watch
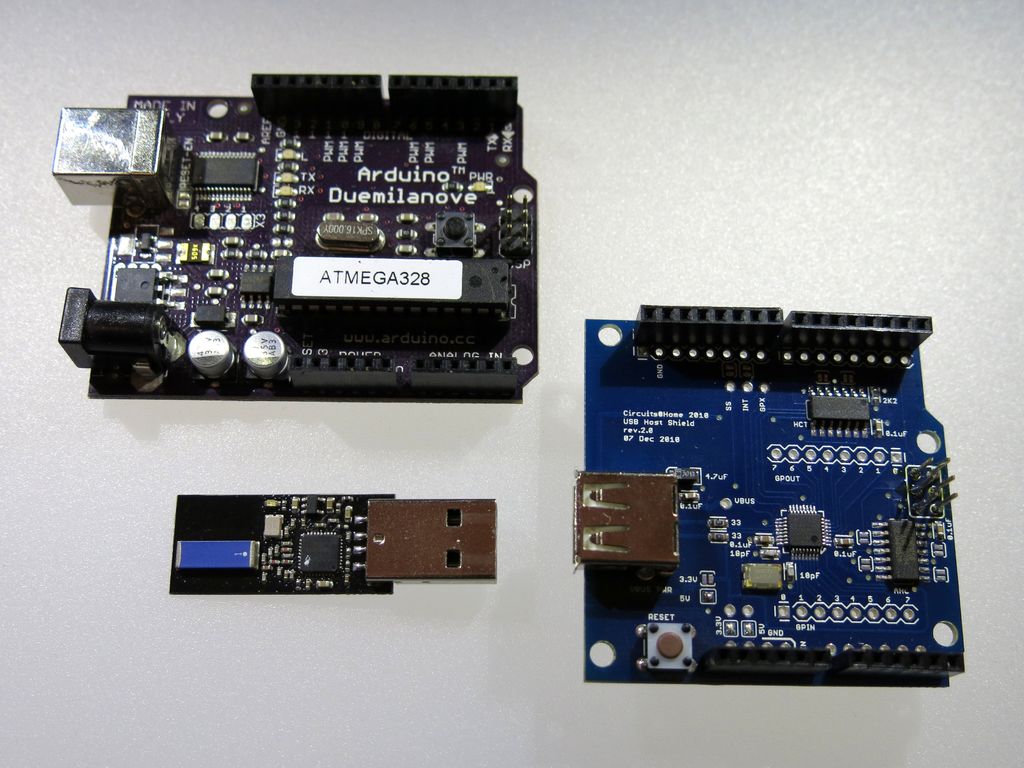
- Arduino board (Duemilanove or Mega ADK variant)
- USB host shield (for non-ADK boards)
- USB_Host_Shield_2.0 library
The Texas Instruments eZ430 Chronos is a cool gadget. It has bidirectional radio communication, and a whole bunch of sensors: temperature, pressure, acceleration.In fact, it is a development kit for the MSP 430 (a low-power microcontroller), that TI packaged as a watch (pure genius!), and delivered with plenty of tools. Its firmware can be modified to implement new features into the watch.
Even without developing anything on the watch, it is a terrific toy:
– the watch alone is pretty cool –and has the TI logo ;-),
– the default features allow for a wide range of cool experimentations and developments around it.
The RF communication has a quite short range, and quite low consumption. It is not Bluetooth, but SimpliciTI[TM] or BlueRobin[TM].
Pretty much documentation about the watch (sample code, specifications, schematics) can be found on the Web. Google is your friend.
Watch to PC
The watch comes along with an access point (i.e. the peer device the watch can talk to) in the form of a dongle, incorporating a TI chip that can, on one side, talk to the watch via RF, and on the other side, talk to the PC via an USB slave interface.
When the access point is plugged into a PC, a PC application provided by TI can exploit it to communicate with the watch: graph sensors, set the watch time, calibrate sensors, send fitness data. The nice thing is that TI wrote it in a scripting language (venerable Tcl/Tk) to run on multiple OS-es.
It is very easy to write your own PC application, as shown by some examples written in Python. There are numerous such examples that can be found on the web.
Watch to Arduino
What about using an Arduino instead of a PC? You could make completely pocket-sized projects!
Surprisingly, I could not find any clue about it on the web.
I evaluated several USB host libraries, and finally found the right application source code to get started (ACM on CDC, for modem, by Circuits@Home, http://www.circuitsathome.com; Oleg, thanks for the library, examples, and for the help!).
It finally works, it’s very simple, and that’s what I’m covering with the present post.
Just basic Arduino knowledge is required. However, this post is not an Arduino tutorial.
Enough said, let’s get to the point!
Step 1: Needed Stuff
You can purchase the TI eZ430 Chronos watch from several resellers (e.g. Mouser, Farnell, or Amazon). It will come along with:
- software and doc on a CDROM,
- an USB dongle that is an RF access point,
- an USB dongle to reprogram the watch, (we won’t use it here),
- a screwdriver to open the watch (we won’t use it either * )
(*) but hey, when did you last get a screwdriver with a watch, and a manual explaining how –and encouraging to– open it?
The Arduino
Any more or less standard Arduino will do, and the most important thing is to have USB host capability.
For this, the following configurations are among the possible ones:
- Arduino (mine is Duemilanove) and an USB host shield (mine is from Circuits@Home)
– or – - Arduino Mega ADK (important: must be ADK variant! it has USB host on board)
Step 2: The Arduino Sketch
Install this library into your Arduino system:
https://github.com/felis/USB_Host_Shield_2.0
- Important: use this 2.0 version of the library
- On Linux, the library files will have to reside in
/usr/share/arduino/libraries/USB_Host_Shield_2_0/
Customize the USB host library for your board
- Edit the library file avrpins.h
(on Linux: /usr/share/arduino/libraries/USB_Host_Shield_2_0/avrpins.h) - and uncomment one of the lines #define BOARD_MEGA_ADK or #define BOARD_TEENSY if your board is one of these. For say Uno or Duemilanove, leave them commented out.
This is pretty annoying, especially if you have some of each boards, because you must remember to check/tweak the library after changing of board and before compiling… I wish the #define could reside in the sketch file.
Create the Arduino sketch
Create an Arduino sketch from the file eZ430_basic.zip attached in this step. Compile, upload and run.How it works
The initialization is done by instantiating these objects:
USB Usb; // instantiate USB
ACMAsyncOper AsyncOper; // Create CDC
ACM Acm(&Usb, &AsyncOper); // Create ACM and bind CDC to USB
Then, in the loop(), one shall call this to let the USB stack run:
Usb.Task();
To exchange data with the USB device:
Acm.SndData(frame_len, frame_to_send);
Acm.RcvData(&len, receive_buffer); // init len w/ buffer size, will be updated with len received
We need to send two different frames, one to turn the dongle’s RF on, and one to request data from the watch. Then we will need to receive and decode one frame, containing the watch response (or absence thereof).
 eZ430_basic.zip2 KB
Step 3: Using this Demo
This demo application initializes the RF access point in SimpliciTI[TM] mode, then keeps on sending accelerometer queries to the watch, gets the response from the watch, filters out, interprets and displays the result.
For more detail: Control an Arduino With a Wristwatch (TI eZ430 Chronos)
- What is the Texas Instruments eZ430 Chronos?
It is a development kit for the MSP 430 microcontroller packaged as a watch with sensors and bidirectional radio communication. - Can I use an Arduino instead of a PC to communicate with the watch?
Yes, you can use an Arduino with USB host capability to create pocket-sized projects. - Which Arduino configurations support USB host capability?
You can use an Arduino Duemilanove with a USB host shield or an Arduino Mega ADK which has USB host on board. - How do I install the required USB host library?
Install version 2.0 of the USB_Host_Shield_2.0 library from the provided GitHub link into your Arduino system. - Do I need to edit library files for different boards?
Yes, you must edit avrpins.h to uncomment the correct board definition like BOARD_MEGA_ADK or leave them commented for Uno/Duemilanove. - What are the basic steps to initialize the USB stack in the sketch?
Instantiate USB Usb, create ACMAsyncOper, bind ACM to USB, and call Usb.Task() in the loop function.