Summary of Classic Joystick to USB Adaptor using Arduino
Summary: This project converts classic ColecoVision/Atari 2600 joysticks into a USB keyboard input using an Arduino Leonardo or Micro. It reads joystick lines via a 9-pin D-Sub connector, interprets directional and keypad/button inputs in frames, and emulates keyboard presses so emulators or PC programs can use the vintage controller.
Parts used in the Classic Joystick to USB Adaptor:
- Arduino Leonardo or Arduino Micro
- 9-Position HD Male D-Sub Connector (DB9 male)
- Wire
- Classic console joystick (Atari 2600, ColecoVision, Coleco ADAM, or ColecoVision Super Action Controller)
If you grew up in the early 1980’s and were into video games, you probably had an Atari 2600, ColecoVision, or similar game console. The controllers or joysticks for each of these systems had a distinct feel that is different from today’s game consoles or PC game controllers. If you find yourself longing to plug your old ColecoVision or Atari 2600 joystick into your modern PC, but are not sure how to go about it, this project is for you.
I designed this Classic Joystick to USB Keyboard Adapter with the ADAMEm ColecoVision and Coleco ADAM emulator in mind (http://www.komkon.org/~dekogel/adamem.html, which can be run in Microsoft Windows using Virtual ADAM http://www.sacnews.net/adamcomputer/downloads/). However it will work with most emulators and any game or program that can use the keyboard as input. I have also tested it with the following emulators:
- blueMSX (ColecoVision, MSX, and others) – http://www.bluemsx.com/
- Stella (Atari 2600) – http://stella.sourceforge.net/
The following classic game console controllers are support:
- Atari 2600
- ColecoVision
- Coleco ADAM
- ColecoVision Super Action Controller (Spinner is not currently supported)
Step 1: What You Need
- Arduino Leonardo – http://arduino.cc/en/Main/ArduinoBoardLeonardo or Arduino Micro – http://arduino.cc/en/Main/ArduinoBoardMicro
- 9-Position HD Male D-Sub Connector – http://www.radioshack.com/product/index.jsp?productId=2102497 or equivalent
- Wire
- Classic Console Joystick
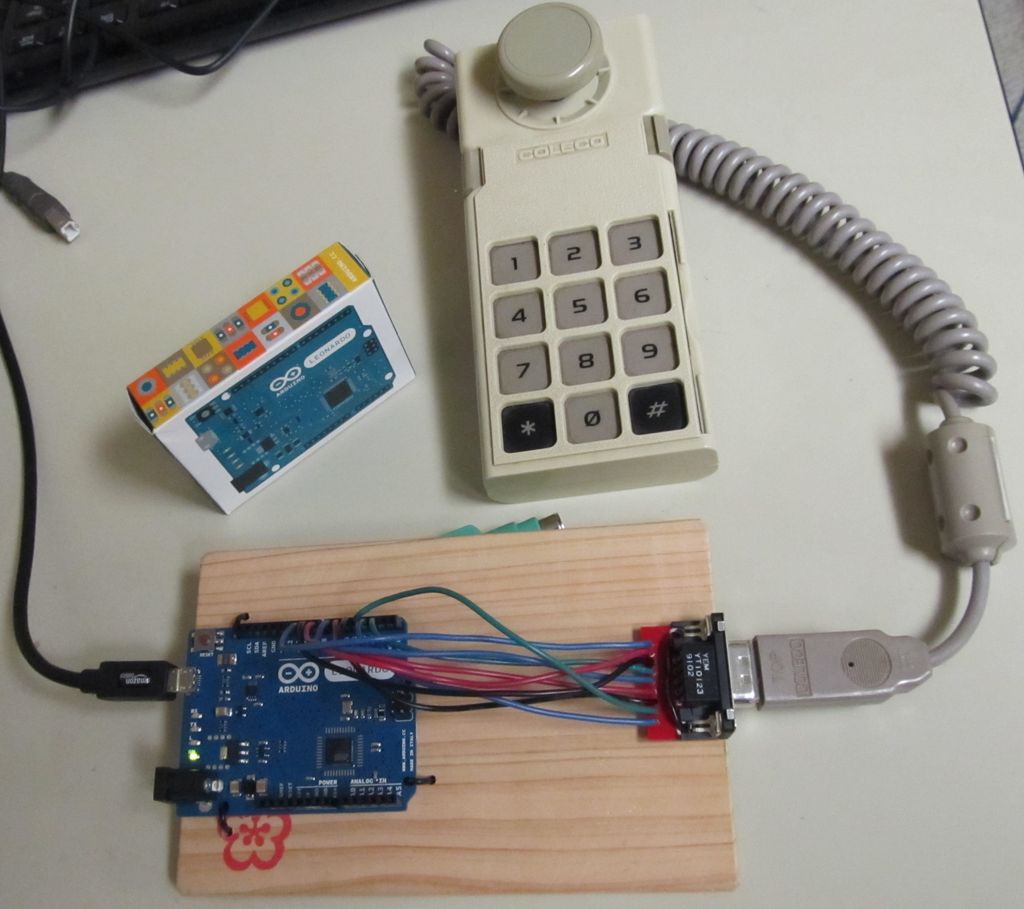
Step 2: Hardware
Connect the pins of the D-Sub Male 9 Position connector to the pins of the Arduino Leonardo or Arduino Micro as shown in the table.
Step 3: Software
The following Arduino Sketch file should be compiled and uploaded into the Arduino Leonardo or Arduino Micro: JoystickToKeyboard.ino
// ColecoVision / ADAM Joystick to PC Keyboard Converter
// for the Arduino Leonardo
// 2014-08-24
//----------------------------------------------------------------------------------

// Joystick Pins
const byte gcFirePin = 2;
const byte gcUpPin = 3;
const byte gcDownPin = 4;
const byte gcLeftPin = 5;
const byte gcRightPin = 6;
const byte gcModeAPin = 7;
const byte gcModeBPin = 8;
const byte gcFireMonitorPin = 13;
const byte gcBit0Pin = 3;
const byte gcBit2Pin = 4;
const byte gcBit3Pin = 5;
const byte gcBit1Pin = 6;

// Keyboard Keys
const char gcUpKey = KEY_UP_ARROW;
const char gcDownKey = KEY_DOWN_ARROW;
const char gcLeftKey = KEY_LEFT_ARROW;
const char gcRightKey = KEY_RIGHT_ARROW;
const char gcLeftFireKey = KEY_LEFT_ALT;
const char gcRightFireKey = KEY_LEFT_CTRL;
const char gcPurpleButtonKey = KEY_LEFT_SHIFT;
const char gcBlueButtonKey = 'z';
const char gcAsteriskKey = '-';
const char gcPoundKey = '=';

// Current Frame Joystick Status
byte gLeftFireButton = 0;
byte gRightFireButton = 0;
byte gUp = 0;
byte gDown = 0;
byte gLeft = 0;
byte gRight = 0;
char gNumPadValue = ' ';
byte gPurpleButton = 0;
byte gBlueButton = 0;
byte gBit0 = 0;
byte gBit1 = 0;
byte gBit2 = 0;
byte gBit3 = 0;

// Last Frame Joystick Status
byte gLastLeftFireButton = 0;
byte gLastRightFireButton = 0;
byte gLastUp = 0;
byte gLastDown = 0;
byte gLastLeft = 0;
byte gLastRight = 0;
char gLastNumPadValue = ' ';
byte gLastPurpleButton = 0;
byte gLastBlueButton = 0;

// Line Read Variables
const unsigned int gcThreashold = 4;
unsigned int gLeftFireCount = 0;
unsigned int gRightFireCount = 0;
unsigned int gUpCount = 0;
unsigned int gDownCount = 0;
unsigned int gLeftCount = 0;
unsigned int gRightCount = 0;
unsigned int gBit0Count = 0;
unsigned int gBit1Count = 0;
unsigned int gBit2Count = 0;
unsigned int gBit3Count = 0;

// Frame Variables
const int gcFrameLength = 10;
unsigned int gLoopsPerFrame = 0;
unsigned long gLastFrameStart = 0;

// Shows the status of the joystick.
void ShowJoystickStatus()
{
  // Debug Information
//  Serial.println(gLoopsPerFrame);
  digitalWrite(gcFireMonitorPin, gLeftFireButton | gRightFireButton);
}

void SendKeyboardStateToPc()
{
  if ((gLastNumPadValue != ' ') && (gLastNumPadValue != gNumPadValue))
  {
    Keyboard.release(gLastNumPadValue);
  }
  if ((gNumPadValue != ' ') && (gLastNumPadValue != gNumPadValue))
  {
    Keyboard.press(gNumPadValue);
  }

  SendLineStateToPc(gLastLeftFireButton, gLeftFireButton, gcLeftFireKey);
  SendLineStateToPc(gLastRightFireButton, gRightFireButton, gcRightFireKey);
  SendLineStateToPc(gLastUp, gUp, gcUpKey);
  SendLineStateToPc(gLastDown, gDown, gcDownKey);
  SendLineStateToPc(gLastLeft, gLeft, gcLeftKey);
  SendLineStateToPc(gLastRight, gRight, gcRightKey);
  SendLineStateToPc(gLastPurpleButton, gPurpleButton, gcPurpleButtonKey);
  SendLineStateToPc(gLastBlueButton, gBlueButton, gcBlueButtonKey);
}

void SendLineStateToPc(byte lastState, byte currentState, char keyUsedForLine)
{
  if ((lastState == 1) && (currentState == 0))
  {
    Keyboard.release(keyUsedForLine);
  }
  if ((lastState == 0) && (currentState == 1))
  {
    Keyboard.press(keyUsedForLine);
  }
}

unsigned int CheckJoystickLine(byte pin)
{
  return (digitalRead(pin) == LOW);
}

void CheckJoystickLines()
{
  const int cLineDelay = 50;

  // Put Joystick in Direction Mode
  digitalWrite(gcModeAPin, HIGH);
  digitalWrite(gcModeBPin, LOW);
  delayMicroseconds(cLineDelay);
  gLeftFireCount += CheckJoystickLine(gcFirePin);
  gUpCount += CheckJoystickLine(gcUpPin);
  gDownCount += CheckJoystickLine(gcDownPin);
  gLeftCount += CheckJoystickLine(gcLeftPin);
  gRightCount += CheckJoystickLine(gcRightPin);
  // Put Joystick in Keypad Mode
  digitalWrite(gcModeAPin, LOW);
  digitalWrite(gcModeBPin, HIGH);
  delayMicroseconds(cLineDelay);
  gRightFireCount += CheckJoystickLine(gcFirePin);
  gBit0Count += CheckJoystickLine(gcBit0Pin);
  gBit1Count += CheckJoystickLine(gcBit1Pin);
  gBit2Count += CheckJoystickLine(gcBit2Pin);
  gBit3Count += CheckJoystickLine(gcBit3Pin);
}

void ResetFrameVariables()
{
  // Copy Current Frame to Last Frame
  gLastNumPadValue = gNumPadValue;
  gLastLeftFireButton = gLeftFireButton;
  gLastRightFireButton = gRightFireButton;
  gLastUp = gUp;
  gLastDown = gDown;
  gLastLeft = gLeft;
  gLastRight = gRight;
  gLastPurpleButton = gPurpleButton;
  gLastBlueButton = gBlueButton;

  // Reset Frame Loop Counter
  gLoopsPerFrame = 0;

  // Reset Joysick State
  gLeftFireCount = 0;
  gLeftFireButton = 0;
  gRightFireCount = 0;
  gRightFireButton = 0;
  gUpCount = 0;
  gUp = 0;
  gDownCount = 0;
  gDown = 0;
  gLeftCount = 0;
  gLeft = 0;
  gRightCount = 0;
  gRight = 0;
  gBit0Count = 0;
  gBit0 = 0;
  gBit1Count = 0;
  gBit1 = 0;
  gBit2Count = 0;
  gBit2 = 0;
  gBit3Count = 0;
  gBit3 = 0;
  gNumPadValue = ' ';
  gPurpleButton = 0;
  gBlueButton = 0;
}

byte DetermineJoystickLineValue(unsigned int pressCount)
{
    return (pressCount >= gcThreashold);
}

void DetermineJoystickValues()
{
  const char cKeypadValueLookup[16] = {
    ' ', '6', '1', '3', '9', '0', gcAsteriskKey, ' ',
    '2', gcPoundKey, '7', ' ', '5', '4', '8', ' '};

  gLeftFireButton = DetermineJoystickLineValue(gLeftFireCount);
  gRightFireButton = DetermineJoystickLineValue(gRightFireCount);
  gUp = DetermineJoystickLineValue(gUpCount);
  gDown = DetermineJoystickLineValue(gDownCount);
  gLeft = DetermineJoystickLineValue(gLeftCount);
  gRight = DetermineJoystickLineValue(gRightCount);

  gBit0 = DetermineJoystickLineValue(gBit0Count);
  gBit1 = DetermineJoystickLineValue(gBit1Count);
  gBit2 = DetermineJoystickLineValue(gBit2Count);
  gBit3 = DetermineJoystickLineValue(gBit3Count);

  int keypadCode = (gBit3 << 3) + (gBit2 << 2) + (gBit1 << 1) + gBit0;

  gNumPadValue = cKeypadValueLookup[keypadCode];

  // Check for SuperAction Controller Buttons.
  if (keypadCode == 7)
  {
    gPurpleButton = 1;
  }
  if (keypadCode == 11)
  {
    gBlueButton = 1;
  }
}

void setup()
{
  // Setup Serial Monitor
//  Serial.begin(19200);

  // Setup Joystick Pins
  pinMode(gcFirePin, INPUT_PULLUP);
  pinMode(gcUpPin, INPUT_PULLUP);
  pinMode(gcDownPin, INPUT_PULLUP);
  pinMode(gcLeftPin, INPUT_PULLUP);
  pinMode(gcRightPin, INPUT_PULLUP);
  pinMode(gcModeAPin, OUTPUT);
  pinMode(gcModeBPin, OUTPUT);
  pinMode(gcFireMonitorPin, OUTPUT);
}

void loop()
{
  unsigned long currentTime;

  currentTime = millis();
  if (currentTime >= (gLastFrameStart + gcFrameLength))
  {
    // Do Joystick Value Commit Logic
    DetermineJoystickValues();

    // Send Values to Monitor
    ShowJoystickStatus();

    // Send Keyboad State to the PC
    SendKeyboardStateToPc();

    // Reset Frame Variables
    ResetFrameVariables();

    // Time to start next frame
    gLastFrameStart = currentTime;
  }
  else
  {
    // Check the value of the input lines and make note of them.
    gLoopsPerFrame++;
    CheckJoystickLines();
  }
}
For more detail: Classic Joystick to USB Adaptor using Arduino
- What does this project do?
It converts classic joysticks into USB keyboard input using an Arduino Leonardo or Micro so emulators and PC programs can use the controller. - Which Arduinos are required?
The Arduino Leonardo or the Arduino Micro are used. - Which connector is used to attach the joystick?
A 9-Position HD Male D-Sub (DB9) connector is used to connect the joystick to the Arduino. - Which classic controllers are supported?
Atari 2600, ColecoVision, Coleco ADAM, and ColecoVision Super Action Controller (spinner not supported) are supported. - What software is needed on the Arduino?
The JoystickToKeyboard.ino Arduino sketch is compiled and uploaded to the Leonardo or Micro. - How are joystick inputs delivered to the PC?
The Arduino reads joystick lines, maps them to keyboard keys, and uses keyboard press/release functions to send input to the PC. - Can this adapter work with common emulators?
Yes; it was designed for ADAMEm but is also tested with blueMSX and Stella and works with most emulators that accept keyboard input. - Is the ColecoVision Super Action Controller fully supported?
Buttons are supported, but the spinner is not currently supported.