Summary of Build your own Arduino for under £10
This article guides readers in constructing a low-cost, custom Arduino clone called the "Veroduino" on a 5cm stripboard using an ATmega328P microcontroller. It details component selection, layout modifications, and assembly instructions to replace standard Arduino boards for specific projects while reducing costs significantly.
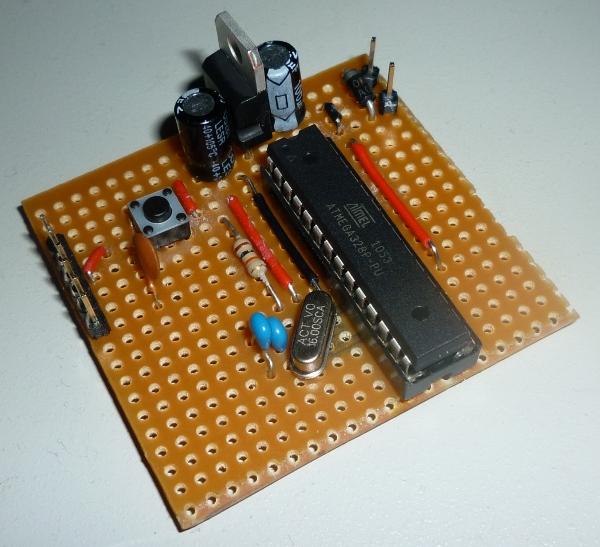
Parts used in the Veroduino:
- Piece of Stripboard/veroboard
- Atmel ATmega328P-PU microcontroller
- 28 Pin DIL Socket
- 16MHz crystal
- LM7805 voltage regulator
- 2 x 100uF 25V electrolytic capacitors
- 2 x 22pF ceramic disc capacitors
- 1N4001 diode
- Momentary push to make button/tactile switch
- 10K 0.25W resistor
- 6 pin male header
- 100nF ceramic disc capacitor
- Hookup wire
How to make a stripboard Arduino clone, AKA the veroduino.
Once a project is past the prototype stage there is no need to use a complete Arduino, even with the ever decreasing cost of Arduino compatibles and the availability of cut down versions such as the Arduino Nano and Mini it’s still overkill for a lot of uses. Fortunately it is very easy to build your own Arduino compatible circuit around the ATmega microcontroller and it will only cost you a few pounds; with some good deals on bulk components and by flashing the Arduino bootloader yourself you could do this for as little as a fiver.
Here is how to build a basic Arduino on a small (5cm square) piece of stripboard, all you need is a handful of components and a little time.
Parts required
Piece of Stripboard/veroboard
Atmel ATmega328P-PU microcontroller
28 Pin DIL Socket
16MHz crystal
LM7805 voltage regulator
2 x 100uF 25V electrolytic capacitors
2 x 22pF ceramic disc capacitors
1N4001 diode
Momentary push to make button/tactile switch (optional)
10K 0.25W resistor (optional)
6 pin male header (optional)
100nF ceramic disc capacitor (optional)
Hookup wire
Here’s my stripboard layout:
Notes on components
You will need a piece of stripboard at least 20 holes across by 19 strips or 14 holes across if on board programming and reset button aren’t required.
If you don’t need the on board reset button you can leave that out and if you don’t need on board programming you can omit the 6 pin header and 100nF capacitor. If you aren’t using both the reset button and the FTDI connection then you can also omit the 10K resistor. The 1N4001 diode isn’t strictly necessary either, it’s just there for reverse polarity protection.
You can use the ATmega168 (half the Flash/EEPROM/SRAM of the ATmega328) if that is all you require, either way the Atmel AVR will require the Arduino bootloader flashed to it before you can upload a sketch to it, you can either buy one with it preloaded or use another Arduino to burn it yourself. If you want to buy one preloaded you can get the ATmega328 on eBay here together with the required crystal and the 22pF loading caps.
The build
Break the tracks on the copper side of the board where indicated with the red crosses and solder in the components, if you haven’t used stripboard before see this page for an explanation of how to use it. Make sure the socket for the ATmega chip is installed with the notch at the top and the LM7805 voltage regulator is installed with the metal strip at the right hand side. The 1N4001 diode needs to be installed with the side marked with a band at the top and the two electrolytic capacitors also need to be installed the right way round (note the + signs in the diagram above) the positive lead should be longer and there is usually a stripe on the canister marking the negative side. Install the tactile switch with the legs on the sides so that it joins the top and bottom strips when pressed. The other components can all go in either way round.
 a
a
Power Connections
You can connect power to the VIN and ground on the right, 7 to 9VDC will be fine as is but I’d put a heatsink on the LM7805 voltage regulator if using 12V. You can also power it via USB from the FTDI connection but make sure that the external power (VIN) isn’t connected at the same time; if you want to have both connected you can disable the FTDI power completely by omitting the link shown in blue next to the 6 pin header.
For more detail: Build your own Arduino for under £10
- How much does it cost to build this project?
You can build this circuit for as little as a fiver or under £10 with bulk deals and self-flashed bootloaders. - What is the minimum size required for the stripboard?
The board needs to be at least 20 holes across by 19 strips if including reset and programming features. - Can I use an ATmega168 instead of the ATmega328P?
Yes, you can use the ATmega168, but it has half the Flash, EEPROM, and SRAM capacity. - Does the ATmega chip come with the bootloader pre-installed?
No, the Atmel AVR requires the Arduino bootloader to be flashed before uploading sketches unless purchased preloaded. - Is the 1N4001 diode strictly necessary for operation?
No, it is not strictly necessary; it is included only for reverse polarity protection. - Can I power the device via USB and external power simultaneously?
No, you must ensure external power is not connected if powering via USB, or omit the link next to the header to disable FTDI power. - What voltage range is suitable for the VIN connection?
7 to 9VDC is fine, though a heatsink is recommended if using 12V. - Which components can be omitted if on-board programming is not needed?
You can omit the 6 pin header and the 100nF capacitor if on-board programming is not required.