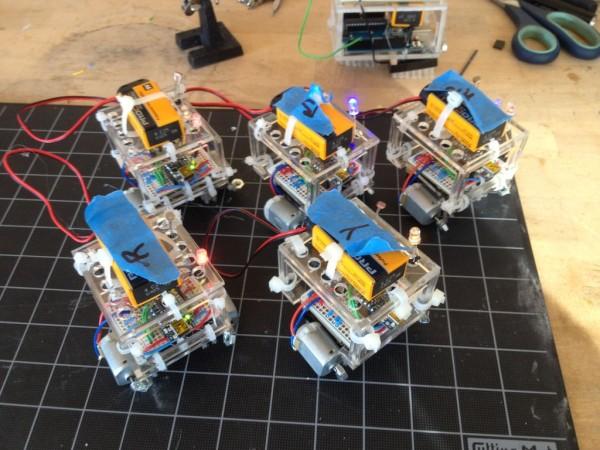
A growing branch of robotics research is the study of swarm organization, emergent behavior and artificial intelligence through the use of autonomous robotic agents. In this Instructable, I’m going to walk you through a one week project that I created as part of my Masters Architecture studies at theCalifornia College of Arts in collaboration with Prerna Auplish. The studio, run by Jason Kelly Johnson and Michael Shiloh, leveraged robotics and digital fabrication as a method to explore the relationship between architects and the tools they use. Our goal was to create a drawing machine with a swarm of robots in as little time as possible and with a fairly limited understanding of electronics and robotics. Oh, and also with not too much money! This project was the inspiration and jump off point for the Swarmscapers project, which has also been published as an Instructable.

In the course of that week long exploration we were able to barely scratch the surface of swarm behavior, and opened up a . In order to more fully explore the potential of these little guys, we’re releasing them into the wild to see what other behaviors the Instructables community can discover!
This Instructable will teach you some basics about how to work with robotics, how to program and work with arduino and we’ll also play around with the grasshopper plugin Firefly created by Jason Kelly Johnson and Andy Payne. So, click on through and we’ll get started!
Step 1: Why Swarms?
But before we get too far ahead of ourselves, let’s spend some time talking about swarms. What’s so cool about a swarm that makes it worth studying? I’m glad you asked!
Swarms are all around us. You and I are both members of a swarm. We are constituted of an enormous swarm of brain synapses that never stop firing. Steven Johnson argues in his book Emergence, that cities can be understood as the resultant emergent behavior of a swarm. It might be easier to answer what isn’ta swarm. Swarms are capable of making very smart decisions but are comprised of drones who aren’t even aware that this high level thinking and computation is going on. How does this happen? When we talk about swarms, we usually imagine a flock of birds (or BOIDS) or maybe a swarm of bees. That’s because the easiest swarm behavior to visualize is how a swarm moves together, sometimes called flocking. We’re actually very good at understanding this particular type of swarm behavior. There are manymathematical models that accurately simulate this phenomenon, which is pretty cool! The highly coordinated behavior of a flock of birds can be described with a few very simple rules:
- Separation: Make sure you don’t get to close to any of your friends.
- Alignment: Try to be going in the same direction as the guys next to you.
- Cohesion: Fly towards where you see everyone else is.
Outside of those few rules, there’s no other type of coordination happening, so the individual agents are really quite simple, but together are capable of doingsome cool stuff.
But the robot we’re going to build isn’t even going to be that smart… yet. We’re going to build a bristle bot that will act as a Braitenburg vehicle and simulate the behavior of a BOID swarm with an attractor (ie a flashlight). So enough talk, let’s get to work.
Step 2: The Shopping List
First up, we’re going to have to pick up some supplies and get access to some tools. I’ll walk you through the specific way I decided to put my robots together, but the basic principles are easily transferable to different designs. The core mechanism of a steerable bristlebot is to have two vibrating DC motors attached directly to two forward leaning bristles. Under compression, the bristles make the robot fall forward and then bounce straight back up, causing forward motion. The reason we originally decided on bristles as a platform is that they’re mechanically simple and easy to assemble. If you’re going to build a swarm of something, keeping things simple works in your favor.
With that in mind, here’s the list of parts that I used to get my swarm rolling. I’m a fan of Adafruit.com as a source for supplies due to their support and the wonderful tutorials that are linked to their products, but many of the items I’ll be linking are available all over and probably for cheaper prices.
Tools:
1. Soldering Iron
If you’ve read this much, you probably already have a soldering iron. If not, consider investing in one. They’re fairly affordable and enable you to sculpt the path of electrons to suit your ends, which is literally what wizards do.
2. 3D Printer or Laser Cutter
If you’ve got access to a laser cutter, you can use the attached .dwg to cut out the chassis. If you’ve got access 3D printer, you can use the attached .stl to print out a body. If you don’t have access to either of those, you can design your own, which may be the best option.
Mechanics/Robotics:
1. Vibrating DC Motors (2x each)
You’ve got two options here. You can buy cheap DC motors and make your own with some wire, a bit of epoxy and a small weight, or you can buy a pre-made weighted motor instead. The major downside to the cheap DC’s are that the contact that you solder to are inevitably the cheapest part and will fail after very little fatigue. The nice part is that they’re less than $2 a piece!
2. Microcontroller (1x each)
You can use basically any arduino you want to. I decided to go with Adafruit’s 5V Trinket as my controller, because they’re small, cheap and it has just enough pins for what I wanted to do.
3. Prototyping Boards (1x each)
One downside of making a robot that relies of vibration to run is that it means it’s going to constantly trying to shake itself to death every time you turn it on. That means a solderless breadboard isn’t going to do us any favors. I’m a big fan of Adafruit’s perma-proto boards. These quarter sized ones are just big enough for what we’re trying to do.
4. Electronics
PN2222 Transistors (2x each) – These will allow us to control the speed of our motors so we can steer

1N4001 Diode (2x each) – Needed to get the transistor circuits to work.
Resistors (5x each) – I used 560 Ohm resistors, but these 330’s should work too.
CdS photoresistor (2x each) – These will be the sensor suite of our robots.
On/Off Switch (1x each) – Much easier than tearing the battery out.
Female Header Pins (1/2x each) – Used for mounting your trinket to the breadboard.
Solid & Stranded Core Wire – 22 AWG, make sure you’ve got a few colors to keep things straight.
LED’s, Multiple Colors (1x different color each) These will be used for our vision tracking system.
5. Power Supply (1x each)
Okay, so you’ve got two options for your power supply. You can either use a9V battery holder and matching barrel jack or you can get fancy and get yourself a lithium polymer battery and charger that you can integrate with your circuitry.
6. Bristles (2x each)
I found the bristles I used at the local Ace hardware here in San Francisco, but you can use any type of toothbrush or cleaning brush you find, as long as they’re symmetrical. Important: the bristles have to lean in the direction of travel in order to operate as we need them to. You’ll probably have to modify them to get the desired effect, so be prepared to experiment.
7. A Chassis
This can be as complicated or as simple as you’d like it to be. The first bots I made were just hot glued to a sheet of acrylic and it worked just fine. The later versions were laser cut acrylic from the attached cutfile. I’ve also got a 3D printable chassis that you can use if you like. The chassis can give your little swarm bots some character, so have fun on this one!
Step 3: Assembly
To assemble your robot, you’ll have to solder all these parts onto a board and assemble the chassis, then stick it all together and you’ll have yourself a functional BristleSwarm. So, ladies and gentlemen, start your soldering irons. I’m going to assume you have some basic knowledge of how to solder and lay out a board. If you don’t, there’s quite a few guides right here on Instructablesthat’ll help you out.
1. Circuit:
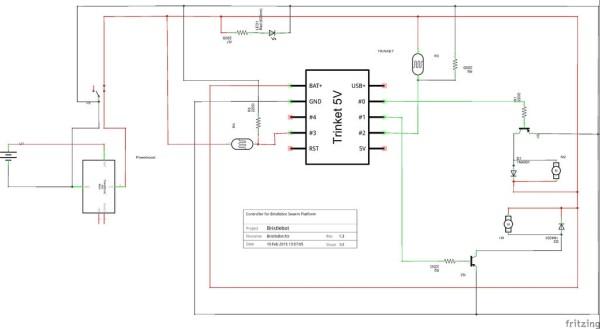
Take a look at the attached schematic and the close up photo of the finished board for reference. To simplify , it’s two transistors, each controlling a DC motor, two photocells, and an LED for tracking. Here’s a great tutorial on Adafruit that explains the basics of using PN2222’s to control a DC motor, and here’s another one on photocells. I squeeze it all in on a trinket, but you can use whichever controller you like.
2. The Chassis:
For the chassis design, just make sure you’ve got your bristles separated and each motor is mounted pretty close to each bristle. Beyond that, you can get as fancy or as simple as you like. My first prototype was quite literally a piece of spare acrylic and some hot glue, which then got stripped down and cut up for the second prototype. Now I’ve got a 3D printable body that’s simple to mass produce and works with all the components that I’m using now.
Lasercut Chassis: Take a look at the images above. I assembled this one with small zip ties and hot glue. I can’t recommend the hot glue attachments, but they get the job done and are easily repairable. Whatever you use as a fixer, make sure it’s durable. The locomotion method this platform uses is based off of nonstop shaking, so every joint will be constantly fatigued. That’s why I designed the next chassis
