Summary of Breadboarding the 68K
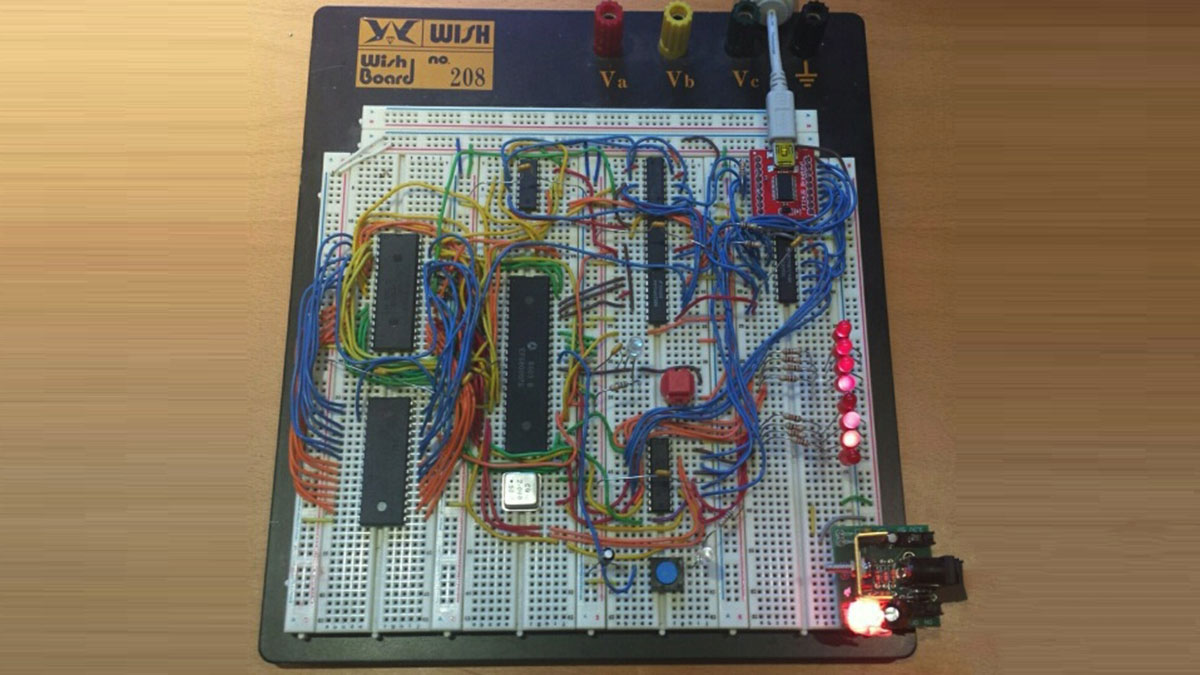
This article details the successful creation of a prototype 68K breadboard computer, designed to test concepts for a future PCB-based 68000 single-board computer. The project features a 68008 CPU running at 2 MHz with 256K Flash ROM and 512K SRAM. Built using discrete logic for address decoding and lacking interrupts or DMA, the system runs BASIC software after overcoming initial challenges like power supply fuses and signal noise. A custom bootloader was developed to facilitate program loading via a serial port without removing the ROM chip.
Parts used in the 68K Breadboard Computer:
- 68008 CPU
- 256K Flash ROM
- 512K SRAM
- USB to parallel serial port
- 8 addressable LEDs
- Miscellaneous 74LS chips
- Miscellaneous 74HCT chips
My 68K breadboard computer is alive! It’s always a thrill when a pile of random chips does something recognizably computer-ish for the first time. Blinking some LEDs in sequence is great; running BASIC is super extra great. I’m excited.
This simple breadboard machine is a prototype of the 68000 single board computer I plan to build next. By testing the key design ideas in a breadboard prototype, I hope to uncover any lurking design problems while they’re still easy to find and fix. Once the design is committed to a PCB with lots of tiny surface-mount components, it will be much more difficult to make changes. Even probing specific signals to observe what’s happening may be difficult. The breadboard is a much more forgiving place to experiment and learn.
Compared to my plans for the final 68000 machine, this breadboard version has less memory, a lower clock speed, a narrower data bus, fewer peripherals, no interrupts, and glue logic built from discrete chips instead of a CPLD or FPGA. Except for the serial interface, the whole thing was built entirely from parts I had on hand. The specs are:
- 68008 CPU running at 2 MHz
- 256K Flash ROM
- 512K SRAM
- USB to parallel serial port
- 8 addressable LEDs for debugging
- Miscellaneous 74LS and 74HCT chips for address decoding and glue logic
The computer doesn’t use interrupts – it always runs at the highest interrupt level, and polls the serial port when it needs input. It also doesn’t use any of the CPU’s DMA or legacy 6800 peripheral support. There’s no handshaking for memory accesses either. The /DTACK signal that devices are supposed to use to indicate a successful memory transfer is just hard-wired to ground – the so-called DTACK Grounded approach to system design.
The Build
Getting the machine up and running went surprisingly smoothly, and only took six days of occasional work. The biggest challenges were the hidden 250 mA PTC fuse in my power supply, and noise in the /RESET signal. Other than that, it was just a matter of placing all the chips on the breadboard and stringing a few hundred wires to connect them.
It was tedious work to perform all the address decoding with discrete logic instead of a CPLD. It’s so nice to type a Verilog equation like /CS = A19 * A18 * /AS * (/F0 + /F1 + /F2), and so annoying to wire up the equivalent equation from a bunch of individual AND, OR, and NAND gates. I quickly ran out of gates, and wasn’t able to decode the address space as fully as I’d hoped, or cover all the reset-related edge cases. It gave me new respect for how useful even a tiny CPLD can be for consolidating glue logic.
The first test programs were written using the Easy 68K editor and assembler. It was a huge help to run the programs in the Easy 68K simulator, to make sure they worked as intended before trying them on my hardware. There’s nothing worse than staring at a non-functional DIY computer with no way to tell if you’ve got a software bug or a hardware one.
Easy 68K assembles programs into Motorola S-record files, which I opened with my EPROM burner software, and programmed into my Flash ROM. That was all I needed to get some basic LED blinker programs going. Physically moving the Flash ROM chip back and forth between the breadboard and the EPROM burner wasn’t much fun, though, so I wrote a quick and dirty bootloader. The bootloader is stored in ROM, and runs when the computer is first turned on, waiting for data to appear at the serial port. The first four incoming bytes define the size of the transfer, then the remaining data bytes are stored sequentially starting at the RAM base address. After the last byte is transferred, the bootloader jumps to the RAM base address to execute the program that was loaded. It’s not fancy – there’s no acknowledgement, or checksums, or facility for alternate load or start addresses. But it’s enough to experiment with new programs without having to unplug the ROM chip each time.
Once I had a working bootloader, I started searching for 68000 software that could be easily ported to this hardware. Lee Davison’s Enhanced Basic for 68000 is well known for being excellent in this respect. All that’s needed is to change a few assembler definitions for RAM base address and size, and to provide implementations for the routines to get or print a character. The rest is just vanilla 68000 assembly code with no platform dependencies. Unfortunately it appears that Lee Davison passed away recently, and his web site is gone. I wasn’t able to find an original version of Enhanced Basic anywhere. In the end, I used an Easy 68K specific version of Enhanced Basic, then ripped out all the Easy 68K specific parts. It took me a while to discover some Easy 68K specific modifications that had been made to the “platform independent” part of the code (naughty, naughty), but it still only took a few hours to get Enhanced Basic up and running on the breadboard hardware.
For more detail: Breadboarding the 68K
- What is the clock speed of the CPU?
The 68008 CPU runs at 2 MHz. - How does the computer handle memory access handshaking?
The /DTACK signal is hard-wired to ground, meaning there is no handshaking for memory accesses. - Why did the author choose a breadboard over a PCB initially?
A breadboard is more forgiving for experimenting and allows for easier discovery and fixing of design problems before committing to surface-mount components. - What tool was used to assemble programs before testing on hardware?
The Easy 68K editor and assembler were used, along with its simulator to verify programs worked as intended. - How are programs loaded into the RAM without removing the ROM chip?
A bootloader stored in ROM waits for data at the serial port, transfers it to the RAM base address, and then jumps to execute the new program. - Does the system use interrupts during operation?
No, the computer does not use interrupts; it always runs at the highest interrupt level and polls the serial port for input. - What specific version of BASIC was successfully run on this hardware?
An Easy 68K specific version of Lee Davison's Enhanced Basic was used after removing Easy 68K specific modifications. - What was the biggest challenge encountered during the build?
The biggest challenges were a hidden 250 mA PTC fuse in the power supply and noise in the /RESET signal.