Summary of Breadboard Arduino
This article details a cost-effective DIY Arduino project built directly on a breadboard for approximately £4. The author outlines the essential components required to create a functional microcontroller circuit, including the ATMega328 chip, oscillator, reset mechanism, and serial programming interface. Optional features like an LED indicator and ISP header are also discussed. Additionally, the guide emphasizes the necessity of an FTDI USB to TTL adapter with DTR support to enable automatic resets during programming via the Arduino IDE.
Parts used in the Breadboard Arduino:
- ATMega328 micro-controller
- 100nF capacitor (for VCC and ground)
- 16MHz crystal oscillator
- 2x 22pF capacitors
- Push to make button
- 10KOhm resistor
- 6 pin header (Serial programming)
- LED
- Suitable resistor for Pin13
- ARef smoothing 100nF capacitor
- 6Pin header (ISP)
- FTDI USB to TTL serial adaptor
Received a couple of nice big bread boards for Christmas and decided that one of them needed an arduino to use with it. After some thought I decided that the best option was to build the required parts of an Arduino circuit direct on the breadboard. Also the cheapest at only £4 for the required parts.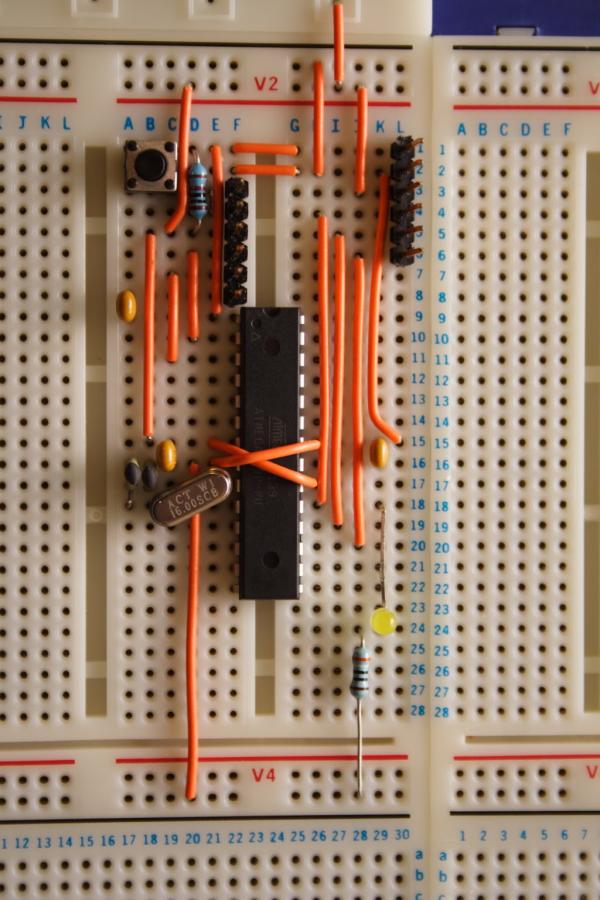
The required sections of the circuit for general Arduino development are:
ATMega micro-controller, in this case an ATMega328 with 100nF capacitor across ground and VCC near chip
Oscillator – 16MHz crystal and 2x 22pF capacitors
Reset – push to make button and 10KOhm resistor
Serial programming – 6 pin header, reset decoupling capacitor 100nF
Optional sections are:
Pin13 LED – LED and suitable resistor
ARef smoothing – 100nF capacitor
ISP – 6Pin header to allow connection to an In System Programmer
If you don’t have the use of an in system programmer for the ATMega devices then the ATMega328 needs to be purchased with the Arduino bootloader already flashed to it. There is little difference in cost. I used the Duemilanove bootloader.
Also required is FTDI USB to TTL serial adaptor. I prefer the Sparkfun “FTDI Basic” board because breaks out DTR rather than RTS as in many converters. This means that the Arduino IDE can reset the Arduino itself when uploading programs. A USB to Serial converter which provides RTS can be used but you have to manually reset the Arduino circuit during the programming cycle.
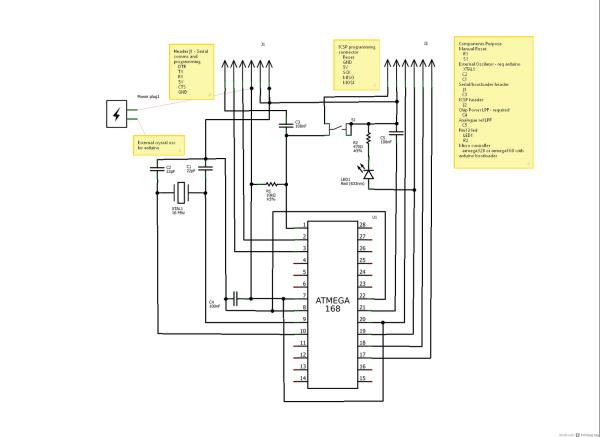
The circuit I used is provided here in picture on the right. Also I as was using Fritzing an image of the a bread board layout is provide.
For more detail: Breadboard Arduino
- What is the cheapest way to build an Arduino circuit?
Building the required parts of an Arduino circuit direct on the breadboard costs only £4. - Can I use a standard USB to Serial converter without DTR?
Yes, but you must manually reset the Arduino circuit during the programming cycle. - Does the ATMega328 need a bootloader flashed?
If you do not have an in system programmer, the chip must be purchased with the Arduino bootloader already flashed. - Which bootloader did the author use?
The author used the Duemilanove bootloader. - Why is the Sparkfun FTDI Basic board preferred?
It breaks out DTR rather than RTS, allowing the Arduino IDE to reset the Arduino automatically when uploading programs. - What optional section allows connection to an In System Programmer?
A 6Pin header is used as the ISP section to allow connection to an In System Programmer. - How many 22pF capacitors are needed for the oscillator?
You need 2x 22pF capacitors for the 16MHz crystal oscillator. - Is there a significant cost difference between chips with and without bootloaders?
No, there is little difference in cost between purchasing the chip with or without the bootloader.