Summary of Bounce Back!
Bounce Back is a responsive pneumatic envelope inspired by blowfish that inflates only when rough handling occurs. Using an MPU6050 accelerometer and Arduino Nano, the system detects shakes to trigger air pumps, creating protective bubbles. The project utilizes either silicone or vinyl skins, acrylic molds for chamber formation, and electronic components to control inflation and deflation based on movement thresholds.
Parts used in Bounce Back:
- Ecoflex 0030 Silicone
- Silicone Tubing for Air Pumps and Valves - 3mm
- T-Connector For Silicone Tubing
- Acrylic sheets
- Acrylic glue
- Gloves
- Mixing Cups
- Vinyl sheets (Alternate option)
- Household hot iron
- Baking paper
- 2 x Air Pump and Vacuum DC Motor - 4.5V
- MPU6050 accelerometer
- Arduino Nano
- Jumper wires
- 9v battery
- 9v battery clip
- 2 x Diode rectifier
- 2 x MOSFET IRF520N
- Soldering kit
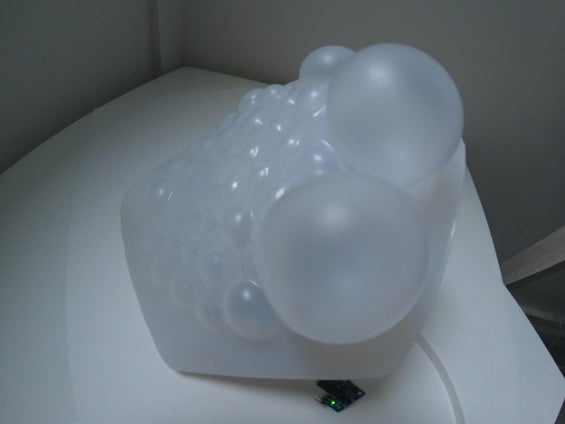
Responsive Pneumatic Envelop (A useless machine) Mockingly inspired by the blowfish, Bounce Back builds on state of the art bubble wrap shipping envelops by only inflating its bubbles when frightened by rough handling. Inversely, when the package is not being shuck, it will not inflate itself.
Creators: Christian Gotthilf Steixner, Ayşe Esin Durmaz
Bounce Back! “Track your package and the way its handled”
Supplies
Silicone skin (Alternate to Vinyl) supplies:
Ecoflex 0030 Silicone
Silicone Tubing for Air Pumps and Valves – 3mm
T-Connector For Silicone Tubing
Acrylic sheets
Acrylic glue
Access to laser cutter
Gloves
Stir
Mixing Cups
Access to CAD software to prepare acrylic cutting files
Vinyl skin (Alternate to Silicone) supplies:
Vinyl sheets
Household hot iron
Baking paper
Tubing for Air Pumps and Valves – 3mm
Electronics supplies:
2 x Air Pump and Vacuum DC Motor – 4.5V and 1.8 LPM
MPU6050 accelerometer
Arduino Nano
Jumper wires
9v battery
9v battery clip
2 x Diode rectifier
2 x MOSFET IRF520N
Soldering kit
*not used but recommended: 6V Air Valve with 2-pin JST PH Connector
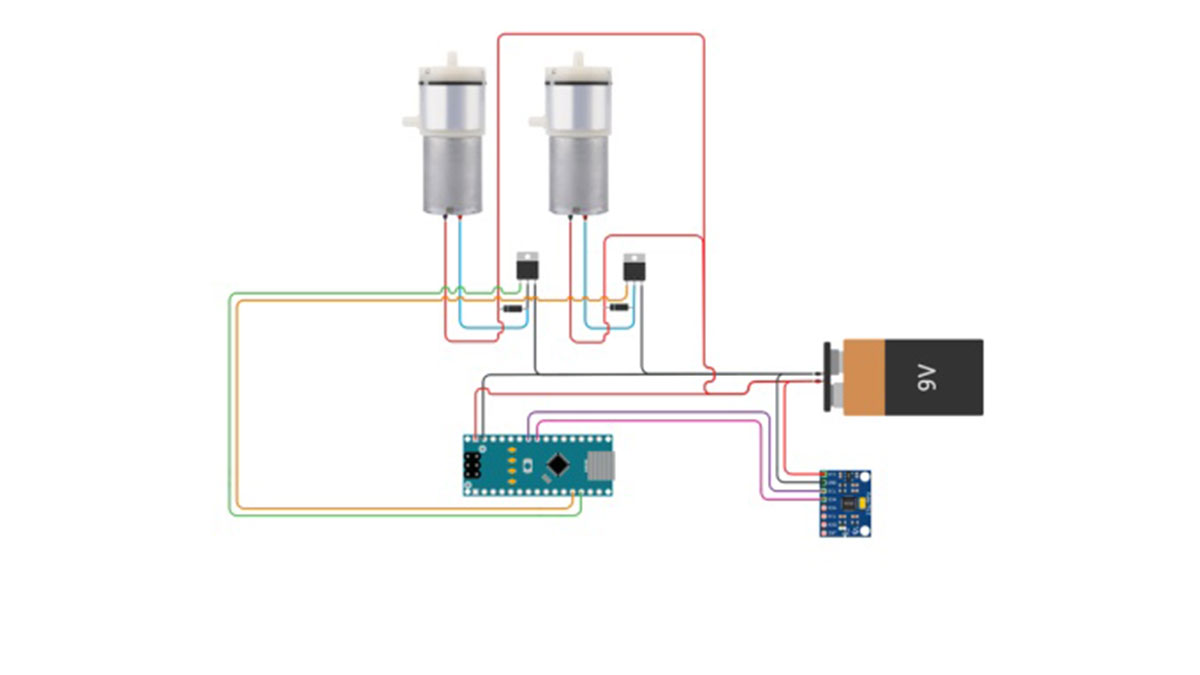
Step 1: The Coding and Wiring
In this schematic diagram you will see the following diagrammatic components:
Air pumps
MOSFET’s
Diodes
9v and clip
Arduino nano
Accelerometer
The code below can be used within Arduino IDE:
#include
#include MPU6050 mpu6050(Wire); int DC_Motor_1 = 9; int DC_Motor_2 = 10;
// variables to hold the new and old positions float oldPosition; float newPosition;
// state holds the current status. // 0 = all off. // 1 = Dc_motor 1 // 2 = DC_motor 2 byte state = 0;
void setup() { Serial.begin(9600); Wire.begin(); mpu6050.begin(); mpu6050.calcGyroOffsets(true);
pinMode(DC_Motor_1, OUTPUT); digitalWrite(DC_Motor_1, LOW); pinMode(DC_Motor_2, OUTPUT); digitalWrite(DC_Motor_2, LOW);
}
void loop() { mpu6050.update(); newPosition = mpu6050.getGyroY(); delay(1); Serial.println(newPosition); // shake the sensor for quarter second to go to new Position. delay(250); // idle until new position become equeal to the old one.
digitalWrite(DC_Motor_1, LOW); digitalWrite(DC_Motor_2, LOW); // has the shake is over threshold. if ( newPosition >= 400 ) { digitalWrite(DC_Motor_1, HIGH); delay(4000); digitalWrite(DC_Motor_1, LOW); delay(500); digitalWrite(DC_Motor_2, HIGH); delay(2000); }
}
——————-
Note: within Arduino IDE>Tools>Board> “Select Arduino Nano”
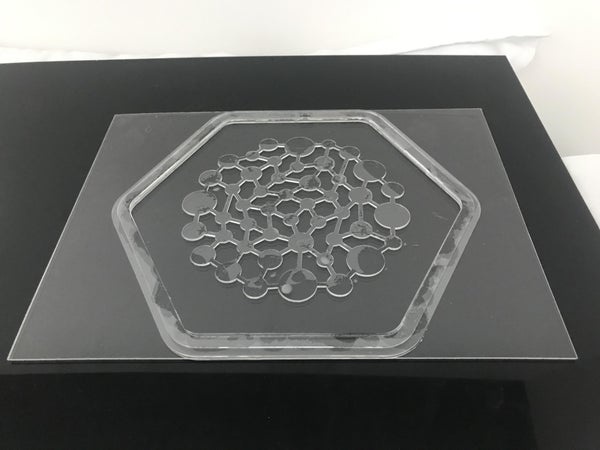
Step 2: Acrylic Trays
Product:
1.5mm Acrylic layers Acrylic Glue Application syringe
Instructions:
– Prepare files in CAD software or equal with intent to cut acrylic on a laser cutter
– Cut acrylic pieces
– Use acrylic glue to make trays “molds” on which to pour silicone
Assemble acrylic 1 ply for all designed air bubble chambers
Assemble acrylic 2 ply for all designed pour boundaries and internalized holes
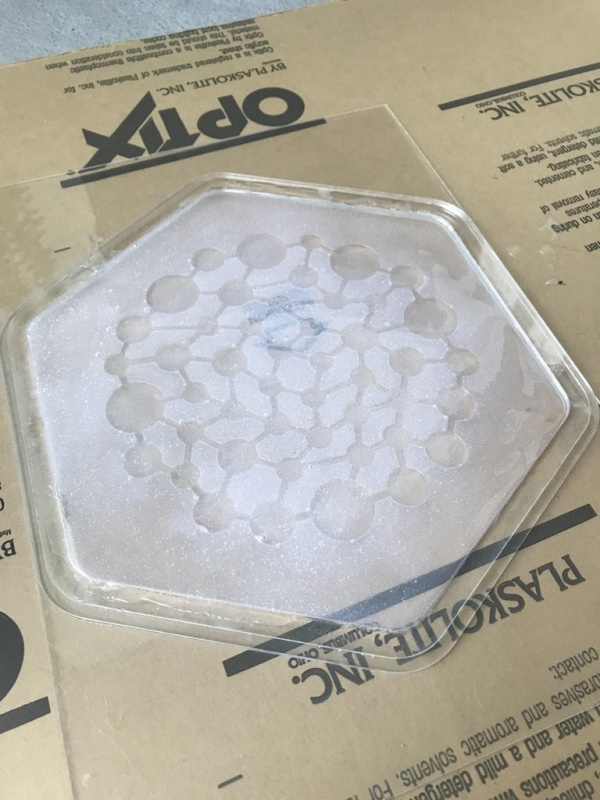
Step 3: Pour Silicone
Product:
Smooth On | Ecoflex 0030
Gloves
stir
Instructions:
Pour Parts A and B 1:1 as instructed Make sure tray is level as the product is very runny 270 minute Cure time Extreme caution and precision when peeling silicone from acrylic trays
Step 4: Silicone Joining and Testing
Product:
Same Smooth On silicone as used in the pour
Air pump (to test)
Small brush
Gloves
Mixing cup
Stir
Instructions:
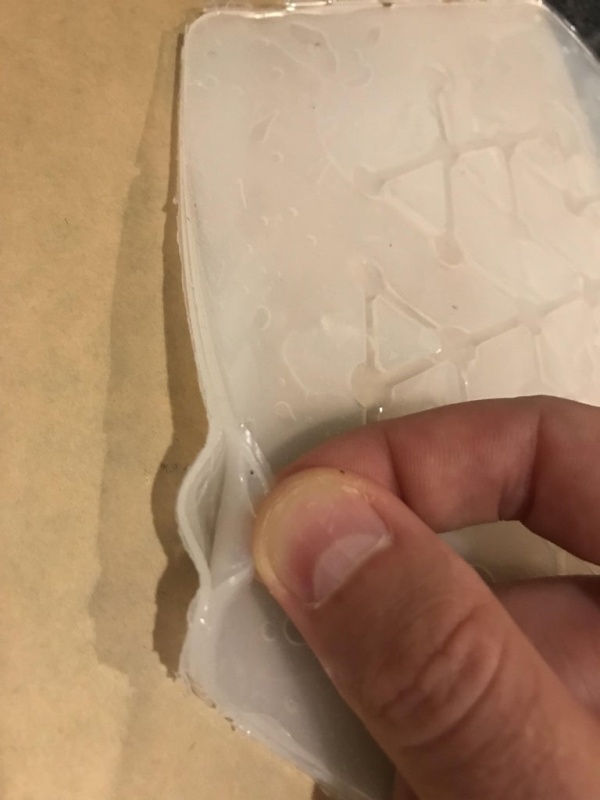
Once silicone molds have cured, remove silicone from acrylic and bond 2 sheets together to create airtight chambers within the material. A small brush was used to lightly spread apply silicone onto the surface of the cured silicone sheet (It is important to use the same silicone to assure bonding). Make sure to not apply silicone to areas intended for air chambers.
Once cured, the air pocket was tested by using a pump to check for leaks, additional silicone was lightly applied where needed to contain leaking.
The silicone tube that punctures the air chamber must be sealed with additional silicone.
Step 5: Mount Electronics | Final Product
Product:
Silicone tubing
Silicone “T” connectors
Instructions:
Mount electronics as required. Connect Micro vacuum pumps to the air chamber through silicone tubes and connectors as required.
Step 6: Vinyl Production
Product:
Vinyl sheets
Household hot iron
Baking paper
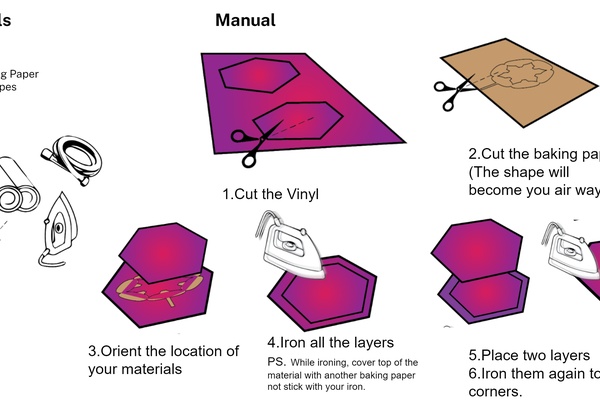
Instructions:
Cut vinyl to size
Cut baking paper shapes to create air chambers
Sandwich baking paper between two sheets of vinyl
Use iron to bond vinyl together (ps. use a sheet of baking paper between the iron and the vinyl)
Source: Bounce Back!
- How does the Bounce Back envelope detect rough handling?
The system uses an MPU6050 accelerometer connected to an Arduino Nano to detect gyro values exceeding a threshold of 400. - Can I use vinyl instead of silicone for the skin?
Yes, vinyl sheets can be used as an alternative material bonded together with a household hot iron and baking paper. - What is the cure time for the Ecoflex 0030 silicone?
The product requires a 270-minute cure time after being poured into the acrylic trays. - Does the envelope inflate itself when not being handled?
No, the package will not inflate itself when it is not being shaken; it only inflates when frightened by rough handling. - Which motors are recommended for the air pumps?
The project specifies using two 4.5V Air Pump and Vacuum DC Motors with a flow rate of 1.8 LPM. - How are the air chambers sealed to prevent leaks?
Chambers are sealed by bonding cured silicone sheets together with more silicone and sealing the tube puncture points with additional silicone. - What software is needed to prepare the acrylic cutting files?
You need access to CAD software to prepare the acrylic cutting files before using a laser cutter. - How do you bond vinyl sheets without melting them?
Sandwich baking paper between two vinyl sheets and use a household hot iron to bond them while protecting the vinyl with the paper.