So you’re here because you want to start learning some of the Arduino Basics… So let’s start with THE most basics… no this “tutorial” is actually a little more basic than what you have in mind. It only requires that you:
- Have ANY Arduino Board.
- Have installed the drivers and required software for the board that you are using.
- Have a breadboard.
- Have one LED.
- Have one resistor (preferably 220 Ohms).
- And some jumper wires (M-M)1.
In fact this is ALL you will need for my second tutorial as well. Just follow the pictures and schematics below and there is no way that you will get lost along the way. In C… this is the language that you will be coding in, you need to remember:
- HIGH=ON
- LOW=OFF
OK! So now we are ready to get started with the HIGH/LOW tutorial.
In my tutorials you will always find that I use Black for Gnd and Red for +ve – just so that you do not get confused – ANYWHERE you see Black Jumpers in my tutorials, that is Gnd and Red is +V.
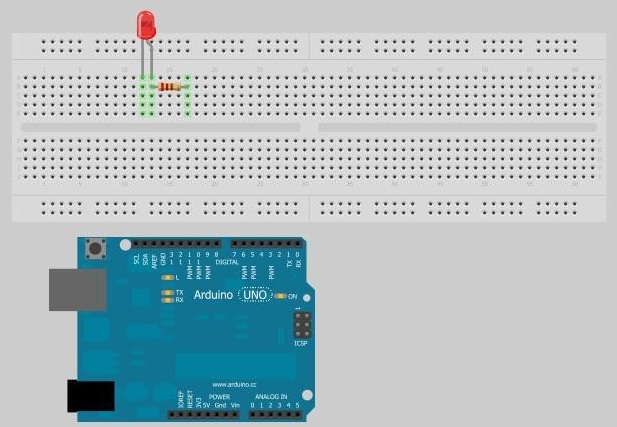
STEP 1: “Breadboard Circuit”
Have a look at the schematic below on how I am connecting this on the breadboard.
Now what is left is to connect the Arduino to the + and Gnd, and then program it!
Step 2: “Connecting to the Board”
This step can be a little tricky, so pay attention. On the Duemilanove (the one that I am using for this demonstration) are – avoiding the analogue in and power slots-16 pins where you can connect your LED. So you have Pins 0-13 (that’s 14 pins including 0), one Gnd Pin, and Aref. For now we will be using the Gnd Pin (the second from last on your board), and one pin between 1-13. It is important to remember what pin you are using, because you need to define it when you program the ATmega chip on the board.
For this demonstration, I have chosen pin 5 for my + (RED jumper), and the Gnd Pin (BLACK/Gnd Jumper), and I have connected them as such:
With the wires being connected to your board, it is now time for the final and most important step of “tutorial 0”, programming.
Step 3: “PROGRAMMING”
Now that we have connected everything, lets fire it up! The first thing you need to do (rather than recheck if you are about to short circuit something), is connect the board to your PC. Once you have connected the board you will see the fixed led on pin 9 start blinking for a few seconds. This means the board is working properly and you are ready to start the Arduino IDE.
Open up the Arduino IDE and you are ready to start programming. Don’t forget that this is C you are coding in, so before I start shooting commands, you should remember: CASE SENSITIVITY IS VERY IMPORTANT!
Even though other programming languages may give you some error messages, this editor is much more complicated. As a matter of a fact, it is not as user friendly as you may imagine, and if you are like me –that is being interested more in the results rather than the details- you may have a hard time understanding the errors that you may or will receive.
So let’s have a look at something really interesting that the Arduino programmers have installed into their editor in order to make it easier for people like us to know when we are making mistakes. If you type a command that is not recognised by the system, the command stays in the usual text colour. That is what you are reading now – BLACK. If the command that you have entered is correct, it immediately turns yellow. You do not need to hit enter or anything for this to happen. If the command that you are typing in is correct, as soon as you are done with the cmd input, it turns yellow. While this is very true, it is actually tricky, so use this to CORRECT yourself and DO NOT rely on it.
Shown below are two examples showing correct and wrong commands. Before you actually read below and realise what mistake has been intentionally made on the commands, you sould try and find it yourself. So look closely.
In the second command– Void loop () – the command should be void loop, instead of Void with a capital V. That’s how easy it is to make mistakes in the Editor. So pay attention. And remember good programming principals make good programs, especially if you are working on a rather large program for your projects.
So now we know how to avoid a few basic errors, we have picked up some really good programming principles, and we know that the FIRST two commands that we have talked about are:
void setup ()
{
}

void loop ()
{
}
These are the 2 MOST basic commands that need to be present with or without anything inside them, or else your program will not run.
Ok, so we have talked about the setup and loop commands, now let’s get some current flowing through our LED. Remember, we have set the RED wire to pin 5 and the BLACK to Gnd.
The first thing that we need to do is define where the LED is. To do that, we use the integer ( >int) cmd as follows:
Now let’s analyse this a little bit.
So we have >int ledPin = 5:
Two things to note here:
- “ledPin” can be changed to whatever name you want as long as you remember it, and as long as 5 is the pin you have connected the RED jumper to.
- And the “;” (Semicolon). Now this is also important. Just remember that at the end of every line INSIDE A COMMAND, you need to add a “;”. There are exceptions to this and you will learn these as you go.
Now we have defined the pin where we want the current to flow. So what comes next?
For more detail: BLINKING AN LED USING AN ARDUINO UNO (EXPLAINED)