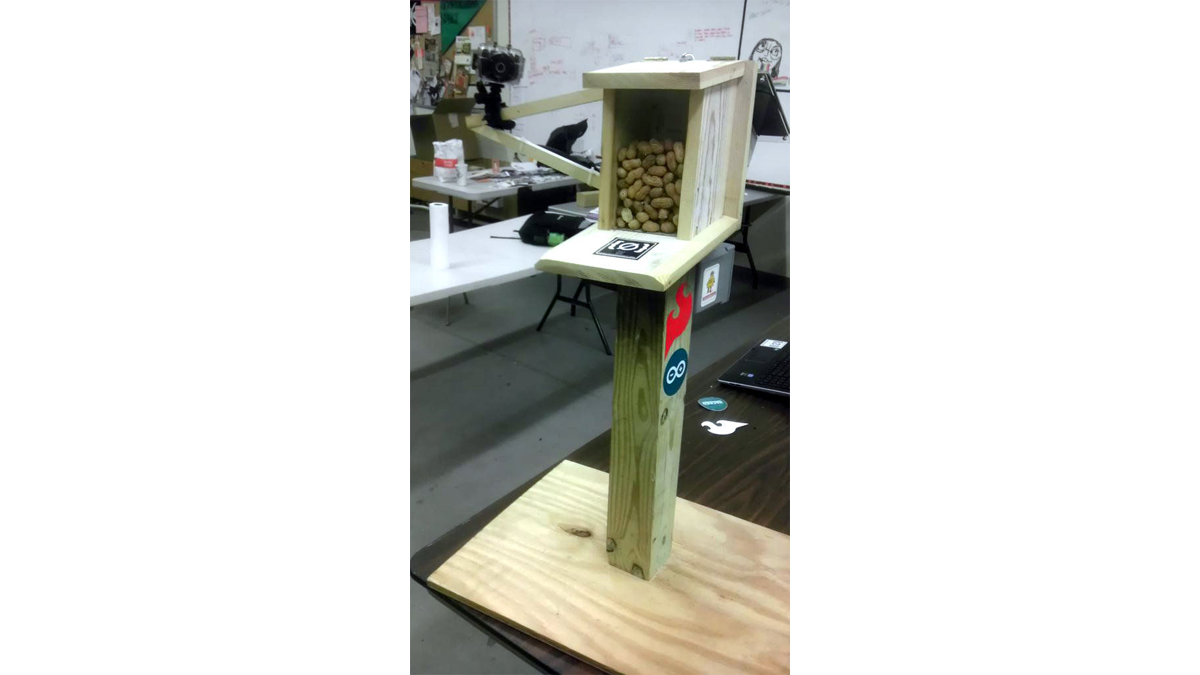
The Solar Powered-Bird Proof Squirrel Feeder w\ Camera will allow squirrels to retrieve seeds, nuts, and corn kernels without worrying about those pesky birds stealing all their food. While your squirrel enjoys the spoils of your feeder, you’ll enjoy lovely digital photos to entertain and impress your friends, family, and fellow squirrel lovers. This environment friendly project is powered entirely off of solar power.
This project is rated moderate for ease-ability. You will learn a little bit about working with wood cutting, micro-controllers (e.g. Arduino Uno), programming, and solar panels (e.g. Voltaic Systems’ 6 Watt Solar Charger Kit). We will provide resources for familiarizing yourself with everything you need to know, like soldering, cutting, where to buy materials, and how to use them.

To begin creating your very own squirrel selfies, continue to the first step.
Why a Solar Powered Bird-Proof Squirrel Feeder w\ Camera?
The purpose of this indestructible it to inspire you. While you will no doubtingly experience challenges while building your very own projects, you can be assured that it is natural to stumble while creating anything from scratch. We hope our instructions will help you build something you can enjoy and share with others. Our folks at Unallocated Space had a few ideas for the Instructable’s Voltaic Systems Build Night contest entry. You can rest assure choosing just the right project for the Instructable community was not a easy task, but be prepared to be wowed and awed!
Presenting the “Solar Powered Bird-Proof Squirrel Feeder w\ Camera”… Sounds awesome right? Don’t take our word for it, see for yourself!
[Video Coming Soon]This Instructable is a living document. As we learn new ways of explaining and doing things, we will update this Instructable. Please continue on to the next step to begin building!
About Us
Unallocated Space (UAS) is an active hackerspace location in Anne Arundel County (Severn, MD) that supports the DC / Baltimore Metro Area. As a 100% free open technology-based community lab, we welcome anyone to share their creativity.
Our mission is to foster our community to “Teach, Learn, Build”. Our 1600+ sqft space is minutes from BWI, between Baltimore and Washington DC. Equipped with a wide range of tools, UAS welcomes DIY tech enthusiasts of all skill levels and interests. Our space enables everyday people to share ideas and work on group and individual projects. Our facility has resources that support electronics (soldering, circuits), fabrication (wood, plastics, metal), and is fully wired/wireless network with a VM lab for network experiments. Our classroom can handle 20+ students and hosts courses in electrics, web development, programming and computer networking.
Our members offer a steady stream of free and public events, classes, activities, and anything that gets people building, making, and learning. We serve the community on 100% donated funds as a non-profit organization. For more information, visit http://www.unallocatedspace.org for upcoming events or contact info AT unallocatedspace.org for more Information.
Step 1: Things You’ll Need
Every hacker/maker knows finding the right materials can be a daunting task. This is an opportunity to be creative. This Instructable is an opportunity for us to help you more easily find the same materials we used, but we want to remind you to think outside the box.
Notes: Before beginning, please review all the steps to observe what is needed and how those items are used. Many of these tools and supplies can be substituted to obtain the same desired effect. We encourage you to experiment and use recycled materials whenever possible!
Tools
– Computer (Windows, Mac OS X, Linux)
– Table Saw (Optional) or Hand Saw
– Miter Saw (Optional) or Hand Saw
– Electric Drill
– 7/64 Drill Bit
– Phillip Screw Bit
– Phillip Screw Driver
– Box Cutter
– Plexiglas Cutter (Optional)
– Solder Iron w\ Solder and Flex
– Hot Glue Gun
– Tape Measure
Supplies
– 6 Watt Solar Charger Kit (e.g. http://www.voltaicsystems.com/)
– Wood
– Wood Screws
– Black Split Loom 5/8″
– Hinges 1 1/2″ x1 1/4″ (Qty 2) (e.g. Gatehouse 3-1/2-in Entry Door Hinges)
– Spring (e.g. The Hillman Group 2-3/8-in Zinc-Plated Steel Window Screen Tension Springs)
– Outdoor Electrical Box (e.g. CANTEX Plastic New Work Electrical Box
– Arduino UNO v3 (e.g. http://www.sparkfun.com / http://www.arduino.cc)
– Digital Camera w\ Weather Proof Enclosure (e.g. Southern Telecom Emeson Action Digital Camera)
– Copper Tape or Switch
– Black Split Loom 5/8″
– Clear Silicon Sealant
– Male to Male Jumper Wires
– 22 AWG Stranded Wire
– 22 AWG Solid Wire (Copper) or Pre-formed Jumper Wire for Breadboards
– Optocoupler (Qty 2) (e.g. PC817) (Qty 2)
– LEDs (Qty 2) (for testing and optional)
– 170-Point Mini Breadboard
– Non-Salted Unshelled Peanuts
Step 2: Cutting Wood for Feeder Box
These instructions assume basic woodworkingskills and access to appropriate tools. The instructions don’t include particular methods for cutting the wood on specific tools because there are many ways to achieve the same cuts using different tools.
Feeder Box Materials:
– 1 board 1X10
– 5′ long
– Plexiglass 1/8″ thick for the clear front panel – 4 7/8″ X 7 11/16″
– Plexiglass 1/8″ thick to support the solar panel – 7 1/2″ X 8 1/2″
– Wood screws #8 X 1 1/2″ (18)
Pieces:
– 1 X base panel 8″ wide by 9 3/16″ long
– 1 X back panel 8″ wide by 9 1/4″ long
– 1 X top panel 6 3/4″ wide by 6″ long
– 2 X side panels 5″ wide by 8 3/4″ long
– 1 X panel
– 5″ wide by 12″ long (will be cut at a 30 degree angle)
Cutting the Panels:
– Rip the board to 8″ width
– Cut a 9 3/16″ and a 9 1/4″ piece out of the ripped board. These are the bottom and back panels.
– Chamfer (angle cut) both pieces at a 10 degree angle along one of the 8″ edges.
– Rip the remaining board to 6 3/4″.
– Cut a piece 6″ long. This is the top panel.
– Chamfer the piece at a 10 degree angle along one of the 6″ edges.
– Rip the remaining board to 5″.
– Cut 2 pieces each 8 3/4″ long. These are the 2 side panels.
– Cut the side panels to 10 degrees across both of the 5″ sides to match the chamfers on the bottom, back, and top panels. The resulting pieces should be parallelograms.
– Cut a 1/8″ wide groove along one long edge of both side panels. Make sure that the grooves will face inwards on the finished box – see the drawings. This groove will hold the clear front panel of the feeder.
– Cut 1 piece 12″ long. This will be cut in half to become the supports for the solar panels.
Make the angle cuts on the solar panel supports. Cut the piece in half at 30 degrees by placing a mark at the exact center of the board, then marking a line at a 30 degree angle to the edge intersecting the center point. The 2 resulting pieces should be identical with one square edge and one angled edge.
Step 3: Assemble the Feeder Box
Attach the base panel to the back panel. The chamfered edge of the base panel should go against the back panel so that the base slopes down while the back is vertical.The chamfered edge of the back panel goes on top sloping towards the back side of the feeder. Pre-drill the holes to prevent the wood splitting. Use 2 screws (and waterproof wood glue if desired).
Attach the side panels to the combined bottom/back unit. The sides should be set in 1″ from the edges of the
back/bottom unit. Make sure the grooves for the clear front face towards the inside of the feeder. Use 2 screws through the back and 2 screws through the bottom to secure each side. Pre-drill holes to prevent splitting.
Attach the solar panel supports to the back. The supports should be set in at least 1 3/4″ from the edges of the back. The angled edge goes against the back panel so that the solar panel will sit at an angle facing the sun. Attach the supports using 2 screws per support from inside the feeder box.
Attach the lid to the back panel using the hinges. The chamfered edge fits against the back panel. Use 2 hinges spaced an appropriate distance apart. Predrill the holes for the hinge screws to avoid splitting.
Open the lid and slide the clear front panel into the feeder.
Attach the plexiglass support for the solar panel to the supports on the back of the feeder. Use 4 screws to attach it, predrilling the holes to prevent splitting. You may wish to mark and drill the mounting holes for the solar panel before attaching the support.
The top of the mounting pole should be cut at a 10 degree angle to match the angle of the base plate. Attach in a secure fashion using 2 to 4 wood screws.
Step 4: Cutting Plexiglas for the Feeder Box
A picture is worth a thousand words, please see photos.
Step 5: Bird-Proof Squirrel Feeder
We decided to mount our Bird-Proof Squirrel Feeder on a mobile platform to allow us to adjust it with the light and remove it from outside during harsh weather. It would also be difficult to get a lot of light if it was secured to a tree, since a tree may offer too much shade for our solar panel.

Step 6: Building the Camera’s Circuit
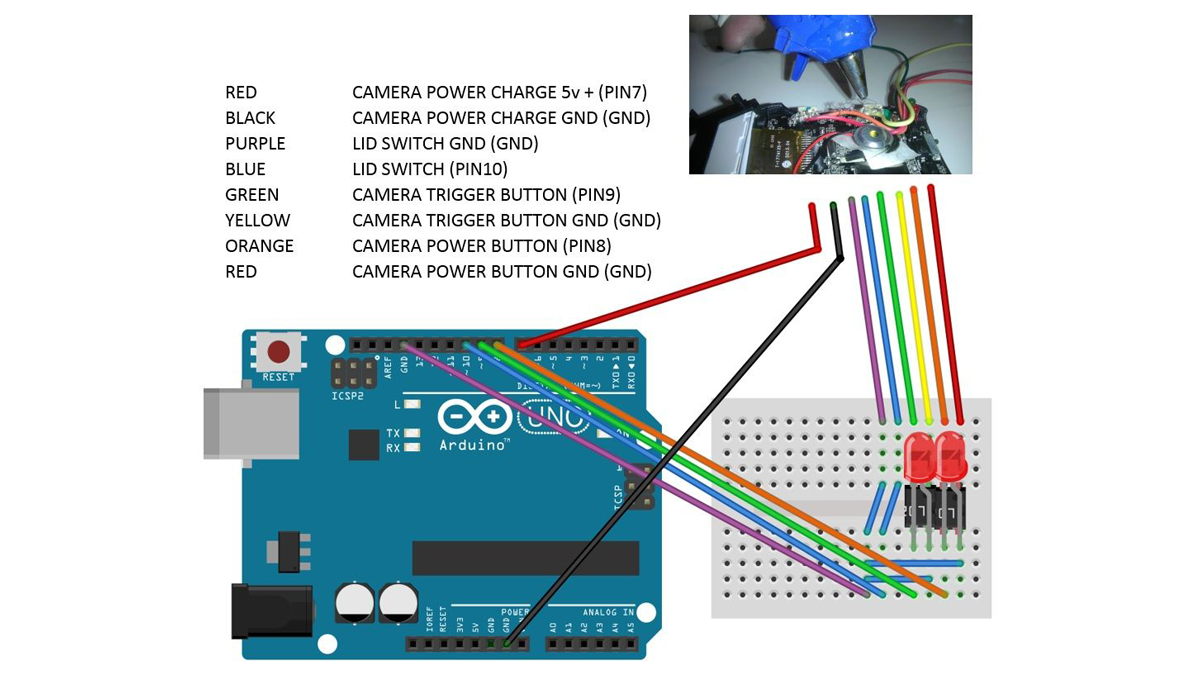
Please see wire diagram for assistance.
– Arduino UNO v3 (e.g. http://www.sparkfun.com / http://www.sparkfun.com
– Male to Male Jumper Wires
– 22 AWG Stranded Wire
– 22 AWG Solid Wire (Copper) or Pre-formed Jumper Wire for Breadboards
– Optocoupler (Qty 2) (e.g. PC817) (Qty 2)
– LEDs (Qty 2) (for testing and optional)
– 170-Point Mini Breadboard
Why all the fancy circuits? We want to control the camera power button, and trigger button, so we decided to do this with Opto-isolators also called an optocoupler, photocoupler, or optical isolator. This allows us to open and close another circuit (the camera) while isolating the two circuits by using light. This all happens inside a chip and clarification has nothing to do with the solar panel. While we were building this, we also decided to connect to the camera’s power to allow us to charge it.
Please see http://en.wikipedia.org/wiki/Opto-isolator .
Wiring Diagram(s)
RED CAMERA POWER CHARGE 5v + (PIN7) -> (See USB Diagram)
BLACK CAMERA POWER CHARGE GND (GND) -> (See USB Diagram)
PURPLE LID SWITCH GND (GND)
BLUE LID SWITCH (PIN10)
GREEN CAMERA TRIGGER BUTTON (PIN9)
YELLOW CAMERA TRIGGER BUTTON GND (GND)
ORANGE CAMERA POWER BUTTON (PIN8)
RED CAMERA POWER BUTTON GND (GND)
WARNING: DO NOT PLACE “CAMERA POWER” (RED or BLACK) TO THE BUTTONS OR SWITCH.
For more detail: Bird Proof Squirrel Feeder & Solar Powered Camera using Arduino
