If you have ever worked with capacitive switches you know how much it makes you want to smash your face into a wall…Now imagine you have no way to monitor output, well that is what I was running into. Problem is you can never know what the output is with stock settings of an attiny. So my solution comes from the good boys/gals of MIT. However, It’s not super clear on their walkthroughs so I thought I would provide a more in depth explanation.
 Remove these ads by Signing Up
Step 1: W-w-w-wire it up
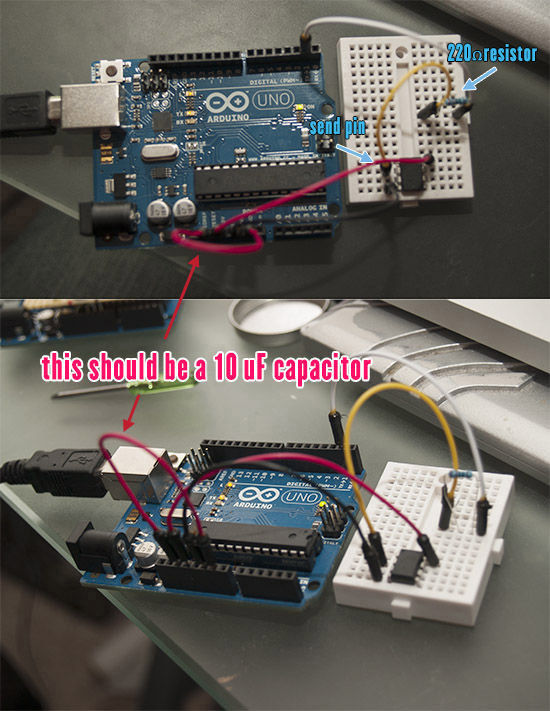
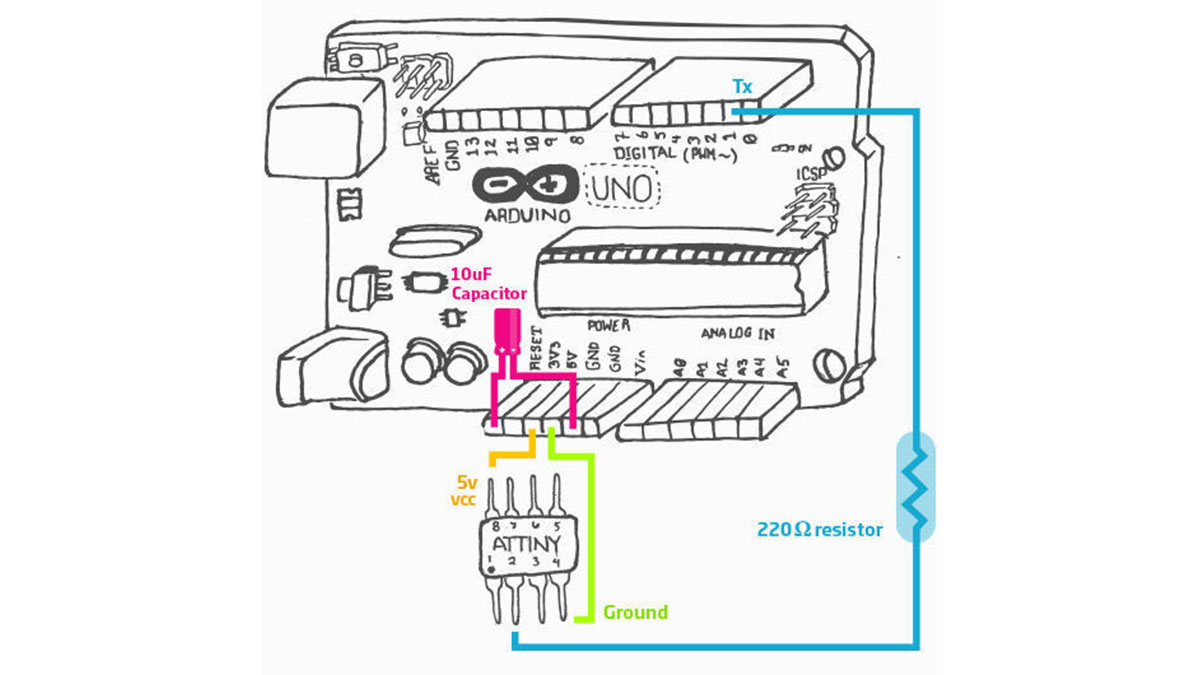
1. Make sure you connect a 220Ω resistor between pin 2 and Tx(transmit) input of arduino. Resistors aren’t directional so it doesn’t matter which way you insert it.
2. Now put a 10uF capacitor between ground and reset with negative going to ground and positive to reset
If you do not do this, you could damage your board/attiny or make the universe implode. (refer to pictures above). SO SERIOUSLY, IF YOU MAKE THE UNIVERSE IMPLODE I WILL FIND YOU IN A PARALLEL DIMENSION AND PUSH YOU IN TO A DEEP PUDDLE OF WATER, AND YOU WILL HAVE TO WALK HOME WITH WET SOCKS.
Step 2: Burn baby, burn!
The items in this menu allow you to burn a bootloader onto the microcontroller on an Arduino board. This is not required for normal use of an Arduino board but is useful if you purchase a new ATmega microcontroller (which normally come without a bootloader). Ensure that you’ve selected the correct board from the Boards menu before burning the bootloader…When you upload a sketch, you’re using the Arduino bootloader, a small program that has been loaded on to the microcontroller on your board. It allows you to upload code without using any additional hardware. The bootloader is active for a few seconds when the board resets; then it starts whichever sketch was most recently uploaded to the microcontroller. The bootloader will blink the on-board (pin 13) LED when it starts (i.e. when the board resets).
But what if I haven’t installed attiny for arduino?! I’m freaking out maaaan.
Lo, and behold! If you do not have attiny85 (or other attiny) installed for arduino, it’s you’re lucky day! If you do, just skip to next step. Here is how to install:
Support for third-party hardware can be added to the hardware directory of your sketchbook directory. Platforms installed there may include board definitions (which appear in the board menu), core libraries, bootloaders, and programmer definitions. To install, create the hardware directory, then unzip the third-party platform into its own sub-directory. (Don’t use “arduino” as the sub-directory name or you’ll override the built-in Arduino platform.) To uninstall, simply delete its directory. —arduino website
Download latest version (choose the with arduino-tiny in title):
http://code.google.com/p/arduino-tiny/downloads/list
For example, my directory looked like:
/Users/[username here]/Documents/Arduino/hardware
 TinyDebugKnockBang.zip
For more detail: Attiny serial monitor using arduino walkthrough