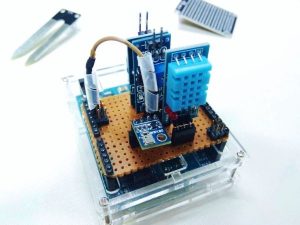
In this project, we will be making a weather station that measures air pressure, temperature, rain drop, soil humidity and air humidity using Arduino which save the data for data acquisition!
It’s a fairly easy project and can be used either on its own or part of something bigger, check it out >> Integrated Weather Station (IWS).
Step 1: List of Material
For this project, we will be using:
– Arduino boards (mine Arduino Uno Rev3)
– DHT11 Humidity and temperature sensor cost: ~5.00 USD
– BMP185 Barometer sensor cost: ~6.00 USD
– Rain Drop sensor module cost:~2.00 USD
– Soil Humidity sensor module cost:~2.00 USD
– Breadboard or Custom ProtoShield (Check it out how to make it >> )
– Jumper Wire
Step 2: Hardware Connections
In general, the connections are very simple. Follow the instructions and images above, and you should have no problems.
Connecting Rain Drop Module
- the VCC pin on Arduino’s 5V output
- the GND pin to Arduino’s GND and
- the Analog Data to Arduino’s analog pin 0
Connecting Soil Humidity Module
- the VCC pin on Arduino’s 5V output
- the GND pin to Arduino’s GND and
- the Analog Data to Arduino’s analog pin 1
Connecting BMP185
- the VCC pin on Arduino’s 3.3V output
- the GND pin to Arduino’s GND
- the SDA (Serial Data Line) pin to Arduino’s analog pin 4 and
- the SCL (Serial Clock Line) pin to Arduino’s analog pin 5
Connecting DHT11
- the VCC pin on Arduino’s 5V output
- the GND pin to Arduino’s GND and
- the DATA pin to Arduino’s digital pin 4
Step 3: Arduino Programming
Below is the Arduino Weather Station code. Include the library from AWS_library.rar, upload the code to your Arduino (Mine Arduino Uno Rev3), and you should have no problems.
You can clone and edit the code in any way you prefer.
Step 4: Enjoy!
Power through batteries or a plug and you’re good to go.
After making sure that everything works smoothly, you can take this project into bigger project. Check it out >> Integrated Weather Station(IWS) !
Read more: Arduino Weather Station (AWS)

