Summary of Arduino Serial Thermometer
This tutorial explains how to build an Arduino Serial Thermometer using an MCP9700 temperature sensor. The system reads voltage from the sensor via pin A0, converts it to Celsius, and displays the average of ten samples in the Arduino IDE's serial monitor. It requires basic knowledge of the Arduino Serial Port and standard breadboarding skills.
Parts used in the Arduino Serial Thermometer:
- Arduino Uno board
- USB cable
- Wire links
- Breadboard
- 100n Capacitor (x2)
- MCP9700 Linear Active Thermistor IC
The Arduino reads temperature from a MCP9700 temperature sensor IC and displays the temperature in the Arduino IDE serial monitor window.
Also see the Arduino LCD thermometer tutorial (tutorial 14).
Prerequisites
Complete Tutorial 9: Using the Arduino Serial Port before attempting this tutorial.
Components
Besides an Arduino Uno board, USB cable, wire links and a breadboard, you will need:
| QTY | PART | DESIGNATOR | NOTES | TYPE |
|---|---|---|---|---|
| 2 | 100n | C1, C2 | Non-polarized | Capacitor |
| 1 | MCP9700 | U1 | Linear Active Thermistor IC | Semiconductor |
Circuit Diagram
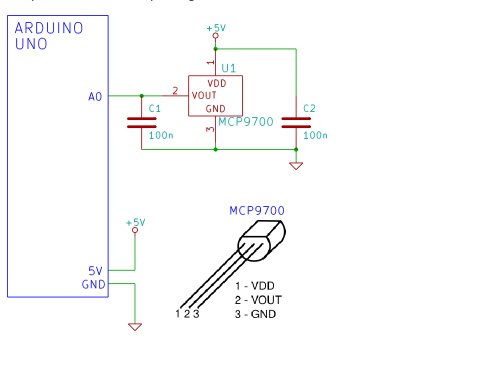
The schematic for the Arduino serial thermometer and pinout for the MCP9700 is shown below. The MCP9700 temperature sensor is packaged in a TO-92 case – it looks like a transistor.
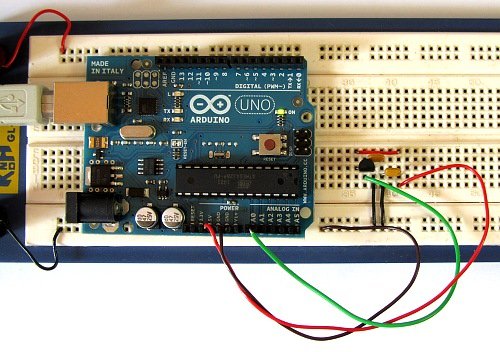
Building the Circuit
The circuit is very simple to build, click the picture below for a bigger image of the breadboard circuit..
Programming the Arduino
The serial_temperature sketch is listed below. Copy the sketch and paste it into the Arduino IDE.
/*--------------------------------------------------------------
  Program:     serial_temperature

  Description:  Reads the voltage from a MCP9700 temperature
                sensor on pin A0 of the Arduino. Converts the
                voltage to a temperature and sends it out of
                the serial port for display on the serial
                monitor.

  Date:         15 April 2012

  Author:       W.A. Smith, http://startingelectronics.com
--------------------------------------------------------------*/

void setup() {
    // initialize the serial port
    Serial.begin(9600);
}

void loop() {
    float temperature = 0.0;   // stores the calculated temperature
    int sample;                // counts through ADC samples
    float ten_samples = 0.0;   // stores sum of 10 samples

    // take 10 samples from the MCP9700
    for (sample = 0; sample < 10; sample++) {
        // convert A0 value to temperature
        temperature = ((float)analogRead(A0) * 5.0 / 1024.0) - 0.5;
        temperature = temperature / 0.01;
        // sample every 0.1 seconds
        delay(100);
        // sum of all samples
        ten_samples = ten_samples + temperature;
    }
    // get the average value of 10 temperatures
    temperature = ten_samples / 10.0;
    // send temperature out of serial port
    Serial.print(temperature);
    Serial.println(" deg. C");
    ten_samples = 0.0;
}
For more detail: Arduino Serial Thermometer
- What does the Arduino read from the MCP9700?
The Arduino reads temperature by reading the voltage from the MCP9700 sensor on pin A0. - Where is the temperature displayed?
The temperature is displayed in the Arduino IDE serial monitor window. - How many samples are taken for each reading?
The program takes 10 samples from the sensor to calculate an average value. - What is the required baud rate for the serial port?
The serial port is initialized at a baud rate of 9600. - Can I use this project without completing Tutorial 9?
No, you must complete Tutorial 9: Using the Arduino Serial Port before attempting this tutorial. - What package type is the MCP9700 sensor?
The MCP9700 is packaged in a TO-92 case and looks like a transistor. - How often does the code sample the data?
The code samples every 0.1 seconds during the loop. - What unit of measurement is used for the output?
The output temperature is measured in degrees Celsius (deg. C).