
Summary of Arduino Propeller LED Display
This article outlines building a Propeller Display using an Arduino, DC motor, and LEDs to create rotating text via the Persistence of Vision effect. The project repurposes a DVD drive as a base, mounting a motor vertically with a battery attached for power. By rapidly spinning eight LEDs arranged in a column, static images appear as continuous circular animations.
Parts used in the Propeller Display:
- Arduino Uno
- DC Motor
- +3.6V LI-ION battery
- LED (8 pieces)
- 1KΩ resistor (8 pieces)
- Old PC DVD DRIVE (used as a stable base)
- Feviquick adhesive
- Dot board (for motor support)
- Quick glue
- Button cell or other testing source
You have seen Propellers in Aircrafts or in marine ships, if not in real then in movies for sure. In this session we are going to design a Propeller Display with Arduino, LEDs and a DC motor. In this Propeller Display, text will appear to be rotating in propeller fashion in a circular shape.
The propeller display is in a way like LED Matrix. It contains 8 LEDs (Light Emitting Diodes) which are arranged in the form of an 8*1 matrix (8 rows and 1 column). They are arranged in the form of ladder one over the other. These 8 LED can be made to display any content like text, numbers, symbols etc. This is achieved by Perception of Vision (POV), in which many still images are moved quickly one by one in a sequence, which gives a perception of animation or a moving image. How this is done is explained in the tutorial given below.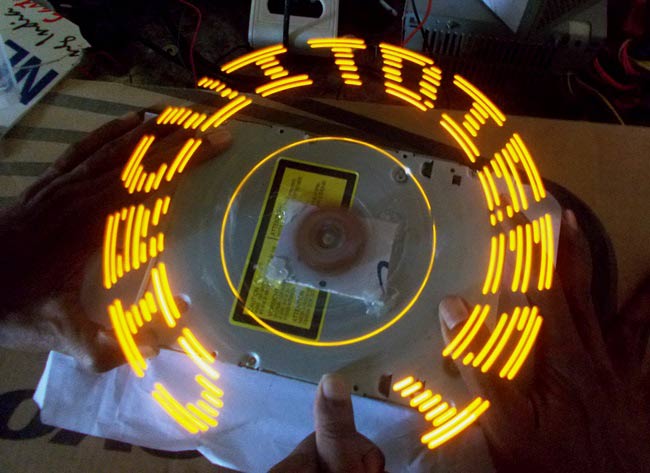
Components Required:
- Arduino Uno
- DC Motor
- +3.6V LI-ION battery
- LED (8 pieces)
- 1KΩ resistor (8 pieces)
Construction of Propeller Display:
First take a stable base; I used a old PC DVD DRIVE which was lying around. You can get a wooden plank or a cardboard box. Then make a hole in the middle of DVD Drive (base) and insert the DC motor axis in it. Make sure the hole is tight enough to hold the motor and motor can rotate freely. I used Feviquick to put the axis in place.
Support the top of Motor to equate the uneven bumps. I used a dot board over it and used quick glue again to stick it with DC motor.
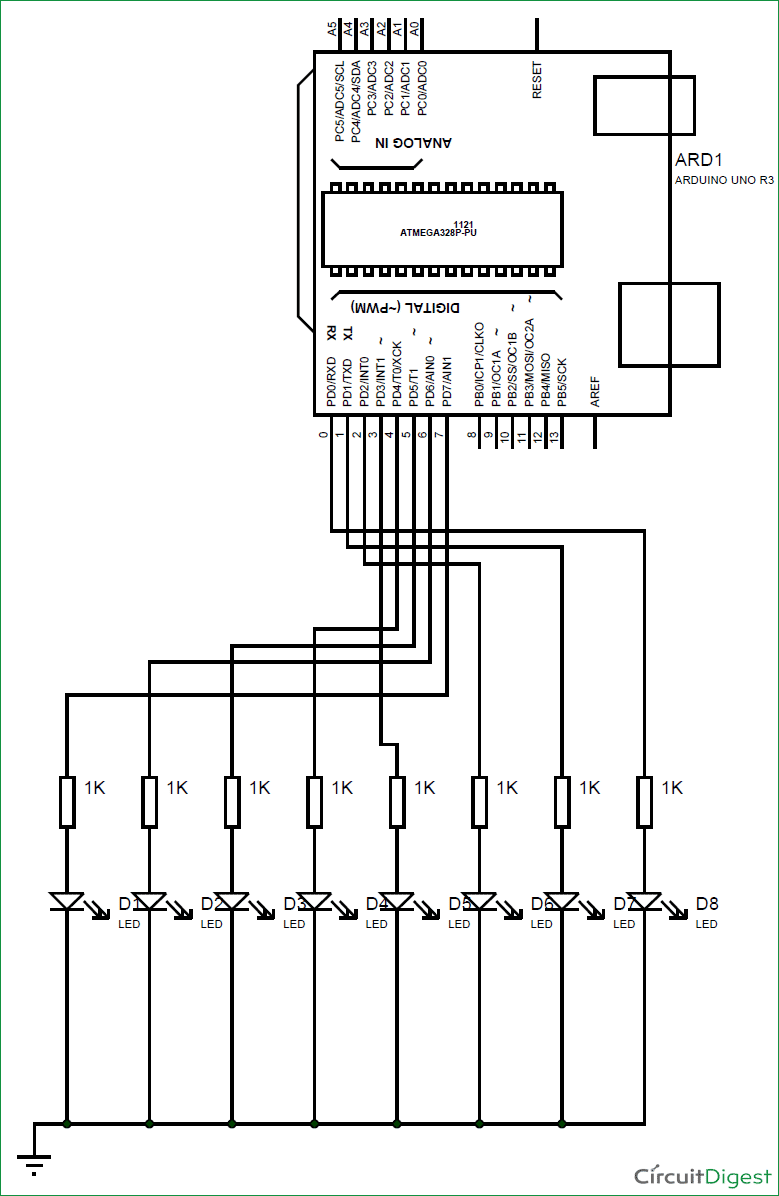 Attach the LI-ION battery on top. If you don’t have LI-ION battery of same size, just leave it. After that take each LED and test it with button cell or any other source. Then take some resistors and solder them with LEDs as per the picture and circuit diagram shown below.
Read More: Arduino Propeller LED Display
-
What is the main principle behind the Propeller Display?
The display uses Perception of Vision (POV), where still images move quickly in sequence to create an animation. -
How many LEDs are required for this project?
The project requires exactly 8 LEDs arranged in an 8 by 1 matrix. -
Can I use materials other than a DVD drive for the base?
Yes, you can use a wooden plank or a cardboard box instead of an old PC DVD drive. -
What adhesive was used to secure the motor axis?
The author used Feviquick to place the motor axis in the hole of the base. -
How should the resistors be connected to the LEDs?
Resistors must be soldered to the LEDs according to the provided picture and circuit diagram. -
Is the LI-ION battery mandatory if it does not fit?
No, if you do not have a LI-ION battery of the same size, you can leave it out. -
What component is used to support the top of the motor?
A dot board is used to support the top of the motor and equate uneven bumps. -
What type of content can be displayed on this propeller?
The 8 LEDs can display text, numbers, symbols, or any other content.
