Summary of Arduino powered GLCD (Graphic LCD)
This article guides users in creating an Arduino-based project to display text, images, and animations using a Graphic LCD (GLCD). It details the necessary hardware components, soldering header pins to the GLCD, connecting them to an Arduino Mega board via specific wiring diagrams, and installing the required GLCD library. The guide emphasizes proper power connections to prevent damage and provides programming examples for updating the display with fonts and graphics.
Parts used in the Arduino powered GLCD:
- Arduino Uno or Mega board
- GLCD screen based on KS108B
- Breadboard
- Header pins (row of 20)
- Jumper wires
- 10k ohm potentiometer
- 1k ohm resistor
- Soldering equipment
Displays are always nice. So far I’ve just been demonstrating how to use 7-segmented displays to display numbers using very few resources. But what if you want to display text? Or pictures? Or both? Well in order to do that, you’re going to need a simple LCD screen.
Now there are simple led screens out there right now which work on serial communication and only display text. That might be good enough for you, but I like flexibility. With a GLCD, I can use different fonts, show pictures, and even animations!
What’s also really nice is that the GLCD I’m using is only $20. Granted, this is a little bit more involved to program and to get to work above the super easy Serial.print(“Hello World”) commands.
As always, I made it at TechShop.
http://www.techshop.ws
Circuit
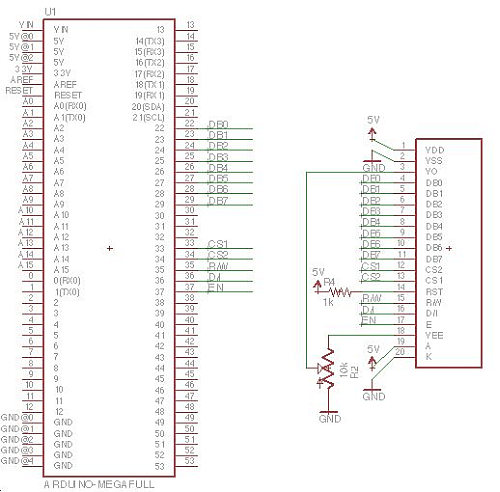
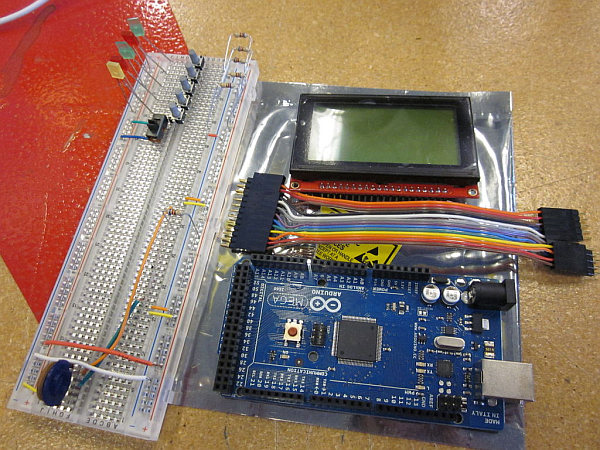
Heads up. There is going to be soldering. Also, to be clear, I am going to be using a Mega board. The wiring for the Uno is NOT THE SAME. But luckily, there is the wiring digram for that available in the provided manual in the GLCD library (next step).
1. Get the header pins and solder them to the GLCD. It is critical that a good connection is made! Just sticking jumper cables in will not cut it.
2. Follow the wiring diagram for the Mega version. Keeping track of what pins do what.
On the GLCD
1,2: Power/GND for the screen
3,18: Contrast through potentiometer
4-11: Data pins
12,13: Left/Right screen
14: Reset (Connect to V++ with 1kohm resistor)
15: Read/Write
16: D/I
17: Enable
19,20: Power/GND for the Backlight
Make sure to get the power connections right. If you do not you could damage the GLCD.
GLCD Library
First thing you are going to need to do is download the library for this GLCD. It can be found at:
http://code.google.com/p/glcd-arduino/downloads/list
To INSTALL:
This library should be unzipped into a folder named glcd in the arduino libraries
directory. If you already have a folder called libraries in your Arduino
sketchbook directory, unzip the glcd files there. If not, create a
folder called libraries in the sketchbook folder, and drop the glcd library
folder here.
To locate your sketchbook directory
bring up the IDE and click on [File]->Preferences
You sketchbook directory can be anywhere you want.
The location that the IDE is looking for you sketchbook directory is
in the text box right there at the top of the “preferences” dialog.
Wherever that directory is, you will need to create a directory called
“libraries”, then extract the zip image into that directory.
So you will end up with
{sketchbook directory}/libraries/glcd
Then re-start the Arduino programming environment, and you should see the glcd
library in the Sketch > Import Library menu.
Alternatively you can install the glcd library directly in the arduino distribution
by placing it in the libraries directory where the arduino distribution
was installed. For arduino release 0018 and later that would be:
{Arduino installdir}/libraries
So you will end up with {Arduino installdir}/libraries/glcd
Then re-start the Arduino programming environment (IDE), and you should see the glcd
library in the Sketch > Import Library menu.
After you unzip, then follow instructions in glcd/readme.txt file.
For full details of the library see the included HTML documentation
in glcd/doc/GLCDref.htm
Arduino Programming
Now then. On to actual programming!
When ever you want to use the library, remember to include
into the sketch.
The library should automatically detect what type of board that you have. However, you can override this manually and select certain ports to act as the display pins. This may or may not be useful to you.
When ever you want to update the GLCD, you can access it with GLCD.[command]. Keep in mind that this does not need to be run all the time. The display will retain the information given to it until changed. When it does update it writes over what is on top, but it does not automatically clear anything. If you write over big font with smaller font, both will be visible because the new stuff did not fully displace the old.
There is a lot of examples included with the library. If you are having trouble, run glcdDiag. It will run a diagnostic on the serial monitor and it might tell you what’s wrong.
Here’s a simple example.
/*
GLCD Library – Hello World
This sketch prints “Hello World!” to the LCD
and shows the time in seconds since reset.
1. Arduino Uno $40
This CAN work, but it takes up just about all of the pins. If you want to do anything else, I recommend a Mega $60
2. GLCD $20
based on a KS108B lcd
from sparkfun.
https://www.sparkfun.com/products/710
3. Breadboard
4. Header pins (row of 20)
5. Jumper wires
6. 10k ohm potentiometer (for contrast control)
7. 1k ohm resistor
8. soldering equiptment
For more detail: Arduino powered GLCD (Graphic LCD)
- What is the main advantage of using a GLCD over simple LED screens?
A GLCD allows you to use different fonts, show pictures, and create animations. - Can I use an Arduino Uno for this project?
Yes, it can work, but it uses almost all available pins, so a Mega board is recommended for more flexibility. - How do I install the GLCD library in the Arduino IDE?
Unzip the library into a folder named glcd inside your sketchbook libraries directory or the Arduino installation libraries folder. - Does the display automatically clear old content when writing new text?
No, the display retains information until changed; writing smaller fonts over larger ones may leave remnants visible. - What should I do if I encounter issues with the display?
You can run the glcdDiag tool included with the library to run a diagnostic on the serial monitor. - Why is soldering critical for this project?
Soldering header pins ensures a good connection, as simply sticking jumper cables in will not suffice. - How is the contrast controlled on the GLCD?
The contrast is adjusted through a potentiometer connected to pins 3 and 18. - What happens if power connections are made incorrectly?
Incorrect power connections could damage the GLCD.