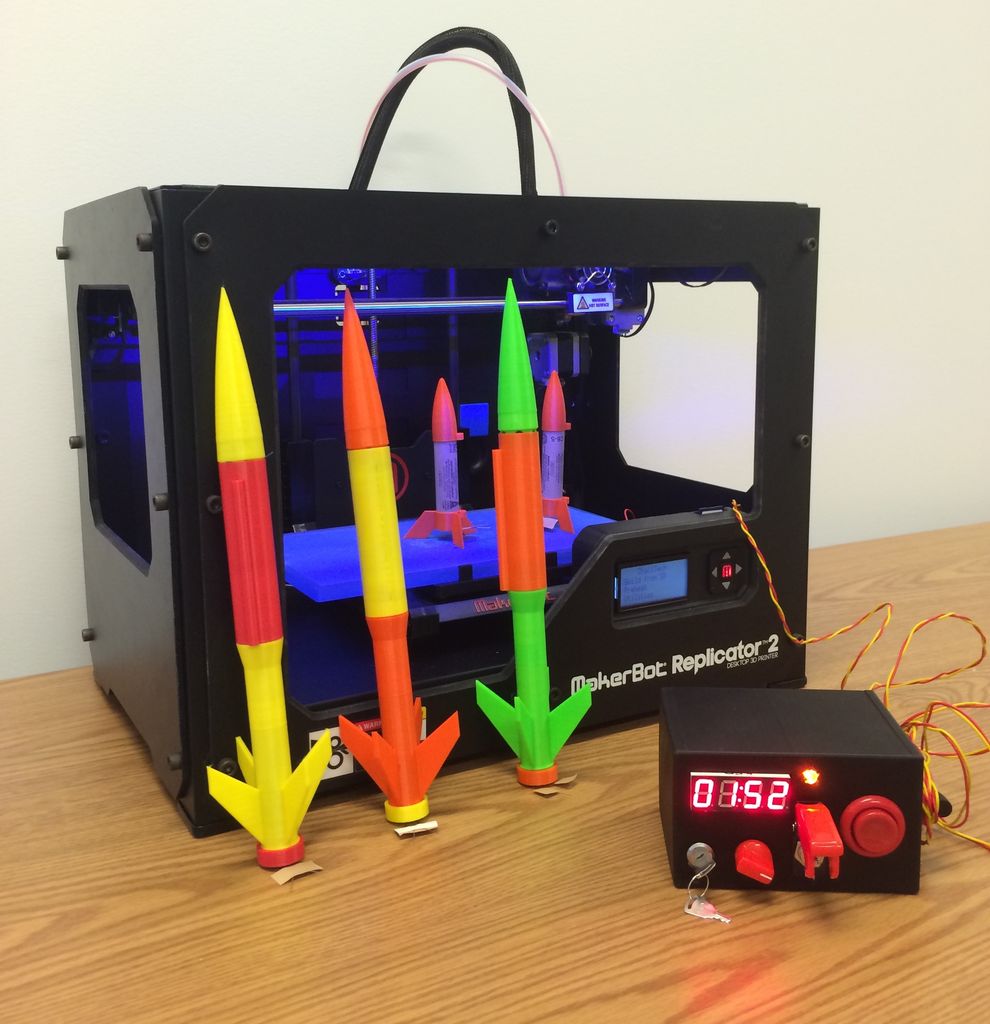
When I was a kid, I loved playing with Estes Rockets, so I decided to get back into the hobby but using all of my maker skizzls. So here’s a really cool Arduino Rocket Launcher launching 3D Printed rockets from my MakerBot Rep2! Enjoy! Fully Open Source for anyone to make!
Arduino Code on GitHub
Thing Files for 3D Printing on Thingiverse
Step 1: Acquire all the Components
Things you are going to need to complete the Instructable and Launch your own 3D Printed Rocket are put together in a comprehensive list in an Excel Spreadsheet with links to the components I used – You can always use your own if they are laying around!
For the actual rockets – I highly recommend designing your own or finding one on Thingiverse.com. Also having a 3D printer, experience with Arduino, and knowing how to solder will be incredibly useful in making the launcher and launching your own 3D printed Rockets!
Also if you are under 18, please acquire an adult for supervision! You will be using (controlled) explosives later on!
 Components and Sources.xlsx44 KB
Step 2: Start 3D Printing rockets and enclosure for the Arduino Rocket Launcher
I’ve hosted all of my 3D printing (.STL) files for the Launcher on Thingiverse and even the SolidWorks files if you want to tweak them:
http://www.thingiverse.com/thing:284198
I’ve found the best way to orient the print for the launcher case is shown in the screenshot of MakerWare. I printed it with .2mm height and with a raft. Using no supports works just fine, despite the overhangs.
For the Rockets, I suggest either the following (I will add more as I test them):
3D Printed Rocket with Forward Swept Fins by QwykSylver
Disposable Rocket by kebes22
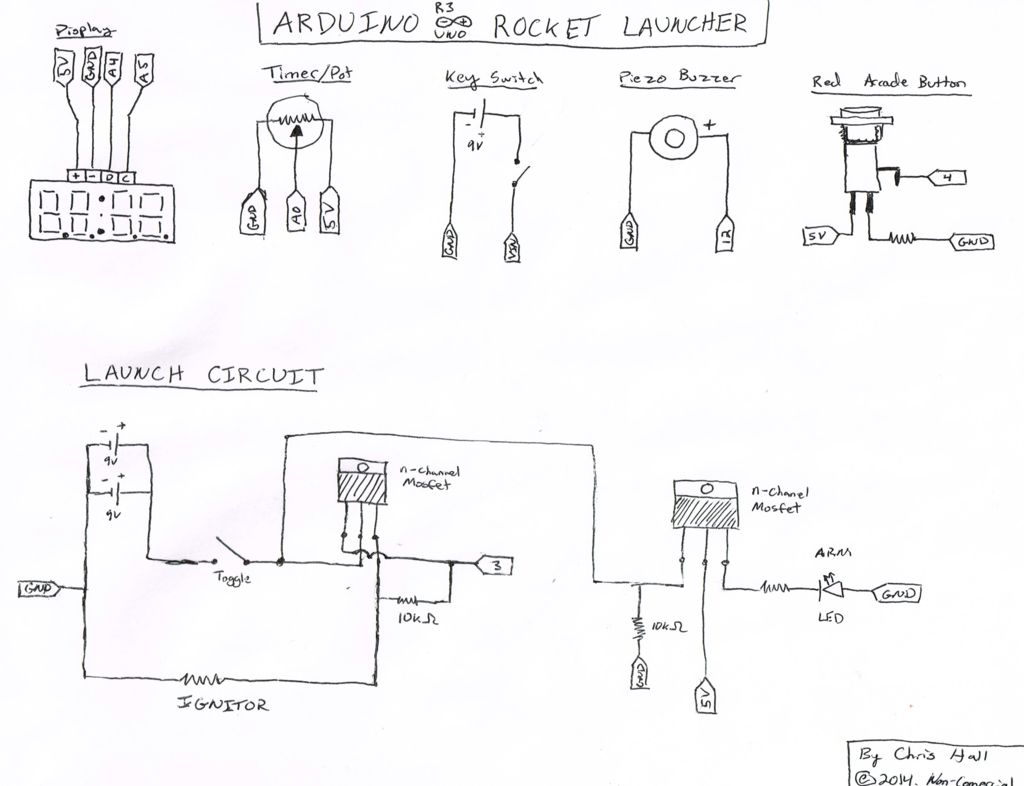
Step 3: Follow the Schematic and Build it on a BreadBoard First
Once you have the components, build the circuit on a breadboard and connect it to the Arduino. This is advanced for someone getting started in electronics/wiring/Arduino, but if you have some experience with electronics this step won’t be too bad.
The Arduino code can be found on my GitHub:
https://github.com/chall2009/Arduino-Rocket-Launch…
Note: You will also need Adafruit’s Arduino Libraries to run the red 7 segment display.
Adafruit_LEDBackpack – https://github.com/adafruit/Adafruit-LED-Backpack…
Adafruit_GFX – https://github.com/adafruit/Adafruit-GFX-Library
Step 4: Test the BreadBoard
To test to see if you wired the breadboard correctly, your launcher should function just as it does in the video. If something doesn’t work, go back and double check your wiring and connections.
The potentiometer is used to set a time between 1second – 2 minutes and the red arcade button begins the countdown. The toggle switch closes the “launch” circuit and acts as a safety mechanism. Only when it is closed will power be sent to the rocket to ignite the engine. The amber/yellow LED acts as our “Armed” indicator.
Note: You can use an LED with a resistor instead of an ignitor to test if current is going to the Launch Circuit. Current only flows for the duration of the buzzer after the timer counts down.
Step 5: Take the 3D Printed Case and Mount the Electronics
I used a glue gun to mount some the electronics. The holes have a high tolerance, so adding in some extra glue tightens everything up nicely. Since most of the parts are panel mounted, you don’t need much glue. Make sure you give yourself plenty of extra wire to connect to the Arduino board.
For more detail: Arduino Model Rocket Launcher for 3D Printed Rockets