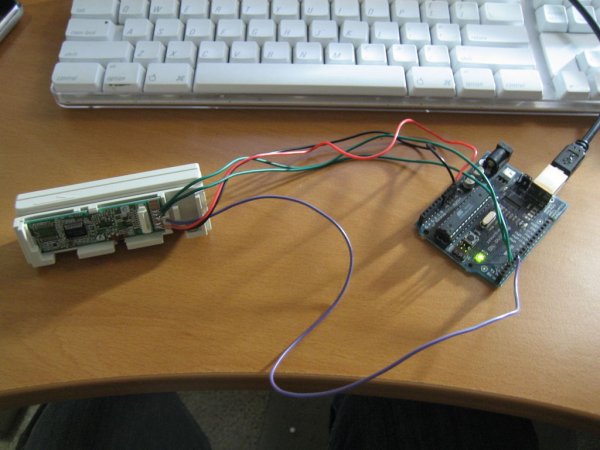
Summary of Arduino magnetic stripe decoder
This project demonstrates how to use an Arduino combined with a standard magnetic stripe reader to scan and display data from magnetic stripe cards such as credit cards and IDs. The author uses an Omron V3A-4K reader, sold at around $20, with soldered wires connected to the Arduino’s digital pins. The provided Arduino sketch decodes the magnetic stripe data for basic display purposes. This setup is aimed at beginners and serves as an accessible alternative to more complex traditional interfaces like those described in MAKE magazine.
Parts used in the Magnetic Stripe Reader Project:
- Arduino board
- Omron V3A-4K magnetic stripe reader
- Soldering wires
- Power supply (+5V and GND connections)
This instructable shows how to use some freely available code, an arduino, and a standard magnetic stripe reader to scan and display the data stored on magnetic stripe cards such as credit cards, student IDs, etc.
I was inspired to post this after reading the intro to magnetic stripe reading and Stripe Snoop that is found in MAKE magazine Volume 1. That tutorial details how to interface a stripe reader to a game port interface, but I have a mac laptop, so I don’t have a game port interface!
Also, I think that the arduino suite of hardware/software is much more integrated and easy to understand for beginners than the “traditional” approach presented on the Stripe Snoop website and MAKE magazine.
However, this application simply shows the data that’s on a magnetic stripe; it does not have any of the more advanced features that Stripe Snoop does.
The last step of this instructable has some links to more in-depth information about this topic for those who are interested.
Step 1: Hardware
Obviously, you first must obtain a magnetic stripe reader. I’m using an Omron V3A-4K that I ordered from digikey. It cost me $20.00 or so. If you can’t find one of these, any standard TTL reader will do.
Don’t worry about buying one of the fancy harnesses that they sell. There are breakout pads on the circuit board inside of the reader. Once you have received your reader, pop off the side cover, and solder wires to the pads as shown in the picture. Of course, if you have a different reader, the wiring will probably be different. In this case, consult your reader’s datasheet to locate the necessary pads.
Next, connect the wires to the Arduino’s digital pins as follows:
DATA – 2
CLK – 3
LOAD – 5
Finally, connect the +5v and GND to their respective terminals on the Arduino board.
Step 2: Software
Note: I didn’t write this code, I found it here. I’ve just attached it here for convenience.

