Summary of Arduino HVAC Servo Thermostat or Controller
This project uses an Arduino, two servos, a temperature sensor and simple metal or wood hardware to build a non-permanent digital thermostat for through-wall HVAC units, enabling temperature regulation in rental units to save energy and money.
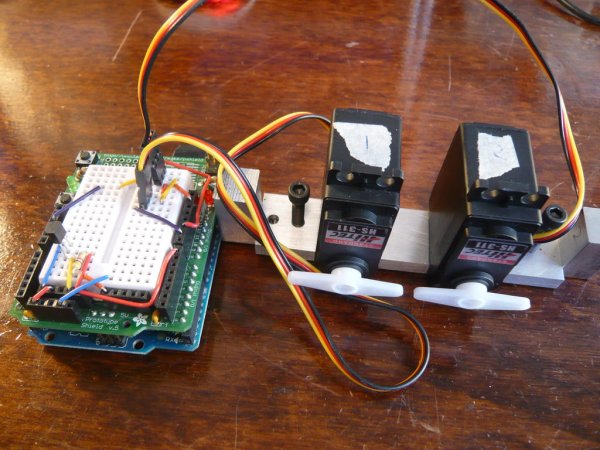
Parts used in the Arduino HVAC Servo Thermostat:
- Two servos (Hitec HS-311 or similar)
- Temperature probe (OneWire sensor from SparkFun)
- Arduino (Duemilanove used)
- Adafruit ProtoShield or small breadboard
- 4.7k ohm resistor for the temperature probe
- 9V wall adapter
- Aluminum pieces for servo bracket and end-posts (or wood alternative)
- Six 1/2" 8-32 socket head cap screws
- Two 1" 8-32 socket head cap screws
- 8-32 tap (matching screws)
- Number 29 drill bit (for 8-32 taps)
- Drill (hand drill or drill press)
- Hacksaw
- Optional adhesive: JBWeld or Gorilla Glue
According to CB Richard Ellis (a major real estate firm), New York City is a renters market, with only about 1/3 of the population owning their home (versus almost 70% home ownership for the rest of the US). This means over 5mm people in NYC live in rented apartments or homes. It is very rare for rental units to have any form of central air conditioning or even a thermostatically-controlled system.
Many apartments have permanent through-wall units like the one seen in the video below. Unfortunately, these units have no ability to regulate the temperature and can only be forced into heat, cold, or off.
According to the Consumer Energy Center, Heating and Cooling accounts for about 45 percent of your energy bill. The federal government estimates that the average homeowner spends more than $10,000 for heating and cooling over a ten-year period.
The cooling capacity of room air conditioners is measured in BTUs, or British Thermal Units, per hour. To cool a 700-1,000 sq ft apartment (a one bedroom or maybe a small 2bedroom), you need about 20,000 BTU’s. This is the equivalent of 1.7 tons or 5,861 watts. At $0.15 per kWh, that means it costs $0.88/hour to run your HVAC unit!
Because HVAC units use a lot of energy (particularly when in ‘air conditioning’ mode during hot summer months) and renters do not have the ability to easily implement energy star (i.e. more efficient) units or to regulate their tempature, I wanted to find a way, without making permanent changes, to control an HVAC unit like a thermostat! Implementing this device can not only save you money, but can help maintain a more steady-temperature in your apartment, reduce energy consumption and help reduce the strain placed on our nations power grid during the hot summer months!
Step 1: Overview of the product & parts list
Electronics Parts List:
1) Two Servo’s. I used Hitec HS-311 ( http://www.hitecrcd.com/servos/show?name=HS-311 ) which can be purchased for under $10 per servo. The SparkFun servo ( http://www.sparkfun.com/commerce/product_info.php?products_id=9064 ) should also work.
2) Temperature Probe: http://www.sparkfun.com/commerce/product_info.php?products_id=245
3) Arduino (I used the Duemilanove – http://www.adafruit.com/index.php?main_page=product_info&cPath=17&products_id=50)
4) I used the Adafruit ProtoShield ( http://www.adafruit.com/index.php?main_page=product_info&cPath=17_21&products_id=51 ) but you can also just use a small breadboard ( http://www.sparkfun.com/commerce/product_info.php?products_id=8802 )
5) a 4K7 resistor for the Temperature Probe: http://www.radioshack.com/product/index.jsp?productId=2062346
6) 9V Wall adapter: http://www.adafruit.com/index.php?main_page=product_info&cPath=17_22&products_id=63
Hardware Parts List:
1) I used Aluminum purchased from my local hardware store (Home Depot). The dimensions of the servo bracket are 4″ x 1″ x 0.25″ and the two end-posts are 1″ x 0.25″ x 0.25″. Alternatively, here is a link to purchase this sized piece of aluminum online: http://www.speedymetals.com/pc-2241-8351-14-x-1-6061-t6511-aluminum-extruded.aspx and http://www.speedymetals.com/pc-2494-8378-12-sq-6061-t6511-aluminum-extruded.aspx
2) I used (6) 1/2″ 8-32 SHCP (socket head cap screws) and (2) 1″ 8-32 SHCP’s. I would recommend purchasing these from your local hardware store, but they can also easily be purchased online. Here are the links: 1/2″: http://www.use-enco.com/CGI/INSRIT?PMAKA=430-0041 and 1″: http://www.use-enco.com/CGI/INSRIT?PMAKA=430-0045.
3) You’ll need a tap that matches whatever screws you use in the previous step. Since I used 8-32 screws, I purchased an 8-32 tap. Once again, this can be purchased at your local hardware store but if you wish to order online, here is a link: http://www.use-enco.com/CGI/INSRIT?PMAKA=325-4772
4) A number 29 drill bit (this corresponds to the 8-32 taps; if you use a different size screw & tap, purchase the appropriate drill bit). NOTE: Many hardware stores sell the taps with the drill bits, which will ensure you purchase the right size. Also available here: http://www.use-enco.com/CGI/INSRIT?PMAKA=325-6119
Tools:
1) I used a drill (can be a hand drill or drill press) and a hacksaw.
2) If you’d rather glue the servo’s to the aluminum mount (in lieu of drilling and tapping the holes), I would recommend using JBWeld or Gorilla Glue
Arduino Library:
In addition to the servo library (included with the Arduino softwre), you need the OneWire library.
You can read more about the library here (optional): http://www.arduino.cc/playground/Learning/OneWire or just download the library via this link: http://homepage.mac.com/wtpollard/Software/FileSharing7.html
For more detail: Arduino HVAC Servo Thermostat or Controller
- What is the project for?
To make a digital thermostat for through-wall HVAC units using an Arduino, two servos, a temperature sensor, and metal or wood so renters can regulate temperature without permanent changes. - Which servos were used?
Hitec HS-311 servos were used, and similar servos such as the SparkFun servo should also work. - Which temperature probe is required?
A OneWire temperature probe from SparkFun is used. - Which Arduino board was used?
The Duemilanove Arduino was used in the project. - Is an Arduino library needed?
Yes, the OneWire library is required in addition to the Servo library included with the Arduino software. - What hardware materials are needed for the mount?
Aluminum pieces sized for a 4 x 1 x 0.25 inch servo bracket and 1 x 0.25 x 0.25 inch end-posts, or similar wood, plus screws and taps. - Which screws and taps are specified?
Six 1/2 inch 8-32 socket head cap screws, two 1 inch 8-32 socket head cap screws, and an 8-32 tap were specified. - What drill bit is recommended?
A number 29 drill bit corresponding to the 8-32 taps is recommended. - Can glue be used instead of tapping holes?
Yes, you can glue the servos to the mount using JBWeld or Gorilla Glue as an alternative to drilling and tapping. - What power supply is used?
A 9V wall adapter is used to power the system.