After a youth spent playing with Amigas and getting into all sorts of trouble on the school computer network, I’ve always had a soft spot in my heart for hardware from the 80s and 90s. This extends beyond computers themselves, and goes so far as to include modems, photocopiers, and even the much-maligned dot matrix printer.
My partner in hacking [Cosmos2000] recently found himself with a wonderful Commodore MPS 1230 printer. Its parallel interface was very appropriate in its day, however parallel ports are as scarce as SID chips. Thankfully, these two interfaces are easy to work with and simple in function. Work on a device to marry these two disparate worlds began.
ENTER: THE PARALLELOSLAM
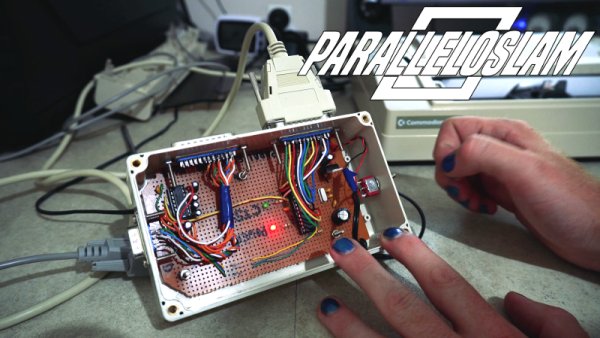
While I was gallivanting around the Eastern coast of Australia, [Cosmos2000] was hard at work. After some research, it was determined that it would be relatively simple to have an Arduino convert incoming serial data into a parallel output to the printer. After some testing was performed on an Arduino Uno, a bespoke device was built – in a gloriously plastic project box, no less.
An ATMEGA328 acts as the brains of the operation, with a MAX232 attached for level conversion from TTL to RS232 voltage levels. Serial data are received on the hardware TX/RX lines. Eight digital outputs act as the parallel interface. When a byte is received over serial, the individual bits are set on the individual digital lines connected to the printer’s parallel port. At this point, the strobe line is pulled low, indicating to the attached device that it may read the port. After two microseconds, it returns high, ready for the next byte to be set on the output lines. This is how parallel interfaces operate without a clock signal, using the strobe to indicate when data may be read.
At this point, [Cosmos2000] reached out – asking if I had a name for the new build.
“Hm. Paralleloslam?”
“Done. Cheers!”
MAKING IT USEFUL
With the preliminary work done and initial testing successful, I paid a visit to [Cosmos2000] on a cloudy Sunday. The interface was operating well with short passages of text, but we are big fans of printing photos and high-quality graphics on these painstakingly slow devices. Unfortunately, it’s not possible to simply bang graphical data out over the serial port, as the printer cannot keep up, and only has a limited buffer. It’s possible to get lucky sometimes by running at an excessively low baud rate, but dot matrix printers are slow enough as it is. We needed a proper solution.
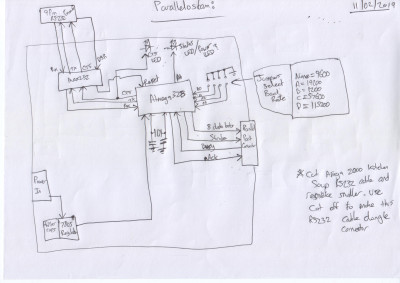
For just this reason, parallel ports feature a BUSY line, which indicates when an attached device cannot accept further data. Similarly, serial interfaces have a variety of flow control methods to handle the same problem. We needed to translate from one to the other.
We were most familiar with the CTS, or Clear to Send pin, on the serial side of things. When this pin is active, it indicates to the host that the attached device is ready to receive further data. We decided to implement flow control using this method. To do so, the Arduino was set up to monitor the BUSY line on the printer’s parallel port, setting the CTS line active whenever the busy line was inactive.
With our task made clear, hours of mucking about then ensued. Serial pinouts were confused, time and again, and there was regular double checking of cables to ensure the flow control pins were actually populated. Finally, after much consternation, we heard the familiar BUZZ and ca-CHUNK as our geriatric printer burst to life. If you’ve never seen two grown men whoop and cheer over a dot matrix before, I’d wager you haven’t spent much time around Hackaday readers.
PERFORMANCE
There’s always plenty of fun to be had with the build, but we always enjoy putting the hardware through its paces. We spent a good afternoon making a logo and printing it over and over again, before pushing various photos and graphics through the machine.
Speed was a concern during development. We tested the device successfully at both 1200 and 9600 bits per second, with no problems. With a strobe time of 2 microseconds, and assuming the rest of the code takes roughly the same time to execute, that gives us a potential top speed of 250,000 Bytes per second (note Bytes, as the parallel code outputs 8 bits at a time). This is roughly in line with the limit of the ATMEGA328’s hardware serial port, which is capable of 2 million bits per second if configured properly.
However, to hit this speed reliably, I suspect several code optimizations would be required. Lacking hardware that requires such throughput, we’ve kept our testing to the lower end of the spectrum. It would be fun to test however, and I think it wouldn’t be too hard to hit at least 115,200 bits per second coming in over serial and being pushed out over the parallel port with the current setup.
SHARING IT AROUND
With our success confirmed, we decided that the project should be shared. The code has proved reliable enough for our purposes, though if your dot matrix is in a safety-critical role, please reconsider your life choices, and send us a photo of your Paralleloslam getting the good work done. Whatever happens is on you, though.
Resources are available on Github for your perusal. It’s not a pixel-perfect, super tidy build. Experience with serial interfaces is recommended, as often debugging is required depending on the various cables and devices you happen to be using. However, for those with the requisite knowledge and tools, it should prove handy. We’d be particularly interested if anyone uses this work for other parallel devices. Anything that receives data in a simple byte-wise mode with unidirectional communication should theoretically work. As always, your mileage may vary.
From [Cosmos2000] and myself, we wish you the best of luck with your retro hardware adventures.
Source:THE PARALLELOSLAM