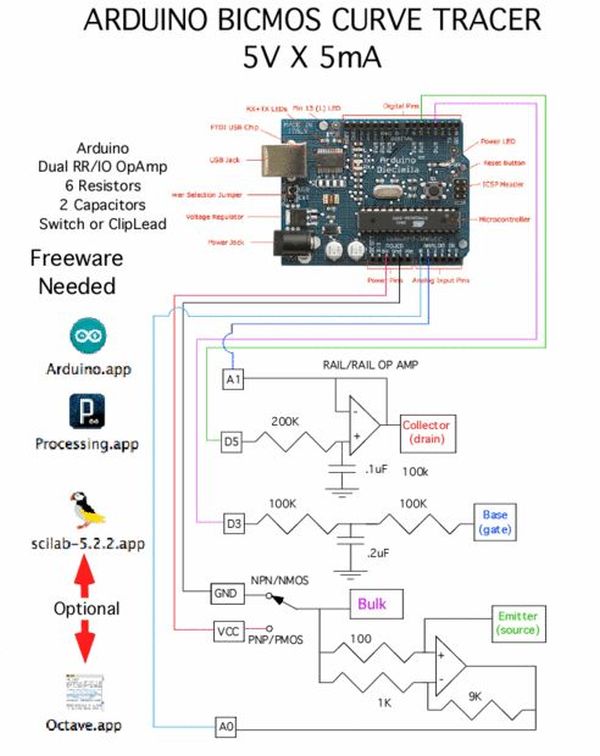
Summary of Arduino BICMOS Curve Tracer
This article outlines the construction and operation of an Arduino-based BiCMOS Curve Tracer. It details how to assemble a circuit on a breadboard or via wire wrapping, upload specific code to an Arduino, and use Processing software to visualize transistor characteristics. The system captures data for NPN, PNP, NMOS, and PMOS transistors, allowing users to plot curves using SciLab or Octave after exporting the recorded measurements.
Parts used in the Arduino BiCMOS Curve Tracer:
- Bipolar and CMOS transistors (NPN, PNP, NMOS, PMOS)
- Arduino board
- Solderless breadboard
- Cardboard
- Hot glue
- Wire wrap components
- SciLab or Octave software
- Processing software
Draw curve traces for both Bipolar and CMOS transistors using this hardware and free online software.
Step 1: Upload and Plot Curve for NPN, PNP, NMOS, and PMOS
The data for the transistor curves gets uploaded into any computer and can be plotted using SciLab or Octave
Step 2: Hook Up The Circuit
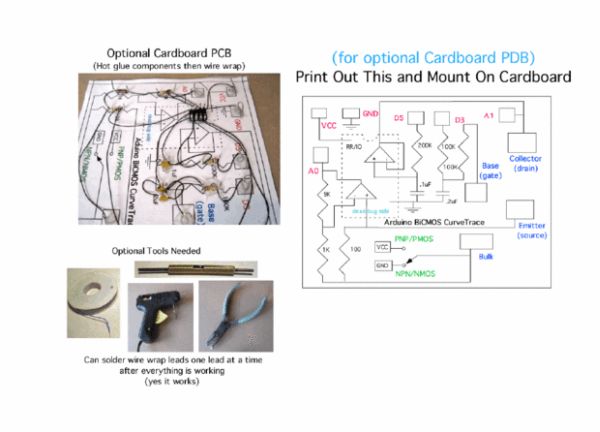
The circuit is simple enough for a solderless breadboard. But this type of circuit tends to want to be used more than once. An alternative is to print out the schematic shown on the right and glue to cardboard. Then hot glue all the components in place, and wire wrap up the circuit. After everything is working, soldering one side of the wire wrap of the components at a times seems to have no trouble with melting the hot glue. The techniques on how to do the wire wrap is described here.
http://www.instructables.com/id/A-Solderless-Printed-Circuit-Board/
Step 3: Now Copy and Paste in the Software
Code needs to be copied and paste into both the Arduino window and Processing widow. The code is simple text, and is included below. Additional code can be found at the follow web site.
http://www.idea2ic.com/BiCmosCurveTracer/Arduino%20BiCmos%20Curve%20Tracer.pdf
Step 4:
After compiling and uploading the Arduino code. Hitting the run button will bring up a graph window. Clip that window and type “s” to start the curve tracing. Typing “w” will write the data into your computer. Use the Show_Sketch_folder menu to find the data file. It will be labeled with the exact second the curve tracing started. This is a good time to rename that data file.
For more detail: Arduino BICMOS Curve Tracer
- How can I plot the uploaded transistor curve data?
The data can be plotted using SciLab or Octave software. - What is the alternative to using a solderless breadboard for this circuit?
An alternative is printing the schematic, gluing it to cardboard, hot gluing components, and wire wrapping the circuit. - Can I reuse the wire wrapped circuit after soldering?
Yes, you can solder one side of the wire wrap of the components at a time without melting the hot glue. - Where can I find additional code for this project?
Additional code can be found at the website http://www.idea2ic.com/BiCmosCurveTracer/Arduino%20BiCmos%20Curve%20Tracer.pdf. - How do I start the curve tracing process in the software?
After compiling and uploading the code, hit the run button and type s to start the curve tracing. - How do I save the generated curve data to my computer?
Type w to write the data into your computer. - How can I locate the data file generated by the tracer?
Use the Show_Sketch_folder menu to find the data file labeled with the exact second tracing started. - Which types of transistors can this hardware trace?
This hardware traces NPN, PNP, NMOS, and PMOS transistors.