This is my second instructable. i want to share some of the basic things i made using the arduino i am so busy lately. then i got the chance to have this spare time… inspired by my former student and a fellow co league to share this arduino based wireless automation.
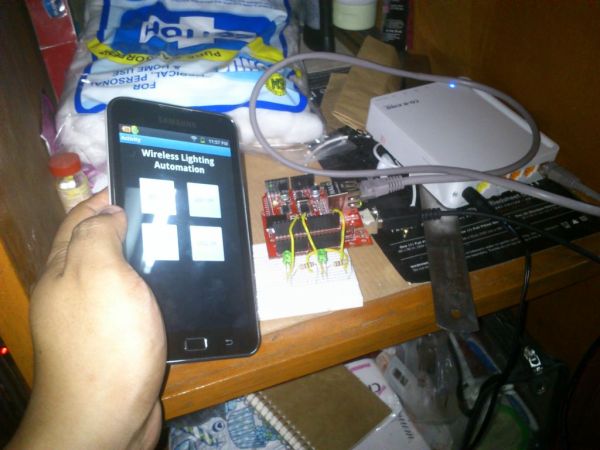
this automation was done using an arduino together with an enc28j60 Ethernet Shield (because this is the only shield available here in my country as i think of) and a android app i made for this particular project.

Here is the video of the project:http://www.youtube.com/watch?v=ZdTwsNPthOI&feature=g-upl
this automation was done using an arduino together with an enc28j60 Ethernet Shield (because this is the only shield available here in my country as i think of) and a android app i made for this particular project.
Here is the video of the project:http://www.youtube.com/watch?v=ZdTwsNPthOI&feature=g-upl
Step 1: Step #1. Thing that you need
Here are the list of what you need in this project:
1. Arduino Uno (Here in the Philippines its Gizduino)
2. Ethernet enc28j60 shield
3. Wireless Router
4. LAN cable (connection for the ethernet shield and the router)
5. 2 pcs. LED
6. Resistors
7. Wires
8. Breadboard
1. Arduino Uno (Here in the Philippines its Gizduino)
2. Ethernet enc28j60 shield
3. Wireless Router
4. LAN cable (connection for the ethernet shield and the router)
5. 2 pcs. LED
6. Resistors
7. Wires
8. Breadboard
Step 2: Step #2: The Arduino hardware setup
First, connect the ethernet shield to your arduino.
Next, connect the LAN cable to your router and to your ethernet shield
Thrid, connect the LED and resistors according to this sequence:PIN 6 –> LED1 –>Resistor –> GND
PIN 7 –> LED2 –>Resistor –> GNDLastly, connect your USB cable to your arduino so we could start the programming
Next, connect the LAN cable to your router and to your ethernet shield
Thrid, connect the LED and resistors according to this sequence:PIN 6 –> LED1 –>Resistor –> GND
PIN 7 –> LED2 –>Resistor –> GNDLastly, connect your USB cable to your arduino so we could start the programming
Step 3: Arduino Sketch
This is the sample sketch i edited based on this website
http://trollmaker.com/article11/arduino-1-0-with-enc28j60-ethernet-shield-v1-1
i made some modification of my own but there are some position of the buttons for the LED 2 i did not edit since i will be using my own android program for this project. the idea is to get have the parameters (such as the “?led1=on”) to work on the lighting condition.
// A simple web server that turn an LED on or off”
#include “etherShield.h”
#include “ETHER_28J60.h”
int outputPin1 = 6;
int outputPin2 = 7;
static uint8_t mac[6] = {0x54, 0x55, 0x58, 0x10, 0x00, 0x24}; // this just needs to be unique for your network,
Major Components in Project
1. Arduino Uno (Here in the Philippines its Gizduino)
2. Ethernet enc28j60 shield
3. Wireless Router
4. LAN cable (connection for the ethernet shield and the router)
5. 2 pcs. LED
6. Resistors
7. Wires
8. Breadboard
2. Ethernet enc28j60 shield
3. Wireless Router
4. LAN cable (connection for the ethernet shield and the router)
5. 2 pcs. LED
6. Resistors
7. Wires
8. Breadboard
For more detail: Arduino Based Automated Lighting Control