Summary of Anti-Social Glasses
Summary: A pair of custom Anti-Social Glasses use a tilt switch and two servos to open and close shutters when the wearer looks up. The design uses a single servo-driven arm with a slot to push steel rods synchronously, fabricated from 1 mm plastic sheet with laser-cut parts. An Arduino Uno reads the tilt switch analog signal to control 30-degree servo movement. Files and CAD are provided for cutting and assembly.
Parts used in the Anti-Social Glasses:
- 30 x 60 cm plastic sheet (1 mm, polystyrene used)
- 100 cm x 1 mm steel rod or equivalent
- Servo motors (2)
- Tilt switch sensor (1)
- Arduino Uno (1)
- 5V power supply (1)
- Pliers
- Plastic glue
- Mounting plates for servos
- Laser-cut CAD files for frame and shutters
- Head and set of eyes (wearer)
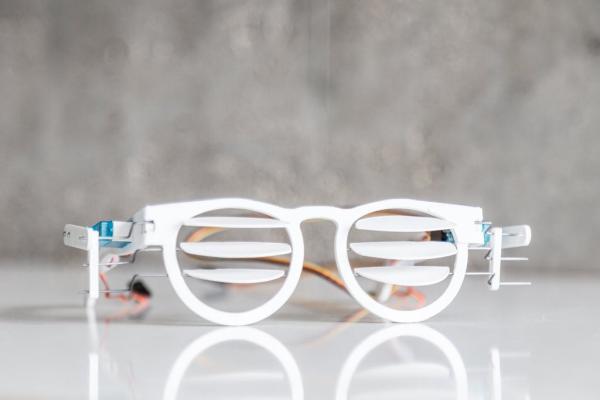
You look up, they tilt down! A tilt switch controls 2 servos which open/ close shutters on a pair of custom glasses.
project by
Rob Faulkner and You-Wen Ji
Step 1: Parts
(1) 30 x 60 cm plastic sheet (We used polystyrene but its up to you!)
(1) 100cm x 1mm steel rod or equivalent
(2) Servo motors (Smaller is better, we used https://www.conrad.com/ce/en/product/1365554/Reely…
(1) Tilt switch sensor
(1) Arduino Uno
(1) 5V power supply
Pliers
Plastic Glue
A head and set of eyes!
Step 2: Mechanism

Critical to the glasses is the shutters which are actuated by a servo.
We wanted to use as few mechanical parts as possible to move the glasses shutters.Initially, we wanted to use a 4-bar linkage BUT this did NOT work with the pivot radius of the rods. We reduced the mechanism to a single arm with a slot that pushes the rods in a synchronized fashion direct from the servo motor. It is important to note the servo rotates 30 degrees to open and close the shutters. The parts are found in the attached CAD file for fabrication.
Step 3: Fabrication Assembling

Lasers! Download the file (we did all the heavy lifting) and get it cut! We set everything up for 1 mm material. We used Polystyrene but you can use whatever you like (maybe even clear?)
STEPS:
1-Cut profiles (We used a laser cutter!)
2-Glue Appropriate Layers (Front + Sides) See Diagram
3-Bend Rods + insert to frame
4-Attach servos (Don’t forget the mounting plates!)
5-Glue sides to frame front (Reinforce maybe)
6-Connect servo arm to hinge mechanism
7-Glue on shutters (Bottom up!)
8-Attach Tilt Switch (Might have to be tuned based on how far you want to tilt your head back)
9-Your ready to be anti-social!
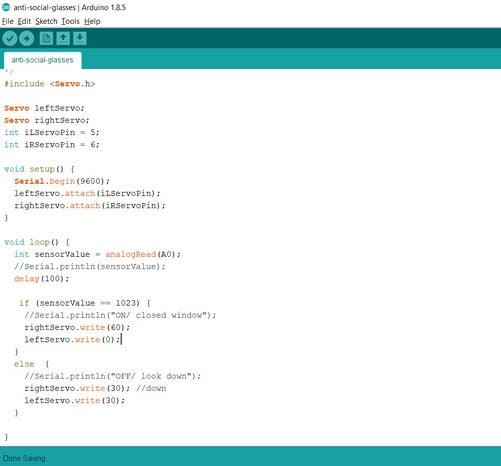
Step 4: Arduino

How to sensing when it needs to close/open and being an anti-social person? We start thinking when you are working or reading and someone want to talk to you, you need to look up or look straight.
Basically, the movement of your head is moving and also angle, so in the beginning, we are looking 6-axis or 3-axis accelerometer to provide the angle which to control the servo. Due to the size of the accelerometer is too big for the glasses, and most important is we don’t need that much angle data.
Thinking more about how to design a glasses simple and keep the project could be more affordable for people. so following the idea, we found the tilt switch is a nice solution to sensing the angle and still provide enough data to active the servo. It super CLEAN and SIMPLE!
We studying the position and angle to place switch on the glasses found the best is close to the front and rotate it a bit. The Last step is controlling better! When we trying to get the signal from the switch, if just setting the input is HIGH/LOW will get buzzing, and we couldn’t use the delay function it will slow the reaction! So we trying using the analog to read the data, and it works almost perfectly.
Step 5: Digital File / Source Code
Source: Anti-Social Glasses
- What sensor is used to detect head angle?
The project uses a tilt switch sensor to detect head angle. - Why was a tilt switch chosen over an accelerometer?
Because the accelerometer was too large for the glasses and the tilt switch provided enough angle data while keeping the design simple and affordable. - How do the shutters move?
Two servos rotate a single arm with a slot that pushes steel rods, moving the shutters synchronously with about 30 degrees of servo rotation. - What material and thickness is used for laser cutting?
The parts were set up for 1 mm material; polystyrene was used in the build. - How is the tilt switch signal read to avoid buzzing?
The tilt switch is read using an analog input rather than simple HIGH/LOW digital reads to avoid buzzing and delays. - What are the basic fabrication steps?
Cut profiles, glue appropriate layers, bend and insert rods, attach servos and mounting plates, connect servo arm to hinge, glue shutters, attach tilt switch, and tune switch position. - How much do the shutters rotate to open and close?
The servo rotates about 30 degrees to open and close the shutters. - Where is the tilt switch placed on the glasses?
The best placement found is close to the front of the glasses and rotated slightly to tune the trigger angle.