Summary of Aerobic Arduino – a $15 Fitness Tracker Power by an Arduino
This article guides readers through building a low-cost ($15) Arduino-powered fitness tracker that counts arm pumps while running. Using an accelerometer and LCD display, the device mounts in a pocket rather than on the wrist, offering 18 hours of battery life without phone connectivity. The project requires 3D printing fabric bands and involves soldering components to a breadboard before housing them in a custom case powered by a power bank or batteries.
Parts used in the Aerobic Arduino:
- Arduino Nano
- Accelerometer (Adafruit product 2809)
- 2x16 Display (LCD I2C)
- Powerbank
- Tulle Fabric
- Jumper wires (female to male recommended)
- Breadboard
- Wire-stripper
- Electrical Tape
- Scissors
- Soldering Iron
- Hot glue
- Clock batteries (optional for power)

Please vote for this in the fitness challenge
instead of a Fitbit or a smartwatch, you can build an Arduino powered fitness tracker for only $15! It tracks the pumping motion of your arms while running and uses an accelerometer to detect this. It is powered by an Arduino Nano and displays the unit that you want to track on a 2×16 screen. You can use miles, kilometers, meters, yards, or anything that you could think of. It also displays steps! You will need a 3D printer for this project because we are printing on fabric for the band. The fabric is tulle fabric and is lightweight and is basically a mesh.
Advantages
- The price
- It has a display on it
- 18 hours of battery life
Disadvantages
- The size
- Not on your wrist
- Doesn’t connect to your phone
Step 1: Printing the Parts
You can print the .stl files included or you can order them on shape ways. No supports are needed and I used PLA, although any hard material is fine.
Step 2: Getting the Parts
Accelerometer: https://www.adafruit.com/product/2809 $4.95
Display: https://www.aliexpress.com/item/Nano-V3-0-Mini-US… $3.15
Arduino: https://www.aliexpress.com/item/MINI-USB-NANO-V3-… $2.78
Powerbank: https://www.aliexpress.com/item/wopow-Portable-ke… $5.12
Tulle Fabric (Or any thin fabric, preferably tulle)
Jumper wires (It is STRONGLY recommended that you have female to male jumper wires)
Breadboard
Wire-stripper
Electrical Tape
Scissors
Soldering Iron
Arduino Software: https://www.arduino.cc/en/main/software
To save you the math, it will cost $16. I already had tulle fabric but if you don’t, https://www.amazon.com/Spool-Wide-White-Tulle-Net…
Step 3: Coding the Arduino
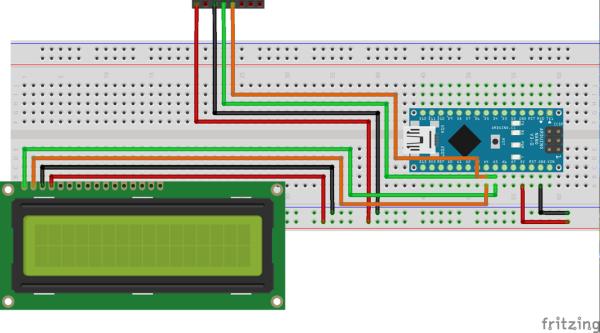
Place the components on a breadboard and connect them using the picture. Make sure you have your headers on the Arduino and the accelerometer! Solder them on if not. (The LCD pins are for the i2c. It is clearly labeled on the i2c) Plug in your Arduino Nano and open the software. Select Tools >Board >Arduino Nano and select 328p. Open Tools>Port. Nothing except maybe Bluetooth-Incoming-Port. This is perfect! Download this driver: https://kig.re/2014/12/31/how-to-use-arduino-nano… and try again. Open the Aerobic Arduino file and hit “Upload” or an arrow pointing right. A few drivers didn’t work for me, but this one did.
Step 4: Calibrating the Arduino
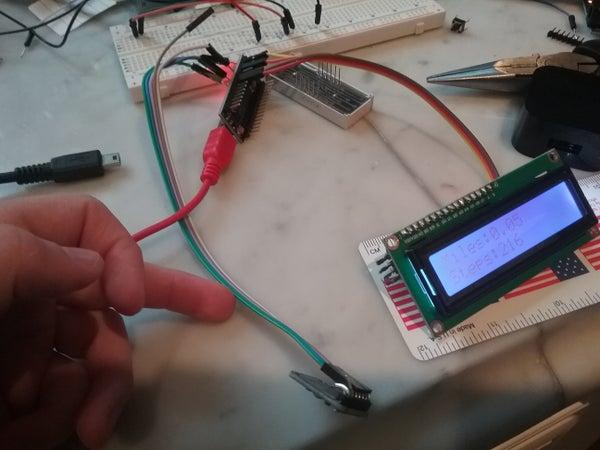
Now, go to a place that has a very long area that you can run in. Take a piece of tape and place it in front of your toes. This is your starting position. Briskly walk for 5 pumps on either your left or your right arm (NOT BOTH ARMS, as that would be 10 pumps). A pump is when you move your arm back and forth. Place a piece of tape in front of your toes. Go back to the starting point and jog for 5 pumps on either your left or your right arm. Place a piece of tape in front of your toes. Finally, run for 5 pumps from your starting position and place a piece of tape in front of your toes. Get a measuring tape and measure each distance and record that. Divide each result by 5. Then, find how many steps are in 1 pump. Find the average of only the 5 pump values and not the step value and place it in the code where it says “your average distance and steps”.
Step 5: Soldering Everything
Get your cable and plug it in. Cut or strip off a part of the cable so only the wires are exposed. This will be used for the cable to go through the casing. Connect the female part of the wires of the accelerometer to the Arduino, while soldering the male part to the header pins of the accelerometer. For the lcd i2c, connect the female part to the i2c while soldering the male part ON TOP of the male wires. It will make much more sense if you look at the pictures. Solder 2 wires (Black and red) to the exposed USB wires (black to black and red to red). The picture of the cable is WRONG. There should be a cable still going after it. I chopped it off, thinking I would power the project with a clock battery, but that didn’t turn out so well. So, I attached a mini USB to the GND and 5V wires and plugged into one of my tablets with a micro USB. I totally forgot that device DON’T output voltage through the charging port. Duh. Finally, I attached a USB cable to the GND and 5V wires so my project got power from the battery pack.
Step 6: Putting It Together
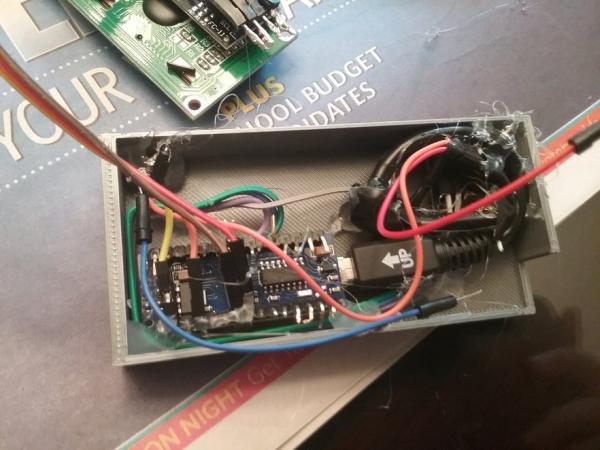
Take everything and place them in the case as shown in the picture. Hot glue them in and cram everything in as much as you can. The cut-out is for the battery, in which I used 3 clock batteries to output around 6V. It should be from 5V to 6V but you will need to adjust the potentiometer on the back of the i2c. Take the final cover and slide it on with some force. You can use a tad bit of hot glue on the bottom to glue it in, but make sure you can remove it for battery replacement!
Step 7: Putting It in Your Pocket and Charging Up Your Powerbank.
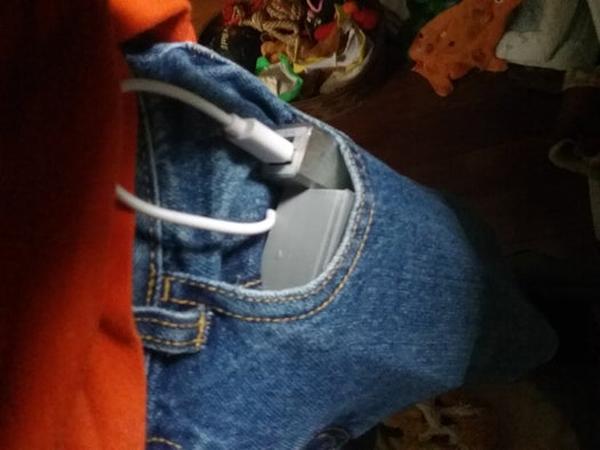
Get your power bank and charge it up. You can put the fitness tracker into any pocket you like, as long as it is near your legs and can detect movement. You can test out different spots any time. Plug the USB end into your power bank and boot it up! You can now jog or run with it.
Step 8: Enjoy!
You are now done! Go ahead and test it out and post any questions in the comments. I will do my best to answer them. If it is not working, go to the troubleshooting page.
Step 9: Troubleshooting
It doesn’t turn on
A pretty vague question, but make sure the switch is turned on and all of the connections are ok.
Post any more questions in the comments!
Source: Aerobic Arduino – a $15 Fitness Tracker Power by an Arduino
- How much does this fitness tracker cost?
The total cost is approximately $16, which includes the Arduino, accelerometer, display, and powerbank. - Can I use any material for the band?
You should use tulle fabric or any thin, lightweight mesh fabric; hard materials are only for the printed parts. - Does the device connect to a smartphone?
No, one of the listed disadvantages is that it does not connect to your phone. - How do you calibrate the distance measurement?
You must walk, jog, and run for five arm pumps each, measure the distances, divide by five, and average the results to input into the code. - What voltage range is required for the device?
The device requires between 5V to 6V, achieved using a power bank or three clock batteries. - Where should the tracker be worn?
The tracker goes in a pocket near your legs where it can detect arm movement. - Is a 3D printer necessary for this project?
Yes, a 3D printer is needed to print the .stl files for the casing, though they can also be ordered online. - What happens if the device does not turn on?
You should check that the switch is turned on and verify that all connections are secure.