Summary of ABC 123 Toddler Trainer using Arduino
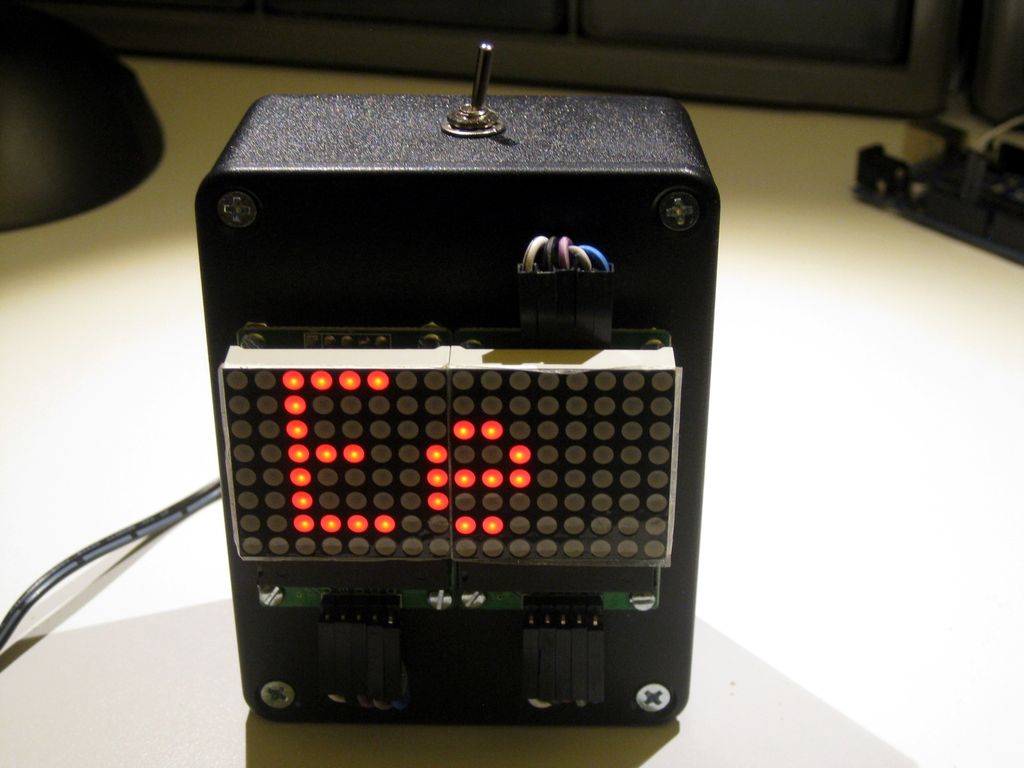
This project is a kid-tested, teacher-approved Arduino-based "ABC 123 Toddler Trainer." It features a scrolling message box using two Max7219 LED matrices to display alternating messages (ABCs and 123s) controlled by a physical switch. The device is powered via a DC jack and housed in an enclosure, offering an affordable educational tool for children learning letters and numbers.
Parts used in the ABC 123 Toddler Trainer:
- Max7219 8x8 Matrix LED x 2
- Anarduino An Arduino Compatible 24 DIP model kit
- BreadBoard with Power Supply
- Module Wiring Dupont Wire Connector Cables 20cm (female-female)
- Mini SPDT Switch
- 2.1mm DC Pwr Jack
- #2 hardware (½ inch bolts)
- 10K Ohm Resistor 1/8W or 1/4W
- Molex Header Item G18974
- Case enclosure MB-173
- Arduino UNO
Here is a kid tested and teacher approved trainer for the kids in your family and / or extended family that are learning their ABCs and their 123s.
It was kid tested on my granddaughter, who really loves it, and was approved by my wife, retired school teacher.
In actuality, it is a simple scrolling message box that is capable of producing 2 different messages at the flip of a switch. So if you don’t have a “kiddo” you want to use it with or give it to, then I will explain in the code segment of this Instructable how to speed it up and change the messages.
If you want to see it in action here it is to watch.
ABC…123 Toddler Trainer
Step 1: Parts:
Max7219 8×8 Matrix LED @ $4.00 on eBay x 2
Anarduino An Arduino Compatible 24 DIP model kit @$5.40 on eBay
BreadBoard P.S. Breadboard Power Supply @$1.50 on eBay
Module Wiring Dupont Wire Connector Cables 20cm (female-female) @$1.50 on eBay
Mini SPDT Switch @ 40 cents
2.1mm DC Pwr Jack @ 50 cents
#2 hardware I use ½ inch bolts to mount parts on case. Check out jameco.com
10K Ohm Resistor 1/8W or 1/4W
Molex Header Item G18974 at Electronic Goldmine @$2.00 / 10
Case enclosure MB-173 at allelectronics.com @$3.00
Arduino UNO Used to program ATMEGA328P chip
Shipping is not included in the above price approximations… some are free shipping and others cost. Everything should run about $30 if you had none of it except the UNO to begin with.
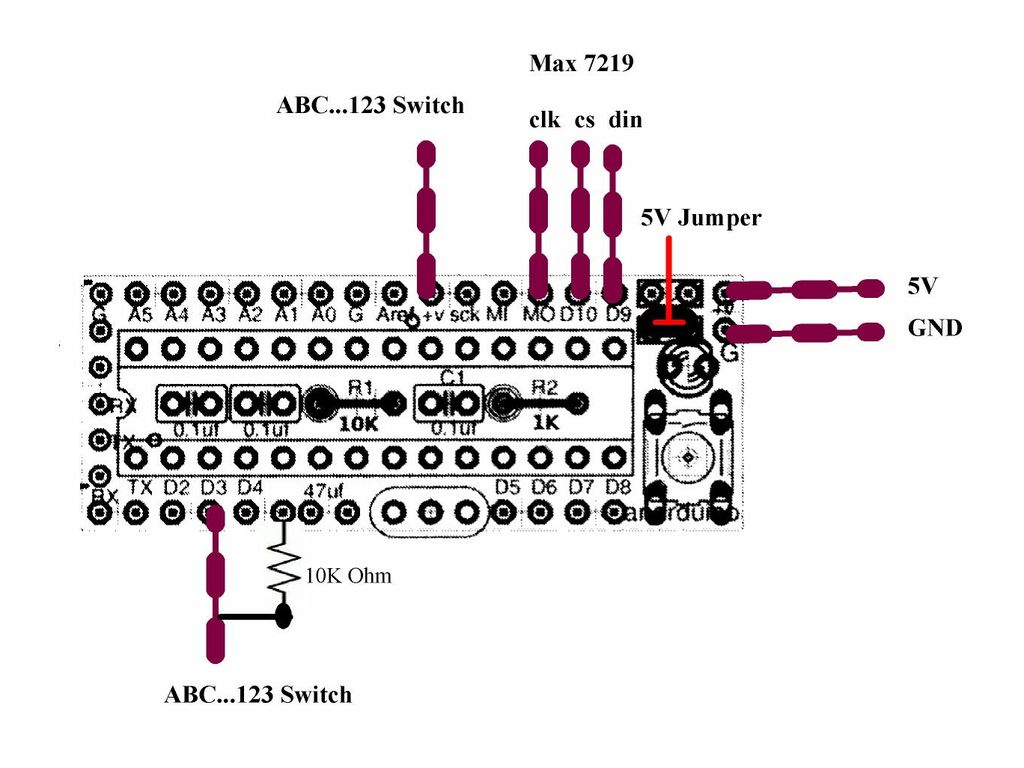
Step 2: Programming the ATMEGA328P
Download the ABC 123 Toddler Trainer INO file, connect your computer and program the UNO. Once you’ve programmed the UNO disconnect the USB cable and go on to the next step.
Step 3: Putting it together
The first picture shows the wiring for the Anarduino. I have explained about the Anarduino and how to set it up in my Kitchen Sink Clock Instructable and ask that you refer back to that one if you plan on building this as I did. Just put the ATMEGA328P that you programmed in the last step in the socket of the Anarduino.
The power supply for this project is explained in my first Instructable about the breadboard power supply and again , I ask you to reference that if you need more info.
For more detail: ABC 123 Toddler Trainer using Arduino
- How does the device display different messages?
The unit produces two different messages at the flip of a switch. - What components are required for the LED display?
You need two Max7219 8x8 Matrix LEDs. - Can I modify the code if I do not have children?
Yes, the article explains how to speed up the scrolling and change the messages in the code segment. - What is the estimated total cost of the project?
The entire project should run about $30 if you only own the Arduino UNO initially. - Which chip is used to program the ATMEGA328P?
The Arduino UNO is used to program the ATMEGA328P chip. - Where can I find the case enclosure?
The case enclosure MB-173 is available at allelectronics.com. - What type of power supply is recommended?
A breadboard power supply is used, with details referenced from a previous instructable. - Does the switch control the scrolling speed?
No, the switch flips between two specific messages, while the code controls the speed.