
Summary of Build a big crane game using Arduino
This project describes building a room-sized, three-axis crane (claw) game using ceiling-mounted J-channel tracks, continuous-rotation hobby servos, Arduino control with IR wireless signaling, and a pre-made claw. It emphasizes low wiring, reproducible standard parts, removable ceiling mounting, and expandability to larger tracks.
Parts used in the Whole Room Crane Game:
- 6 x 8' J channel
- 7 x continuous-rotation servo motors (HobbyPartz EXI-Servo-B1226)
- 1 x roll of electrical tape
- 2 x Arduino UNO boards
- 3 x small pieces of perforated board
- 2 x IR de-modulator modules
- 1 x universal TV remote control (IR transmitter)
- 1 x 25' coiled phone cord
- 1 x 15' straight phone cord
- 1 x roll packing tape
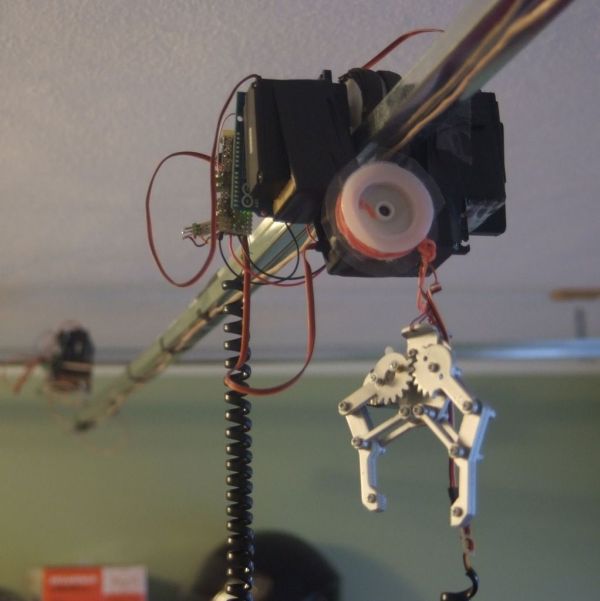
- 1 x pre-made claw with servo (SparkFun ROB-10332)
- 2 x 4 AA battery packs (rechargeable)
- 6 x screw hooks
- 3 x pieces of plywood (2 x 6" each)
- 1 x roll metal plumbers strap
How to build a whole room crane game. Based on the arcade style ‘Crane Game’ or ‘Claw Machine’. This is a continuation of a previus instructable titled CRANE GAME in which we built a 2-axis crane game in a door frame. We have now added a third axis and wireless control. And made it big.
A few technical and functional improvements:
- Less wires – controllers and batteries move with the motors and are signaled with IR light.
- Precision not needed – I was able to set-up a 8x10ft track without measuring anything
- Reproducible – used standard parts, used the same components in many spots
- Expandable – use longer tracks to make it bigger – track cost is about 50cents a foot.
- Removable – hangs from the ceiling by 4 small hooks
- Future? Could be used as basis for a big 3D printer
Overview
- Materials
- Frame
- X-Axis Mechanical
- Y-Axis Mechanical
- Z-Axis Mechanical
- X-Axis Electronics
- Y-Axis Electronics
- Z-Axis Electronics
- IR Control Overview
- IR Receive Circuit
- IR Transmitter (TV remote)
- IR Decode Process
- X-Axis Control Code
- Y/Z – Axis Control Code
- What’s next?
- Complete Wiring
- Complete Code
note: this still has some holes in it, feel free to ask for stuff
Step 1: Materials
Materials:
6 – 8′ J channel
7 – Big continous servo motors — HobbyPartz — EXI-Servo-B1226
1 – Roll of electrical tape
2 – Arduino UNO boards
3 – Small peices of perferatored board
2 – IR de-modulator
1 – Universal TV remote control
1 – 25′ coiled phone chord
1 – 15′ straight phone chord
1 – Roll packing tape
1 – Pre-made claw with servo — Spark Fun ROB-10332
2 – 4 AA battery packs, rechargeable
6 – screw hooks
3 – Peice plywood – 2×6″ each
1 – roll metal plumbers strap
Tools:
– Drill
– Computer
– Soldering iron
Step 2: Frame
Frame:
X-Axis –
Y-Axis
To Make the Tracks:
Using 6 peices of J channel, make 3 tracks
Hang X-axis
-Cut 4 peices of plumbers strap, about 6 inches long
-Thread the peice of plumbers strap towards the end of each track
-Bend the plumbers strap, like an L, so that it will hold up the track
-Hang the other end of the plumbers strap on the hooks on the ceiling
-Adjust as needed
Prepare Y-axis
-For now, cut 2 more pieces of plumbers strap and thread through each end of Y-axis

Step 3: X – Axis Mechanical
X-Axis Mechanica
The X axis has 2 motorized carrages
Modify servos for continous rotation
-Take the 4 screws out of the fron of the motor
-Take off the smaller part of the plastic shell
-Disassemble gears
-There is a small white disk around the shaft of the potentioometer
-Remove the smal white disk
-Re-assemble
Make plywood base
– Cut 2 pecised of 1/4 ply (used MDF) to 3×6″
– Drill/cut 2 slots in each peice – 1/4″ wide, 2inch long, and 3.5″ apart [CHECK THIS]
Attach Servos
-Attach a large wheel to the servo, use a screw
-Wrap wheel with something for friction (used this sticky foam)
-Put the servo Bracket in the slot
-Wrap servo and base with electrical tape to secure
-Repeat with the second servo
-When done, weels should be a little less than 1/8″ appart (3/32″ ?)
Hang the assembled carraiges, one on each X axis
Put an eye-hook on the bottom of each platform
Hange the Y-axis track from these hooks using plumbers strap
7 – Big continous servo motors — HobbyPartz — EXI-Servo-B1226
1 – Roll of electrical tape
2 – Arduino UNO boards
3 – Small peices of perferatored board
2 – IR de-modulator
1 – Universal TV remote control
1 – 25′ coiled phone chord
1 – 15′ straight phone chord
1 – Roll packing tape
1 – Pre-made claw with servo — Spark Fun ROB-10332
2 – 4 AA battery packs, rechargeable
6 – screw hooks
3 – Peice plywood – 2×6″ each
1 – roll metal plumbers strap
For more detail: Build a big crane game using Arduino
- What is the overall goal of this project?
Build a room-sized 3-axis crane game based on arcade claw machines with wireless IR control and removable ceiling mounting. - How are the tracks for the axes made?
Tracks are made by placing two J channels back-to-back, taping seams with clear tape, and using three such tracks for X and Y axes. - How is the X-axis supported from the ceiling?
Two screw hooks are installed in the ceiling and short pieces of plumbers strap are bent and threaded through track ends to hang the X-axis tracks on the hooks. - How are the motorized carriages constructed for the X-axis?
Two plywood bases hold modified continuous-rotation servos with wheels attached and wrapped for friction, mounted in 1/4" slots and secured with electrical tape. - How is the Y-axis suspended?
The Y-axis track is hung from eye-hooks on the X-axis carriages using plumbers strap. - What wireless control method is used?
IR signaling using a TV remote as transmitter and IR de-modulator receivers is used so controllers and batteries move with the motors and require fewer wires. - How are the servos modified for continuous rotation?
Open the servo, remove the small white disk around the potentiometer shaft, then reassemble to allow continuous rotation. - What tools are required?
Drill, computer, and soldering iron are listed as required tools. - Can the design be expanded to a larger area?
Yes; the design is expandable by using longer J-channel tracks, with track cost about 50 cents a foot. - How is the claw integrated?
A pre-made claw with its own servo (SparkFun ROB-10332) is used as the Z-axis end effector.