Summary of How to make a XY-plotter with Makeblock
This project builds a Makeblock-based XY-plotter Drawing Robot using linear shafts, beams, stepper motors, drivers, timing belt, and an Arduino with Bluetooth. The robot accepts images from a phone (sent or taken) via Bluetooth and reproduces them on paper. The instructable gives a full materials list, tools, and step-by-step assembly: making the holder, building the frame, mounting slide units, adding motor driver holders, and installing stepper motors and brackets.
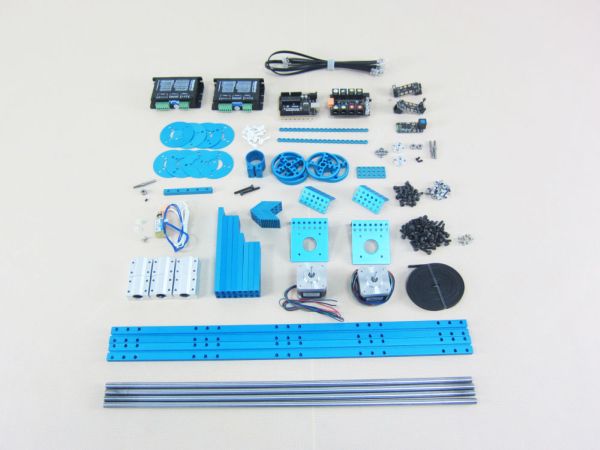
Parts used in the Drawing Robot:
- Linear Motion Shaft D8x480 (4)
- Linear Motion Slide Unit 8mm (6)
- Beam 0824-496 (2)
- Beam 0824-144 (1)
- Beam 0824-128 (3)
- Beam 0824-96 (1)
- Beam 0824-80 (3)
- Beam 0808-80 (1)
- General Bracket (1)
- Bracket 3x6 (2)
- Bracket 3x3 (11)
- Plate 3×6 (1)
- Stepper Motor Bracket (2)
- Timing Pulley 90T (4)
- Timing Pulley Slice 90T (8)
- Open-end Timing Belt (3m) (1)
- Link Rod (2)
- Shaft Connector-4 (2)
- Threaded Shaft 4x31mm (3)
- Shaft Collar 4mm (3)
- Flange Bearing 4x8x3mm (4)
- Headless Set Screw M3x5 (8)
- Countersunk Screw M3×8 (15)
- Plastic Rivet 4120 (20)
- Plastic Ring 4x7x2mm (25)
- Plastic Ring 4x7x1mm (5)
- Screw M4×8 (30)
- Screw M4×14 (55)
- Screw M4×30 (2)
- Nylon Lock Nut M4 (40)
- Nylon Cable Ties (10)
- Arduino (1)
- Acrylic Arduino Bracket (1)
- Me-BaseShield (1)
- Solenoid 12v (1)
- Stepper Motor (2)
- Stepper motor driver (2)
- Me-Bluetooth module (1)
- Me-Limit Switch (2)
- 6P6C RJ11 cable 20cm (3)
- 6P6C RJ11 cable 50cm (2)
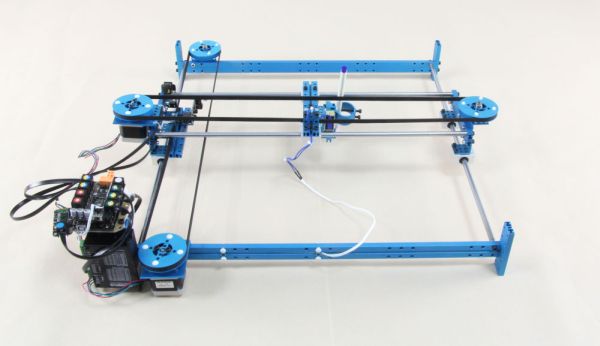
Last month, I made a XY-plotter by Makeblock and use it to built a Drawing Robot.
This Drawing Robot was built with two Linear Motion Shaft D8x480mm, two Long Beam0824, the timing belt, two stepper motors, two stepper motor driver, and a micro-controller Arduino. You can send a picture from the phone or you can take a picture by the phone and then send it to the robot by Bluetooth. After that the robot will draw what you send.
For more information, please visit Makeblock website listed below:
www.makeblock.cc
Getting Started
This instructable, How to make a XY-plotter with Makeblock, will show you the step-by-step instructions on how to build a XY-plotter and a Drawing Robot by Makeblock.
Now let’s have some fun!
Step 1: Materials list
Materials List:
4 × Linear Motion Shaft D8x480
6 × Linear Motion Slide Unit 8mm
2 × Beam 0824-496
1 × Beam 0824-144
3 × Beam 0824-128
1 × Beam 0824-96
3 × Beam 0824-80
1 × Beam 0808-80
1 × General Bracket
2 × Bracket 3×6
11 × Bracket 3×3
1 × Plate 3×6
2 × Stepper Motor Bracket
4 × Timing Pulley 90T
8 × Timing Pulley Slice 90T
1 × Open-end Timing Belt (3m)
2 × Link Rod
2 × Shaft Connector-4
3 × Threaded Shaft 4x31mm
3 × Shaft Collar 4mm
4 × Flange Bearing 4x8x3mm
8 × Headless Set Screw M3x5
15 × Countersunk Screw M3×8
20 × Plastic Rivet 4120
25 × Plastic Ring 4x7x2mm
5 × Plastic Ring 4x7x1mm
30 × Screw M4×8
55 × Screw M4×14
2 × Screw M4×30
40 × Nylon Lock Nut M4
10 × Nylon Cable Ties
Electronic Modules List:
1 × Arduino
1 × Acrylic Arduino Bracket
1 × Me-BaseShield
1 × Solenoid – 12v
2 × Stepper Motor
2 × Stepper motor driver
1 × Me-Bluetooth modules
2 × Me-Limit Switch
3 × 6P6C RJ11 cable-20cm
2 × 6P6C RJ11 cable-50cm
Step 2: Tools
Tools
1.5mm Hexagonal Screwdriver
3mm Hexagonal Screwdriver
Cross Screwdriver
Slotted Screwdriver
Pliers
Nylon CableTies
Step 3: Make the Holder
Materials List:
2 × Beam 0824-496
1 × Beam 0824-96
3 × Beam 0824-80
7 × Screw M4×14
Procedure:
1. Install the first Beam 0824-80 on Beam 0824-496 by using 2 Screw M4×14.
2. Install the second Beam 0824-80 on Beam 0824-496 with 2 Screw M4×14.
3. Install the third Beam 0824-80 on another Beam 0824-496 with 2 Screw M4×14.
4. Install the Beam 0824-96 on Beam 0824-496 with 1 Screw M4×14.
Step 4: Build the Frame
Materials List:
2 × Linear Motion Shaft D8x480
4 × Linear Motion Slide Unit 8mm
4 × Screw M4×14
Procedure:
1. Install the 2 Linear Motion Shaft D8x480s on Beam 0824-496 by using 2 Screw M4×14.
2. Install 2 Linear Motion Slide Unit 8mm on each Linear Motion Shaft D8x480.
3. Install the 2 Linear Motion Shaft D8x480s on another Beam 0824-496 with 2 Screw M4×14.
Step 5: Add Stepper Motor Driver Holder
Materials List:
2 × Bracket 3×3
4 × Screw M4×14
3 × Nylon Lock Nut M4
Procedure:
1. Install the first Bracket 3×3 to Beam 0824-96 on Beam 0824-496 by using 2 Screw M4×14 and a Nylon Lock Nut M4.
2. Install the second Bracket 3×3 to Beam 0824-96 on Beam 0824-496 by using 2 Screw M4×14 and 2 Nylon Lock Nut M4.
Step 6: Add Stepper Motor
Materials List:
1 × Bracket 3×6
1 × Stepper Motor Bracket
4 × Countersunk Screw M3×8
2 × Screw M4×8
3 × Screw M4×14
3 × Nylon Lock Nut M4
1 × Stepper Motor
Procedure:
1. Install the Stepper Motor Bracket on Beam 0824-496 by using 2 Screw M4×14 and 2 Nylon Lock Nut M4.
2. Install the Stepper Motor to Stepper Motor Bracket with 4 Countersunk Screw M3×8.
3. Install the Bracket 3×6 on Beam 0824-496 by using 2 Screw M4×8, 1 Screw M4×14 and 1 Nylon Lock Nut M4.
For more detail: How to make a XY-plotter with Makeblock
- What components are needed to build the Drawing Robot?
The article lists beams, linear motion shafts and slides, timing pulleys and belt, stepper motors and drivers, Arduino and Me-BaseShield, Me-Bluetooth, solenoid, limit switches, various brackets, screws, bearings, and cables. - Can I send a picture from my phone to the robot?
Yes, you can send a picture from the phone to the robot via Bluetooth. - Can I take a picture with my phone and send it to the robot?
Yes, you can take a picture by the phone and then send it to the robot by Bluetooth. - How many linear motion shafts are used in the project?
The materials list shows four Linear Motion Shaft D8x480 are used. - How many stepper motors does the Drawing Robot use?
The project uses two stepper motors. - What microcontroller is used to control the robot?
The robot uses an Arduino microcontroller. - Does the instructable include step-by-step assembly instructions?
Yes, it provides step-by-step instructions including making the holder, building the frame, adding motor driver holders, and installing stepper motors. - What tools are needed to assemble the robot?
Tools listed are 1.5mm and 3mm hexagonal screwdrivers, cross and slotted screwdrivers, pliers, and nylon cable ties. - Is a timing belt required for the XY-plotter?
Yes, an open-end timing belt (3m) is included in the materials list. - Where can I find more information about the project?
The article refers to the Makeblock website at www.makeblock.cc for more information.