Summary of Arduino Automatic Watering System For Plants Sprinkler
Elecrow designed an automatic plant watering system to care for neighbor's potted plants while their team was away. The system monitors soil humidity and activates a pump to spray water when needed, using a rotating platform to target specific pots.
Parts used in the Automatic Plant Watering System:
- Soil Moisture Sensor
- Small pump plus driver
- Servo motors
- Rotating Platform
- Crowduino controller
- Expansion Board
- Water pipes
- Power supply
- Wires
Last month, Elecrow have left from the original office and moved to a new office. We will miss our original office where we worked so hard for more than two years, we will miss everything here, the desks, the windows, and those potted plants, that we cared for more than two years with our neighbor.
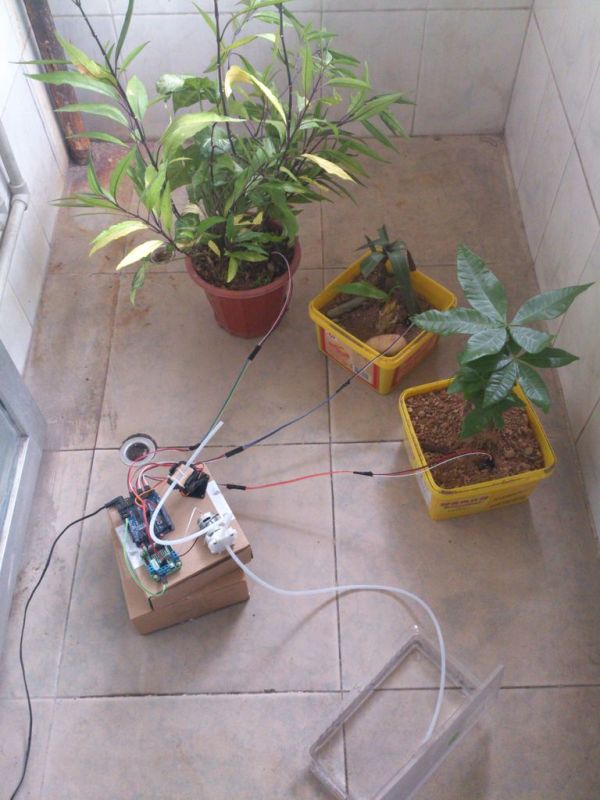 Our neighbor, a design team, led by a man named Kimi, we had so many memories together in the difficult early days. Together we planted some potted plants in the balcony, to help us release when tired after a whole day hard working. But as we leave, Kimi team are so careless and they often go out for some shows, we all worry about that these plants will be thirsty as we leave. So, We decided to design an automatic watering system to ensure that these plants are still alive when we come back here the next time. It monitor the soil humidity of each potted plant, if the humidity too low, the pump automatically start to spray, in this way, Kimi team do not need to water those plants every day.
I have recorded a video for reference:http://v.youku.com/v_show/id_XNjQwNDk0ODg4.html
Step 1: Install the soil moisture sensor
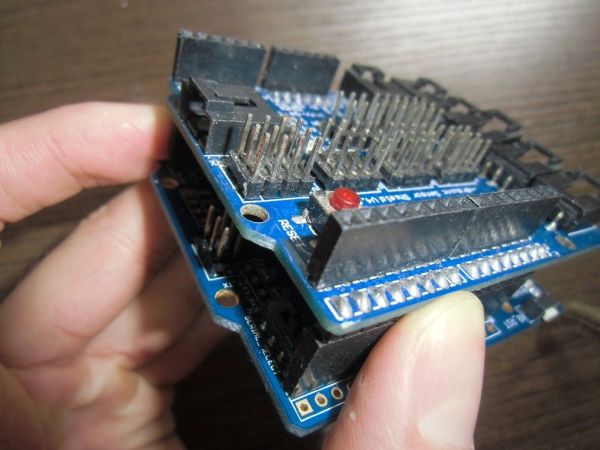 First, we connect the humidity sensors to the Crowduino via the expansion board. Plug the expansion board to Crowduino, and connect the sensors to the analog ports A0~A2 as the image. Each pot needs such a sensor to collect the moisture information, in my project, i use 3 pcs of this sensor. If you need more, connect the other sensors to the Crowduino analog ports too. You can use 5 sensors at most. Note that if you found the cables too short, you can use the extension cable to extend the length. Notice that you should ensure the connection right, just as the third image. Plug the sensor into the soil, the sensor would report the moisture information to Crowduino: Hey, this pot is too dry, you need to do something! This kind of soil moisture sensor is cheap and stable, but it may corrode after a long-term usage such as one year, you can also use other soil moisture sensor such as the capacitive moisture sensor, but it may cost you much more.
Step 2: Build the servo rotating platform
In this step , i need to installed the servos onto the rotating platform, this platform can take the sprinkler pipe to rotate 160 degrees in horizontal and vertical direction. When installing the servo and bracket, in order to locate the pot location, you need to adjustment the “zero” position. First install the programMedianValueSetting to your Crowduino and make it run. And then install the servo_1 (the servo to control the horizontal position ) to the same direction of the base, and the servo_2(the servo to control the vertical position) vertical to the base bracket as the image.
Step 3: Install the pipe & pump.
Two pipes are needed in this application, one for the water output and the other one for water input. First, plug one end of the water output pipe to the outlet of the pump, and fix the other end onto the rotating platform, i use the bonding cable to fix it, you can use any thing such as glues. And then, plug the water input pipe to the inlet of pump, and the other end to a water tank, such as a mineral water bottles. Then, connect the power supply of the pump to the outlet of the driver board, Note that connect the “+”pole(with red mark) to “OUTC” of the driver, and “-” to “OUTD”.
For more detail: Arduino Automatic Watering System For Plants Sprinkler
- How does the system know when to water the plants?
The system monitors soil humidity with sensors; if the humidity is too low, the pump automatically starts to spray. - Can I use more than three sensors in this project?
You can connect up to five sensors by plugging them into other analog ports on the Crowduino. - What are the disadvantages of the cheap soil moisture sensor?
The cheap sensor may corrode after long-term usage such as one year. - Is there a better but more expensive alternative to the standard sensor?
Yes, you can use a capacitive soil moisture sensor, but it costs about ten times the price. - How do I adjust the zero position for the servo motors?
You need to install the MedianValueSetting program to your Crowduino and then align the servos relative to the base bracket. - What is the maximum spray distance of the recommended pump?
The small pump used in the article provides a spray distance of about one meter. - How should the power supply be connected to the driver board?
Connect the positive pole to OUTC and the negative pole to OUTD on the driver board. - What components are required to control the spray angle and distance?
Two servo motors and a rotating platform are necessary to control the spray distance and angle.