Step 1: Introduction

What is APEX?
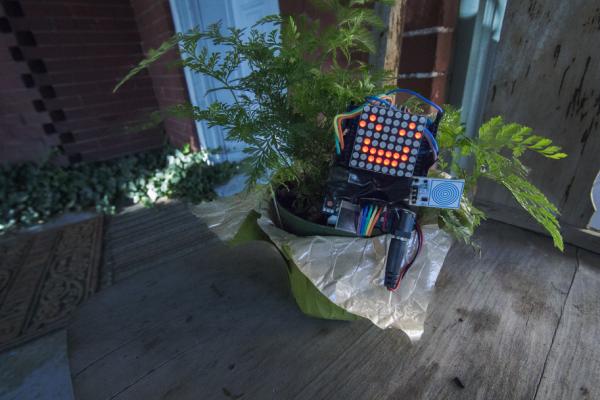
APEX is a smart (not to mention cute) plant monitoring device. Just plug it into any plant and it will display the “happiness” level of the plant! This is a great reminder to water your plants if you have a bad habit of forgetting to water them.
How does it work?
Magic. Just kidding! APEX uses an Arduino attached to a moisture sensor, which is inserted into the soil of the plant. This sensor will read the moisture content of the soil, and then the Arduino calculates what face to display.
But why?
Why not?
Step 2: Gathering the Parts and Tools

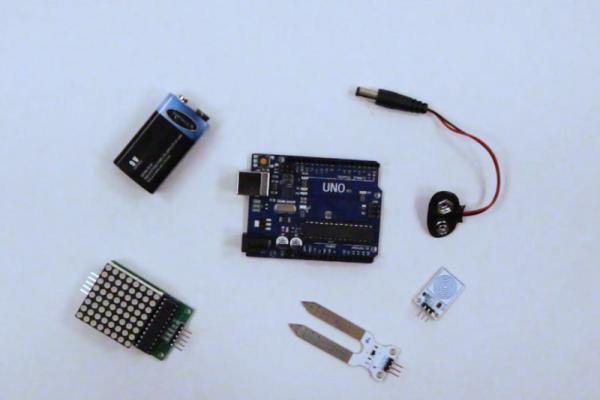
Let’s get into it! For this Instructable, you will need quite a few parts and tools. Luckily for you, they are all listed below:
In the spirit of the Microcontrollers Contest, this project was completely made by parts purchased on Amazon! (not sponsored)
Parts List:
Tools List:
Once you have collected all the necessary equipment, it’s time to setup the Arduino software!
Step 3: Installing the Arduino IDE

For this project to work, we will need to be able to program the Arduino. This requires downloading and installing the Arduino Integrated Development Environment (IDE) onto your computer. It’s a fairly simple explanation, but I’ll walk you through the process:
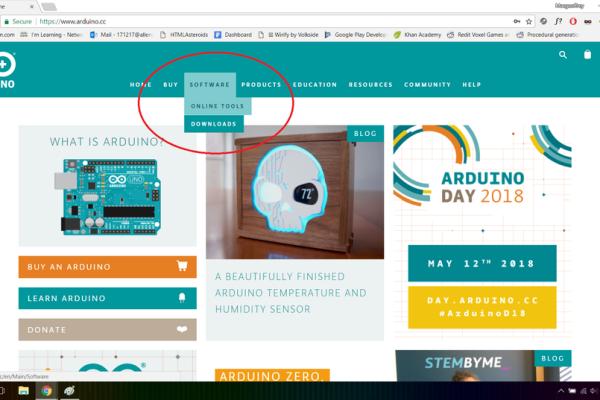
1. Visit the Arduino Website
2. Navigate to Downloads Page (Software > Downloads)
3. Click the Download Link for your Operating System
Side Note: The program will work on Windows, Mac, and Linux.
4. Installing On Windows
- Double click on the downloaded file to run it
- Click “Agree” to agree to the License
- Follow the rest of the prompts
- The program should now be installed!
(Make sure to look at the screenshots if you get lost)
5. Installing On Mac
- Click on the downloaded file
- Choose “Open”
- The program will automatically install and run!
(Make sure to check out the screenshots if you get confused)
6. That’s It!
And you’re done! You now have the Arduino IDE downloaded onto your system!
Step 4: The Code

This step is all about the code. It’s a fairly short program, so I will be going over it with you and explaining how it works. First, a brief overview, then an in-depth explanation, and finally how to push it to the Arduino!
The Brief Overview
For those of you not interested in the detailed explanation of the code, I am providing a TL;DR segment! Here’s the basic explanation. The Arduino grabs values from the moisture sensor every few seconds. This information is then used to calculate and display a certain face! There’s also a bit of code at the end which let’s the capacitive touch button turn on and off the display. Pretty simple right?
The Nitty Gritty
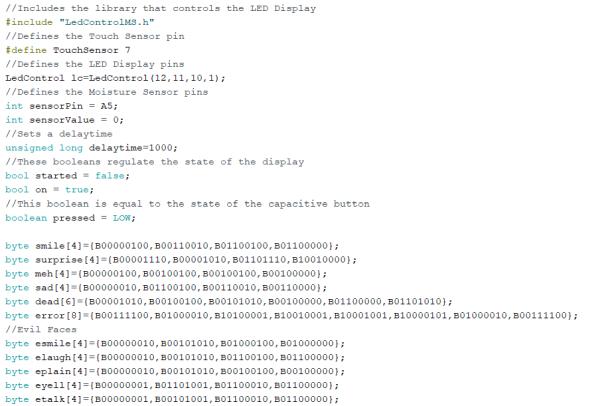
This portion of the tutorial is for those who are very interested in how the entire program works, line by line. I’ll provide screenshots above to help you understand what I’m talking about, as well as include some of the lines of code in this description.
This program is divided in to five sections:
- Including Libraries and Creating Variables
- The Setup Function
- Functions for Facial Expressions
- The Write Arduino On Matrix Function
- The Loop Function
Including Libraries and Creating Variables:
The first section of this code is all about the variables and libraries we will use.
#include "LedControlMS.h"
#define TouchSensor 7
LedControl lc=LedControl(12,11,10,1);
int sensorPin = A5;
int sensorValue = 0;
bool started = false;
bool on = true;
boolean pressed = LOW;
The first line includes a library called LedControlMS. This library is required to be able to send values to the LED display. The next line is a define statement that sets the pin for the touch sensor to 7. After that we have three more variables that define the pins for the LED display, the moisture sensor, and it’s value. The last three lines are all booleans that regulate the state of the touch button and the display. After this, we have our byte values:
<p>byte smile[4]={B00000100,B00110010,B01100100,B01100000};<br>byte surprise[4]={B00001110,B00001010,B01101110,B10010000};
byte meh[4]={B00000100,B00100100,B00100100,B00100000};
byte sad[4]={B00000010,B01100100,B00110010,B00110000};
byte dead[6]={B00001010,B00100100,B00101010,B00100000,B01100000,B01101010};
byte error[8]={B00111100,B01000010,B10100001,B10010001,B10001001,B10000101,B01000010,B00111100};
//Evil Faces
byte esmile[4]={B00000010,B00101010,B01000100,B01000000};
byte elaugh[4]={B00000010,B00101010,B01100100,B01100000};
byte eplain[4]={B00000010,B00101010,B00100100,B00100000};
byte eyell[4]={B00000001,B01101001,B01100010,B01100000};
byte etalk[4]={B00000001,B00101001,B01100010,B01100000};</p>
These values represent all the faces of APEX. Each byte is an array which contains multiple bits that dictate the state of each pixel in a given row. “1” and “0” represents On/Off respectively.
The Setup Function:
Moving onto the next section, we have our setup function.
<p>void setup() {<br>  //MS Serial Output
  Serial.begin(9600);</p><p>  pinMode(TouchSensor, INPUT);

  //LED Matrix Setup
  lc.shutdown(0,false);
  lc.setIntensity(0,4);
  lc.clearDisplay(0);
}</p>
The name explains it very well. This is where we “setup” our touch sensor and display. The first two lines begin our serial output (used for debugging). The third line sets the touch sensor pin to an input, and the last four lines start up the display.
Functions For Facial Expressions:
This is probably the longest section over all, but it’s all very simple and repetitive.
<p>void broken() {<br>  lc.setRow(0,0,error[0]);
  lc.setRow(0,1,error[1]);
  lc.setRow(0,2,error[2]);
  lc.setRow(0,3,error[3]);
  lc.setRow(0,4,error[4]);
  lc.setRow(0,5,error[5]);
  lc.setRow(0,6,error[6]);
  lc.setRow(0,7,error[7]);
}</p><p>void happy() {
  lc.setRow(0,0,smile[0]);
  lc.setRow(0,1,smile[1]);
  lc.setRow(0,2,smile[2]);
  lc.setRow(0,3,smile[3]);
  lc.setRow(0,4,smile[3]);
  lc.setRow(0,5,smile[2]);
  lc.setRow(0,6,smile[1]);
  lc.setRow(0,7,smile[0]);
}</p><p>void plain() {
  lc.setRow(0,0,meh[0]);
  lc.setRow(0,1,meh[1]);
  lc.setRow(0,2,meh[2]);
  lc.setRow(0,3,meh[3]);
  lc.setRow(0,4,meh[3]);
  lc.setRow(0,5,meh[2]);
  lc.setRow(0,6,meh[1]);
  lc.setRow(0,7,meh[0]);
}</p><p>void surprised(){
  lc.setRow(0,0,surprise[0]);
  lc.setRow(0,1,surprise[1]);
  lc.setRow(0,2,surprise[2]);
  lc.setRow(0,3,surprise[3]);
  lc.setRow(0,4,surprise[3]);
  lc.setRow(0,5,surprise[2]);
  lc.setRow(0,6,surprise[1]);
  lc.setRow(0,7,surprise[0]);
}</p><p>void dying() {
  lc.setRow(0,0,dead[0]);
  lc.setRow(0,1,dead[1]);
  lc.setRow(0,2,dead[2]);
  lc.setRow(0,3,dead[3]);
  lc.setRow(0,4,dead[4]);
  lc.setRow(0,5,dead[5]);
  lc.setRow(0,6,dead[1]);
  lc.setRow(0,7,dead[0]);
}</p><p>void crying() {
  lc.setRow(0,0,sad[0]);
  lc.setRow(0,1,sad[1]);
  lc.setRow(0,2,sad[2]);
  lc.setRow(0,3,sad[3]);
  lc.setRow(0,4,sad[3]);
  lc.setRow(0,5,sad[2]);
  lc.setRow(0,6,sad[1]);
  lc.setRow(0,7,sad[0]);
}</p><p>void evilsmile() {
  lc.setRow(0,0,esmile[0]);
  lc.setRow(0,1,esmile[1]);
  lc.setRow(0,2,esmile[2]);
  lc.setRow(0,3,esmile[3]);
  lc.setRow(0,4,esmile[3]);
  lc.setRow(0,5,esmile[2]);
  lc.setRow(0,6,esmile[1]);
  lc.setRow(0,7,esmile[0]);
}</p><p>void evillaugh() {
  lc.setRow(0,0,elaugh[0]);
  lc.setRow(0,1,elaugh[1]);
  lc.setRow(0,2,elaugh[2]);
  lc.setRow(0,3,elaugh[3]);
  lc.setRow(0,4,elaugh[3]);
  lc.setRow(0,5,elaugh[2]);
  lc.setRow(0,6,elaugh[1]);
  lc.setRow(0,7,elaugh[0]);
}</p><p>void evilplain() {
  lc.setRow(0,0,eplain[0]);
  lc.setRow(0,1,eplain[1]);
  lc.setRow(0,2,eplain[2]);
  lc.setRow(0,3,eplain[3]);
  lc.setRow(0,4,eplain[3]);
  lc.setRow(0,5,eplain[2]);
  lc.setRow(0,6,eplain[1]);
  lc.setRow(0,7,eplain[0]);
}</p><p>void evilyell() {
  lc.setRow(0,0,eyell[0]);
  lc.setRow(0,1,eyell[1]);
  lc.setRow(0,2,eyell[2]);
  lc.setRow(0,3,eyell[3]);
  lc.setRow(0,4,eyell[3]);
  lc.setRow(0,5,eyell[2]);
  lc.setRow(0,6,eyell[1]);
  lc.setRow(0,7,eyell[0]);
}</p><p>void eviltalk() {
  lc.setRow(0,0,etalk[0]);
  lc.setRow(0,1,etalk[1]);
  lc.setRow(0,2,etalk[2]);
  lc.setRow(0,3,etalk[3]);
  lc.setRow(0,4,etalk[3]);
  lc.setRow(0,5,etalk[2]);
  lc.setRow(0,6,etalk[1]);
  lc.setRow(0,7,etalk[0]);
}</p>
These functions are used to define each facial expression using our byte values from the first section. Each line defines an x position and byte values and then applies the values to that column. Some functions require more lines because there are more rows used to display the values of that face. Each face is symmetrical, which is why we repeat the lines.
The WriteArduinoOnMatrix Function:
The fourth section is used to calculate and write the proper faces on the LED display. It consists of a series of else if statements which check for the water values and then sets the display by calling different functions from the previous section.
<p>void writeArduinoOnMatrix() {<br>  if(sensorValue > 0 && sensorValue <= 30) {
    broken();
  } else if(sensorValue > 30 && sensorValue <= 100){
    dying();
  } else if (sensorValue > 100 && sensorValue <= 200) {
    crying();
  } else if (sensorValue > 200 && sensorValue <= 400) {
    plain();
  } else if (sensorValue > 400 && sensorValue <= 650) {
    happy();
  } else if (sensorValue > 650 && sensorValue <= 800) {
    surprised();
  } else {
    broken();
  }

}</p>
You may notice that we added “broken” faces just in case the sensor goes outside of the working ranges. This prevents some weird null errors that happen and gives us a better visual understanding of what is going on within the code.
The Loop Function:
Last but not least is the loop function. This code does exactly what it’s name says, it loops! Although there are quite a few lines in this function, it’s actually fairly simple. The code first reads the button state and sees if the display is “On”. If it finds this to be true, it will then call the WriteArduinoOnMatrix function, which will then draw a face on APEX. Because this function loops, it will update the display as often as we want. This delay is dictated by the delaytime variable.
<p>void loop() {  <br>  if (started == true){
    delaytime = 3000;
  }

  //Read Button
  pressed = digitalRead(TouchSensor);</p><p>  if (pressed) {
    if (on == true) {
      lc.clearDisplay(0);
      on = false;
      delay(delaytime);
    } else {
      on = true;
      delay(delaytime);
    }
  }

  sensorValue = analogRead(sensorPin);
  delay(delaytime);

  if (on == true) {
    //Draw Faces
    writeArduinoOnMatrix();
  }</p><p>  started = true;
}</p>
That’s all there is to the code. Hopefully now you have a better understand of how it all works, and can use this knowledge to begin customizing it to your project!
Pushing the Code to the Arduino
Now that we have covered all the code, it’s time to push it to the Arduino! Luckily, the IDE makes this very simple. All you have to do is plug your Arduino into your computer with a USB cable, and then just click the right arrow in the top left of the IDE. Let the code push, and you should see a success message on the bottom of the program if you did it right!
Source: The Artificial Plant Emotion Expressor (A.P.E.X.)
