Summary of Singing plant. Make your plant sing with Arduino, touche and a gameduino
This project uses an Arduino, a homemade Touché capacitive sensor shield, and a Gameduino sound shield to turn a plant into a touch-responsive musical instrument by measuring capacitance and converting it to sound. It includes a hardware workaround to avoid a pin conflict on Arduino pin 9 by rerouting Gameduino to pin 4 and wiring the Touché directly to pin 9. The build requires basic soldering, woodworking, buttons, clips, connectors, and an enclosure.
Parts used in the Singing Plant:
- Arduino
- Homemade Touché shield (prototyping shield with Touché circuitry)
- Gameduino shield
- Two buttons
- Alligator clips
- Two banana connectors
- Enclosure (wooden box or similar)
- Pin headers
- Resistors: 10k, 1 MΩ, 3.3k
- Capacitors: 100 pF, 10 nF
- Diode: 1N4148
- Coil / inductor: 10 mH
- Wire for rerouting pins
This project is a part of experiments done while doing an artist in residence at Instructables. You can see the other projects here.
Making a plant sing has been a trick since the Theremin was invented. Here I am going to teach you how to do this with and arduino board, a gameduino shield and a the touch shield from my previous instructable.
A short introduction to capacitance
If two objects are conductive you can measure the capacitance between them (e.g. objects like: metal, water, human bodies and plants). By connecting a capacitance sensor to a plant we can detect if people are touching it and convert the touch into sound. Normally you would do this with a theremin like interface.

With the introduction of the touché frequency principle by Disney Research lab we can now make a really stable solution that can run entirely on the Arduino platform. The Touché works on a similar principle as a normal theremin, but does a frequency sweep instead. By hooking the touché up to the plant we can measure the capacitative interaction and convert it into sound.
Credits:
The singing plant as an artistic project has been done with multiple people as a member of illutron. I will just credit af few key people who I have worked with: Åsmund Boye Kverneland, Nicolas Padfield, Thomas Jørgensen, Schack Lindemann, Thor Lentz, DZL, Vanessa Carpenter
Step 1: Components and tools
Components needed:
- Arduino
- Homemade touche shield (Instructable can be found here)
- Gameduino (We are going to use it for sound).
- Two buttons.
- A couple of Alligator clips.
- Two banana connectors.
- Enclosure (I used a wooden box from http://www.containerstore.com/welcome.htm)
Components needed for the touche shield:
- Prototyping shield
- Pin headers
- Resister: 10k, 1MOmh, 3,3k
- Capacitor: 100pf, 10nf
- Diode: 1N4148 diode
- Coil / inductor: 10mH (cypax.dk part no: 07.055.0510)
Tools:
- Basic soldering tools.
- Wood working tools.
For the enclosure I lasercut an acrylic plate, but you could just as well use a piece of wood and cut it manually.
Step 2: Touche shield
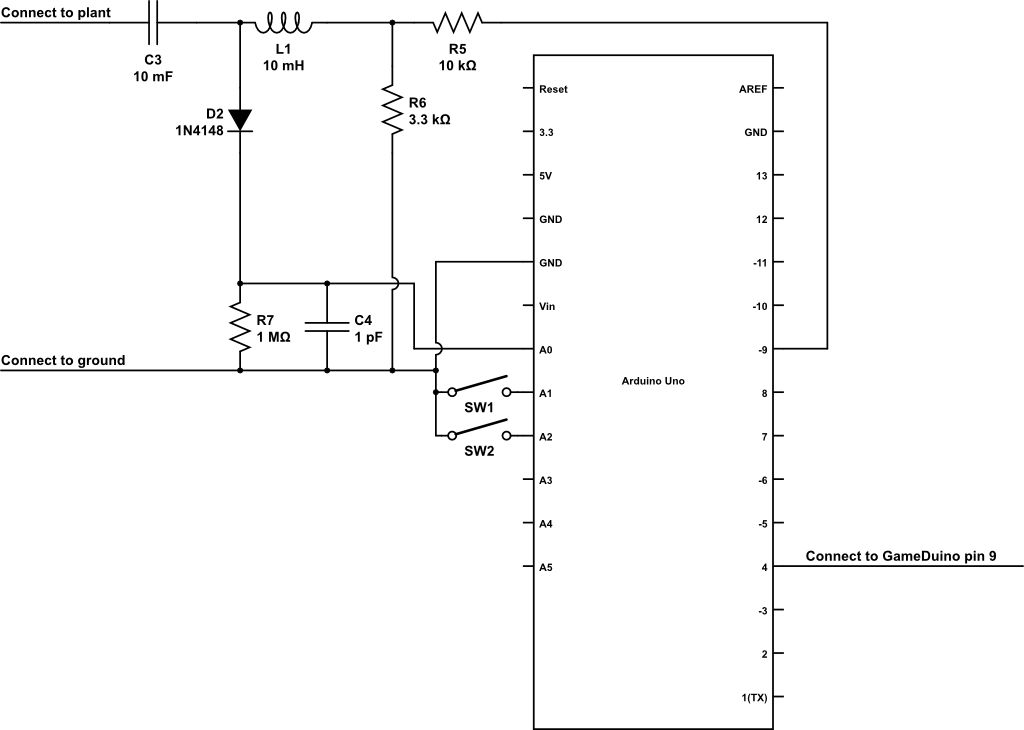
We are going to use the same shield that we used for this instructable. For the touche shield and the gameduino to work together we need to do a little hack. Since the touche shield is using pin 9 for frequency generation and the gameduino uses pin 9 for the chip select. For now all you need to know is that you should not connect the wire to the pwm pin nine but let it hang loosely (at least you should be able to disconnect it again when you are done testing).
Step 3: Making the Touché shield and the GameDuino play nice together.
Since the touche shield and the Gameduino are both using pin 9, we need to make the GameDuino use pin 4 on the Arduino board and we need to connect the touche shield directly to pin 9 on the Arduino board.
Here are the steps:
- Bend pin nine on the gameduino out. Be aware that it will break if you bend it back and forth.
- Connect a wire from the bend out pin on the gameduino board to pin four on the Arduino board.
- Connect another wire from pin nine on the arduino to the pwm pin on the touch shield.
This is not an elegant solution, but it will work 🙂
For it to work we need to make sure the Gameduino library communicates properly on pin 4 instead of pin nine. I have included a customized library for that.
- Arduino
- Homemade touche shield (Instructable can be found here)
- Gameduino (We are going to use it for sound).
- Two buttons.
- A couple of Alligator clips.
- Two banana connectors.
- Enclosure (I used a wooden box from http://www.containerstore.com/welcome.htm)
Components needed for the touche shield:
- Prototyping shield
- Pin headers
- Resister: 10k, 1MOmh, 3,3k
- Capacitor: 100pf, 10nf
- Diode: 1N4148 diode
- Coil / inductor: 10mH (cypax.dk part no: 07.055.0510)
For more detail: Singing plant. Make your plant sing with Arduino, touche and a gameduino
- What does the project do?
It measures capacitance on a plant using a Touché shield and converts touch into sound via a Gameduino on an Arduino. - What main components are needed?
An Arduino, homemade Touché shield, Gameduino, two buttons, alligator clips, banana connectors, and an enclosure. - How does the Touché sensor detect touch?
It measures capacitance between conductive objects like plants and converts the capacitative interaction into a signal. - Why is there a pin conflict between Touché and Gameduino?
Both the Touché shield and the Gameduino use Arduino pin 9 by default, causing a conflict. - How is the pin conflict resolved?
By bending out Gameduino pin 9, wiring it to Arduino pin 4, and connecting the Touché directly to Arduino pin 9, plus using a customized Gameduino library to use pin 4. - Do I need special tools to build the enclosure?
No, basic woodworking tools are sufficient; a laser-cut acrylic plate was optional in the project. - What additional components are required to build the Touché shield?
Prototyping shield, pin headers, resistors (10k, 1 MΩ, 3.3k), capacitors (100 pF, 10 nF), diode 1N4148, and a 10 mH inductor. - Is special software needed for the Gameduino after rerouting the pin?
Yes, a customized Gameduino library is needed so it communicates on pin 4 instead of pin 9.