
Summary of Play a Melody using the tone() function with Arduino
This article demonstrates generating musical notes on an Arduino using the `tone()` command to play a simple melody. It details connecting an 8-ohm speaker to digital pin 8 via a 100 ohm resistor and utilizing the `pitches.h` library for note definitions. The provided code defines a sequence of notes including middle C, G3, A3, and B3 to create the tune.
Parts used in the Play a Melody Project:
- Arduino board
- 8 ohm small speaker
- 100 ohm resistor
- hook-up wire
This example shows how to use the tone() command to generate notes. It plays a little melody you may have heard before.
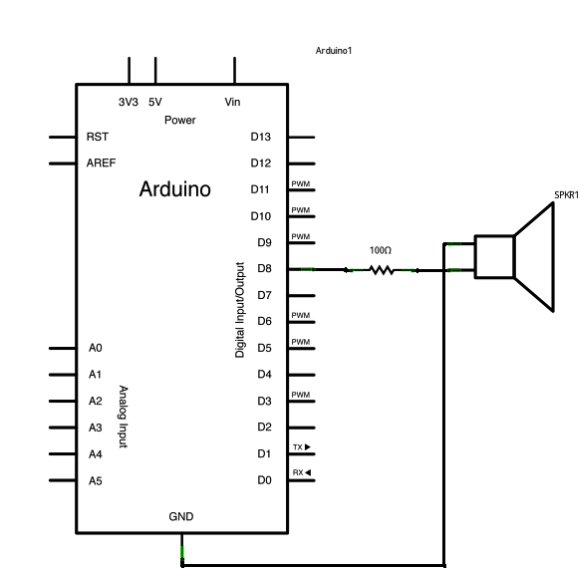
Circuit

image developed using Fritzing. For more circuit examples, see the Fritzing project page
Connect one terminal of your speaker to digital pin 8 through a 100 ohm resistor. Connect the other terminal to ground.
Schematic
Code
The code below uses an extra file, pitches.h. This file contains all the pitch values for typical notes. For example, NOTE_C4 is middle C. NOTE_FS4 is F sharp, and so forth. This note table was originally written by Brett Hagman, on whose work the tone() command was based. You may find it useful for whenever you want to make musical notes.
The main sketch is as follows:
Melody
Plays a melody
circuit:
* 8-ohm speaker on digital pin 8
created 21 Jan 2010
modified 30 Aug 2011
by Tom Igoe
This example code is in the public domain.
http://arduino.cc/en/Tutorial/Tone
*/
#include “pitches.h”
// notes in the melody:
int melody[] = {
NOTE_C4, NOTE_G3,NOTE_G3, NOTE_A3, NOTE_G3,0, NOTE_B3, NOTE_C4};
Hardware Required
- Arduino board
- 8 ohm small speaker
- 100 ohm resistor
- hook-up wire
For more detail: Play a Melody using the tone() function with Arduino
- How do you connect the speaker to the Arduino?
Connect one terminal of the speaker to digital pin 8 through a 100 ohm resistor and the other terminal to ground. - What is the purpose of the pitches.h file?
This file contains all pitch values for typical notes like NOTE_C4 for middle C. - Can this code be used for other melodies?
Yes, the note table was originally written by Brett Hagman and is useful whenever you want to make musical notes. - Which digital pin is used for the speaker?
The circuit uses digital pin 8 for the speaker connection. - What type of resistor is required for this project?
A 100 ohm resistor is required to connect between the speaker and digital pin 8. - Who created the original work for the tone() command?
The note table and work were originally written by Brett Hagman. - Is the example code copyrighted?
No, the example code is in the public domain. - What does the number 0 represent in the melody array?
In the context of the melody array, 0 represents a rest or silence between notes.