
Summary of How to build an Arduino synth
This article guides readers through building a customizable Arduino synthesizer. The project involves wiring electronic components like potentiometers and a SoftPot to an Arduino Uno, coding the device using specific software, and constructing an acrylic enclosure using welding tools. It emphasizes simplicity, allowing beginners to modify code for custom sounds and easily assemble the unit with basic soldering and woodworking skills.
Parts used in the Arduino Synthesizer:
- Arduino Uno
- Power source (9v with adapter)
- 4- 5k linear potentiometers
- 200mm linear SoftPot
- Output jack
- Knobs
- Wire
- Solder
- Optional Arduino holster
- Acrylic pane
- Weld-On 4
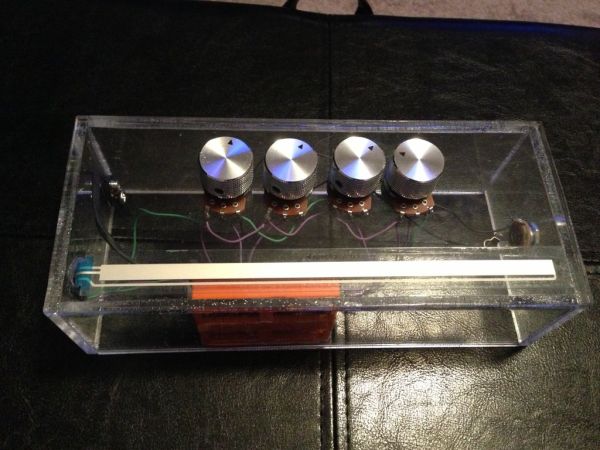
This is a super simple and easily customizable little synthesizer. This is my first time using the Arduino and also with acrylic, both I found very fun to work with though. This is also my first Instructables so hopefully I have explained this well enough.
Step 1: Part and tools
For the innards:
Arduino Uno
power source(I used a 9v with an adapter)
4- 5k linear potentiometers
200mm linear SoftPot(you can go smaller than this I just used this length because its what I had)
output jack
knobs
wire
solder
optional: Arduino holster(I had this made using a MakerBot) for easily removing the Arduino if you want to use it for something else.
all of this I was able to get off jameco.com except the SoftPot which i found at trossenrobotics.com
For the box:
Acrylic pane(found mine at Lowe’s)
Weld-On 4(found on Amazon)
Tools:
Soldering iron
table saw
router table
drill press
butane torch
Weld-on applicator bottle
Step 2: Wire It Up
This is extremely easy to make. 10-15 minutes of soldering and you are ready to go.
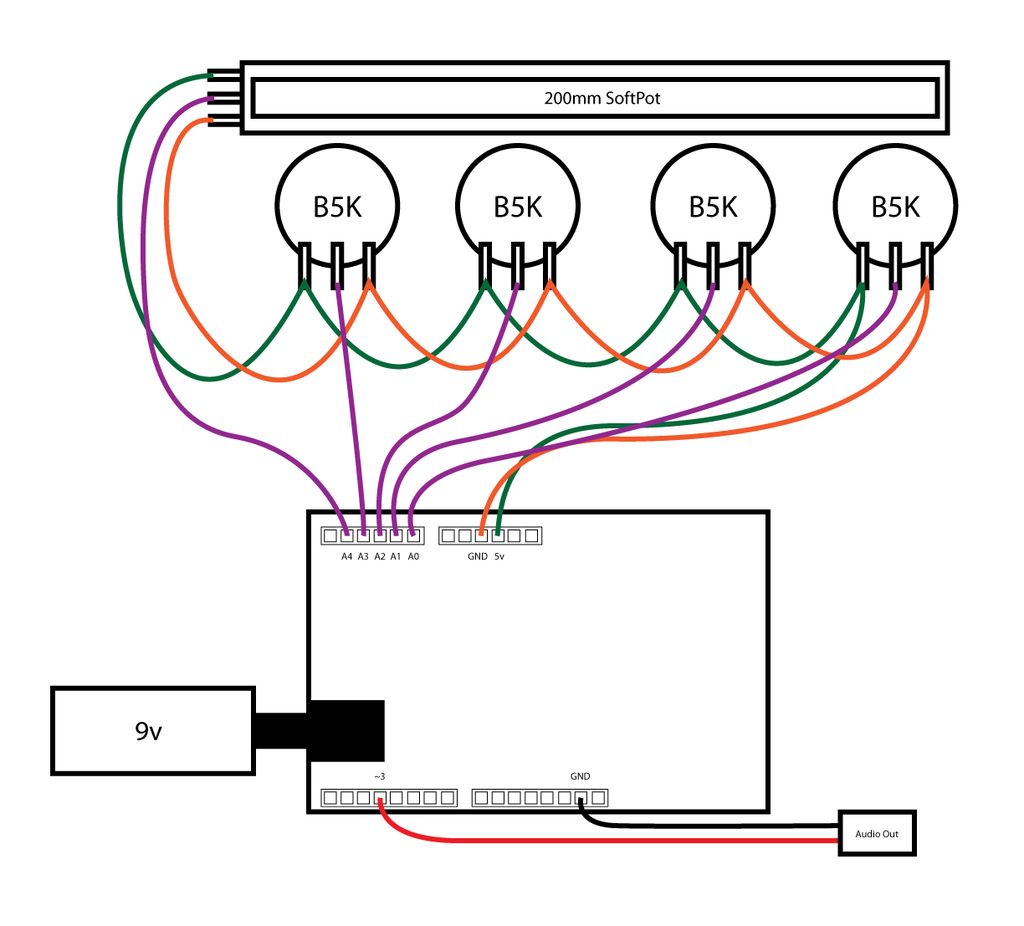
First just line up the five pots with the SoftPot. Then wire the first pole of each post together and solder it. The do the same with third pole. Then solder a wire to each of the center poles. The SoftPot center pole needs to connect to the A4 pin, the second pot’s center goes to A3, the third pot’s center goes to A2, the fourth pot’s center goes to A1, and the final pot’s center goes to A0. Then on the fifth pot solder another wire to the left and right poles, with the left pole connecting to the 5v pin and the right pole connecting to the GND right next to it. The only thing left is to connect an audio output jack with the hot going to ~3 and ground to GND.
Step 3: Code
You will need a way to get the code onto the Arduino so if you don’t have it go download the Arduino program and their website: arduino.cc
I got the code from here: http://code.google.com/p/tinkerit/downloads/detail?name=auduino_v5.pde&can=2&q=
Now load the code onto the Arduino, hook it up to a speaker and check that it works. If not then just go back and check the diagram I made and make sure that you got all of the pots wired correctly and that you got the wires in the right pins.
Now I know nothing about coding but after looking at the sketch for a while I was able to sort of see how it worked. I was able to make some changes to the decays and the second pitch to get the sounds I was wanting, so I would say go ahead and mess around with it until you get the sounds you like even if you are like me and know nothing about coding. Just make small changes at a time and then test it, if you do mess it up too much then you can always just reload the original sketch and start again.
Major Components in ProjectFor the innards:
Arduino Uno
power source(I used a 9v with an adapter)
4- 5k linear potentiometers
200mm linear SoftPot(you can go smaller than this I just used this length because its what I had)
output jack
knobs
wire
solder
optional: Arduino holster(I had this made using a MakerBot) for easily removing the Arduino if you want to use it for something else.
all of this I was able to get off jameco.com except the SoftPot which i found at trossenrobotics.com
For the box:
Acrylic pane(found mine at Lowe’s)
Weld-On 4(found on Amazon)
Tools:
Soldering iron
table saw
router table
drill press
butane torch
Weld-on applicator bottle
For more detail: How to build an Arduino synth
- What are the main electronic components needed?
The innards require an Arduino Uno, a 9v power source, four 5k linear potentiometers, a 200mm linear SoftPot, an output jack, knobs, wire, and solder. - Can I use a different length for the SoftPot?
Yes, you can go smaller than the 200mm length used in the article depending on your needs. - How do I connect the potentiometer center poles?
Connect the first pot's center to A4, the second to A3, the third to A2, the fourth to A1, and the final pot's center to A0. - Where should the fifth potentiometer be wired?
Solder wires to the left and right poles of the fifth pot, connecting the left pole to the 5v pin and the right pole to GND. - How is the audio output jack connected?
Connect the hot wire to pin ~3 and the ground wire to GND. - Where can I download the necessary code?
You can download the code from http://code.google.com/p/tinkerit/downloads/detail?name=auduino_v5.pde&can=2&q=. - What tools are required to build the box?
You need a table saw, router table, drill press, butane torch, and a Weld-on applicator bottle. - Is it possible to customize the sound?
Yes, you can modify the decays and the second pitch in the sketch to get the sounds you want. - What should I do if I mess up the code?
You can always reload the original sketch and start again. - Where did the author purchase the materials?
Most parts were from Jameco.com, the SoftPot was from trossenrobotics.com, and the Weld-On 4 was found on Amazon.