
Summary of Displaying Images on 4D OLEDS using Arduino
This tutorial guides users in setting up 4D Systems serial OLEDs (specifically µOLED-128-GMD) with Arduino. It covers loading images via Graphics Composer, configuring the SD card, and wiring the display to an Arduino using a specific library by Oscar Gonzalez. The guide details circuit connections, including voltage ranges and resistor placement, and explains how to extract sector addresses from generated text files to display custom images programmatically.
Parts used in the 4D OLED Arduino Project:
- 4D OLED Display (µOLED-128-GMD, µOLED-96-G1, or µOLED-160-GMD1)
- Micro SD Card
- MicroSD to USB Adapter
- Arduino Board
- Breadboard
- 1k Resistor
- Jumper Wires
- Power Supply (3.3V to 6.0V)
- Graphics Composer Software
- Oscar Gonzalez's OLED Library
4D Systems makes some really nice serial OLEDS. They aren’t hard to use, but the documentation for them is very scattered. This tutorial pulls together the various pieces i’ve found so that you can get up and running very quickly.

Start by skimming through the user manual for your particular 4D OLED.
µOLED-128-GMD
µOLED-96-G1
µOLED-160-GMD1
The OLED I worked with was the µOLED-128-GMD. The other OLEDs listed have the same pinouts and as far as i know should work similarly.
I. Slide Show
Start by loading images on the SD card for an OLED slide show. This will serve as a test run to see if the images are on the card properly before you do any coding.
1. Get the images on the Micro SD card.
Download Graphics Composer from the 4d website. http://www.4dsystems.com.au/downloads.php The only version they have is for PCs. You need a microSD to USB adapter so that you can write to the card. The directions to load images with the software come with the zipped sofware file. You can do some minor image editing with the software, but the program is clunky. I suggest cropping and sizing the image in photoshop beforehand. A text file will be created when you upload your pictures. You will need this later for part II so don’t get rid of it.
2. Plug stuff in
Put the SD card in the OLED card slot. Make sure the jumper is connecting both pins on the back. Plug in power (Voltage supply from 3.3V to 6.0V) and Gnd.
3. Show off
Wow everyone with your tiny slide show.
II. Controlling image display with Arduino
1.Download the library
Oscar Gonzalez, the 4d distributor in Spain, wrote up a library with functions that can help you get started.
It’s got these useful functions:
// This will dectect the baudrate
void OLED_Init()// Get 16bits value from RGB (0 to 63, 565 format)
int GetRGB(int red, int green, int blue)// Clears the screen
void OLED_Clear()
//drawing functions
void OLED_PutPixel(char x, char y, int color)
void OLED_DrawLine(char x1, char y1, char x2, char y2, int color)
void OLED_DrawRectangle(char x, char y, char width, char height, char filled, int color)
void OLED_DrawCircle(char x, char y, char radius, char filled, int color)
// Change font format – FontType can be: OLED_FONT5X7, OLED_FONT8X8, OLED_FONT8X12
void OLED_SetFontSize(char FontType)
void OLED_DrawText(char column, char row, char font_size, char *mytext, int color)
void OLED_DrawSingleChar(char column, char row, char font_size, char MyChar, int color)
Once you’ve downloaded the library, put it in the following path arduino-0010 -> hardware -> libraries. When you start writing your program in arduino, import the OLED library. The library is specifically written for the MicroOLED-160-GMD1module, but works fine with the other modules, except the x parameter on all functions can’t be more than the number of pixels that your 4D_OLED has.
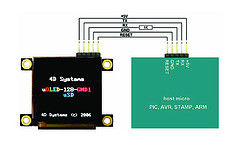
2. Set up the circuit
* Wire the OLED’s TX pin to arduino’s RX pin.
* A 1k resistor should be wired between OLED’s RX pin and arduino’s TX pin.
* Oscar’s library has been setup to use arduino pin 8 as the reset button for the OLED, so wire the ‘R’ pin on the OLED to pin 8 on Arduino.
* Wire power and GND from the breadboard to Arduino.
* Put the OLED jumper on only one pin (so that the two pins are NOT conntected)
4. Examine the text file that was created when you were working with graphics composer.
You will need the sector addresses of each image to be able to call them up using the OLED’s “Display image/Icon from memory card. This will be the last three number in the list that’s give after the height and width.
You will see a string of numbers like “64, 73, 0, 0, 128, 128, 16, 0, 16, 0.” You want are the “0, 16, 0.”
5. Arduino Code
To send out commands serially from Arduino, you’ll use the ‘printByte()’ method as opposed to the Serial.print() method. You’ll be using the OLED’s “Display Image/Icon from Memory Card” command. 4D labels this as an extended command, so a ’40’ hex must be sent before the Display Image command. The following code will load images and then draw on them, resulting in drawing a nose on Tom, a hat on John and earrings on Giana.
- How do I prepare images for the slide show?
Download Graphics Composer, use a microSD to USB adapter to write to the card, and crop images in Photoshop beforehand as the software is clunky. - What voltage range should I use for power?
The power supply voltage must be between 3.3V and 6.0V. - Which pin on the Arduino connects to the OLED reset pin?
The R pin on the OLED connects to Arduino pin 8. - Do I need a resistor for the TX/RX connection?
Yes, a 1k resistor should be wired between the OLED's RX pin and the Arduino's TX pin. - How should the jumper be set for Arduino control?
When controlling with Arduino, place the OLED jumper on only one pin so the two pins are not connected. - Where do I find the sector addresses for images?
Look at the last three numbers in the text file created by Graphics Composer after uploading pictures. - Can I use this library with different OLED models?
Yes, the library works with other modules like the MicroOLED-160-GMD1, but the x parameter cannot exceed the pixel width of your specific OLED. - What command prefix is needed for extended commands?
A 40 hex value must be sent before the Display Image command because it is labeled as an extended command.